Bp VIP.net does not have a backup utility internal to the software. You must use SQL server tools (such as Management Studio) or third-party tools to back up the Bp VIP.net database.
Before you begin
Backing up your data is a critical component of data integrity and availability. Best Practice Software strongly recommend that you:
- Develop a database backup plan with regular scheduled backups (such as daily after hours) in consultation with an IT resource or database administrator
- Store a copy of backups off-site in case of disaster recovery
- Maintain a test server and regularly carry out database recoveries to the test server to test backup data integrity.
The backup example shown uses SQL Server 2012 Management Studio, which is installed with a SQL Server 2012 database. If you use a third-party tool to back up the database, Best Practice Software Support may not be able to provide assistance on backing up and restoring the database.
If your practice uses a different version of SQL Server, the steps will be similar. Your practice's IT resource can provide assistance.
Back up Bp VIP.net with Management Studio
Before you start, ensure there is sufficient space on the database server hard disk to store the backup. To see how large a database is, right-click on the database name in Management Studio and select Properties.
- Log in to Windows on the machine on which SQL Server has been installed.
- Navigate to Start > Apps > Microsoft SQL Server 2012 > SQL Server Management Studio. Management Studio will prompt you to select the database server to connect to.
- Select the database server to connect and enter the username and password. Management Studio will open with the Object Explorer to the left.
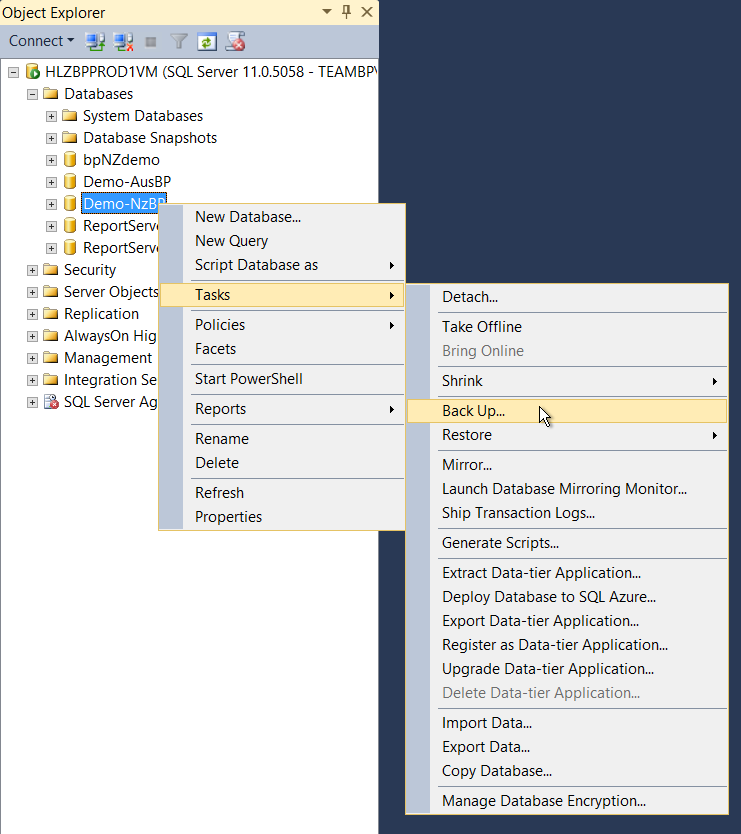
- From the Object Explorer tree, open the Databases node under the server name at the top of the tree. Right-click on the database you want to back up and select Tasks > Back up.
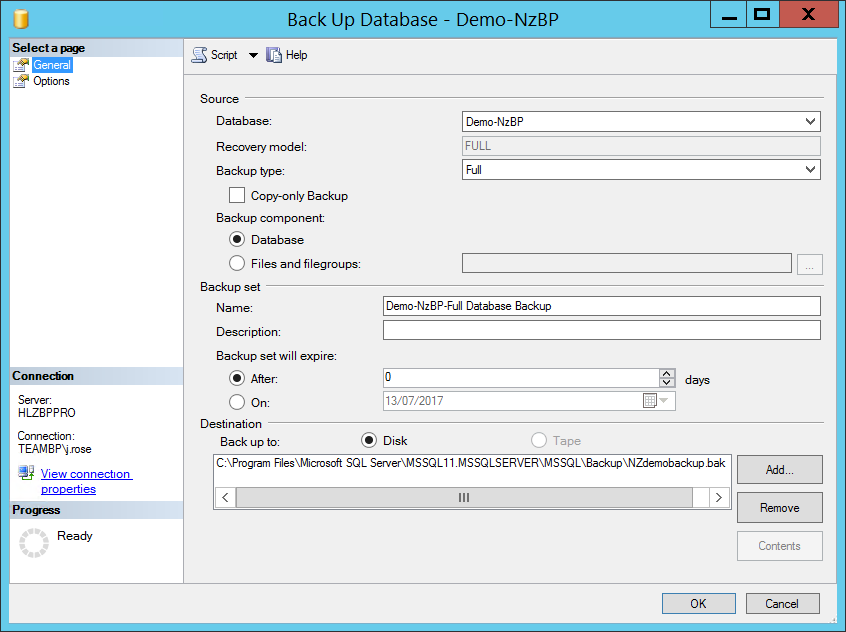
- Set the Backup Type to 'Full'.
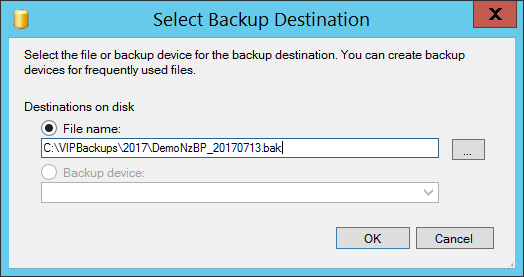
- In the Destination section, click Remove to remove the default location. Click Add. The Select Backup Destination screen appears.
- Enter the name of the folder and filename you want to save the backup to, or click ... to navigate to an existing folder.
- Click OK to return to the Back Up Database screen. Click OK to start the backup. The size of the database and the speed of the database server will determine how long a backup takes.
- Management Studio will prompt when the backup is complete. Click OK to finish.
- You can now copy or move the backup file to a different location.

In the example above, the database 'Demo-NzBP' is being backed up. The Back Up Database screen will appear.


NOTE You can only back up to a folder or device (such as a USB stick) on the local hard disk. You cannot back up to a network share or mapped network drive. You can copy and move the backup file after the backup is created.
In the example above, a datestamp has been added to the end of the filename in the format YYYYMMDD. A datestamp will assist in organising your backup files and show the most recent backup without viewing the contents.
IMPORTANT You must add the '.bak' to the filename to indicate a backup file. Management Studio will not do this automatically.
Related topics
Last modified: July 2020