After you've set your Xero integration up, you can start exporting your daily financial data to Xero.
If this is the first time you've exported to Xero, Best Practice Software recommend testing the integration first, and then sending historical financial data as a starting point:
- Run a trial export to the Xero Demo Company
- Check the export in Xero
- Export historical data to the live account
- Export opening balances
After you have run a trial export and imported historical data, you can set up a scheduled task to export a data file daily. Once a day, or as often as your practice prefers, a user can enter File > Accounts > Export, select the previous day's export file, and submit it to Xero.
You can also run an export at any time through File > Accounts > Export without needing to run a scheduled task first.
Run a trial export
Best Practice Software strongly recommend testing data export to the Xero Demo Company before transferring data to a live account. The Demo Company is available with every Xero registration.
Data you enter into the Xero Demo Company account (by Bp VIP.net export or otherwise) will erase automatically every 28 days.
Set up the Demo Company
- Log in to Xero in your internet browser at https://www.xero.com/au/login/ or https://www.xero.com/nz/login/.
- Select the Demo Company link from your Xero home page.
- Follow the steps in Set up the export interface to set up the Xero interface for the Demo Company.
- Follow the steps in Run an export to Xero
For more information, consult the Xero user documentation on the Demo Company.
Check the export in Xero
- Log in to your Xero dashboard.
- Click the Accounts menu and select Sales.
- Exported invoices should appear under the Invoices heading.

If transactions have been successfully exported to the Xero Demo Company, run some more trial exports and confirm that transactions are being exported with no errors. The next trial is to export historical transactions to your live Xero account.
NOTE Some zero-value transaction lines in the export .csv file are not designed to go through to Xero. Every line with a non-zero value in the debit or credit column should go through.
If the export failed, check the logs you saved in step 10 to see the errors that occurred.
Export historical data to the live account
- Follow the steps in Run an export to Xero, but when you reach step 3, select a date well into the past, such as three months.
- Continue running the export of historical data.
- Check the export in Xero (Accounts > Sales).
This will export transactions into your live account to test the interface, but the historical data should contain only 'closed' transactions that should not affect future transactions.
If the export failed, check the logs you saved in step 10 to see the errors that occurred, and check the configuration of the live account in Xero.
If the batches were successfully exported, run some more trial exports on different historical dates.
If you have tested trial exports to the Demo Company, and historical data exports on different dates, with no errors, you are ready to go live with your Xero integration.
Export opening balances
If you are just starting your Xero integration, Best Practice Software recommends choosing a Go Live date that coincides with the commencement of a reporting period. The first step will be to export opening balances.
- From the main screen of Bp VIP.net, select Setup > Facility Preferences > Financial Preferences. Select the Exports tab.
- Click Export Opening Balances.
- This will populate your live Xero account with your practice's current open invoices and balances.
For the next export of daily transaction data, follow the steps in Run an export to Xero, choosing today's date or a recent date with unexported transactions.
NOTE Depending on the volume of transactions, it may take up to 60 minutes for a batch to completely export.
Set up a scheduled export Task
Use Bp VIP.net's Task function to set up a scheduled task to create a Xero export file daily. The export will be added to the list of exports in File > Accounts > Export, ready to send.
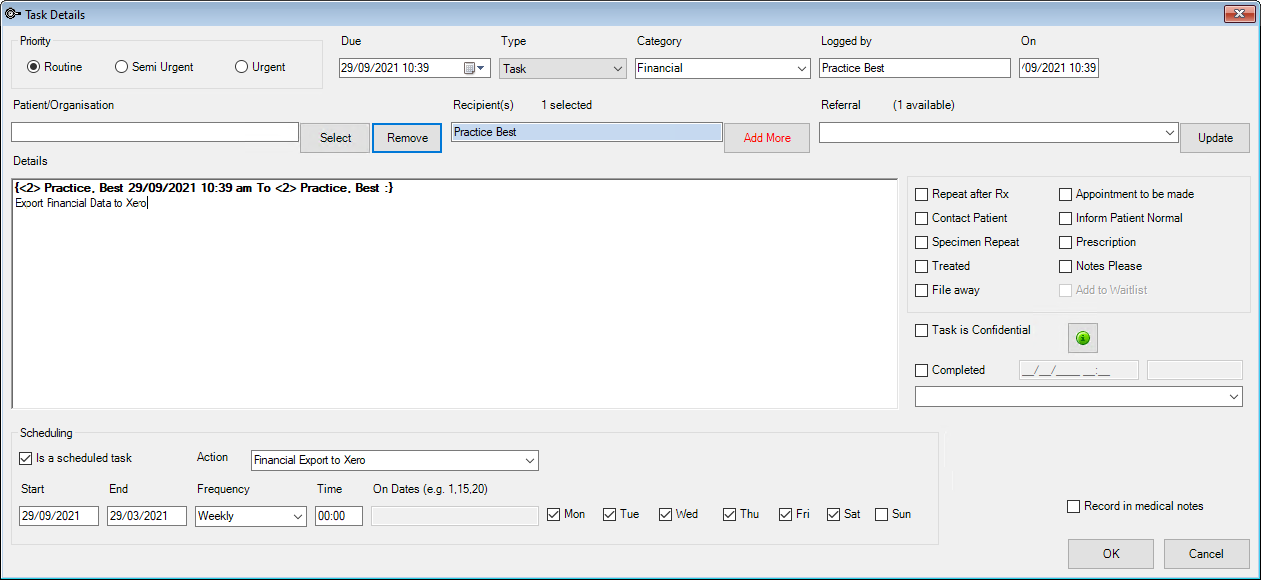
- From the main screen of Bp VIP.net, select File > Tasks or press Ctrl+F1. The Tasks, Contacts, and Texts screen will open.
- Click New to create a new scheduled Task.
- Select a Category of 'Financial'.
- You do not need to select a source Patient or Organisation. Nominate a recipient normally responsible for your practice's Xero integration, or any suitable user.
- Tick Is a scheduled Task and select an Action of 'Financial Export to Xero'.
- Select a Start and End date to produce Xero exports, and select a Frequency of 'Weekly'. Tick the days of the week on which your practice is open. An export file will be generated at the indicated Time for each selected day.
- Click Ok to save the scheduled task and close the details screen.
- Bp VIP.net inserts a note into the text panel on the right hand side for Xero tasks:
- Close or minimise the Tasks, Contacts, and Texts screen. To complete the export to Xero for exports created through the task scheduler, select File > Accounts > Export, and follow the instructions in Run an export to Xero


You can ignore the message 'Log file created for 0 transactions'. This is a small cosmetic known issue to be fixed in a future release.
Run an export to Xero
The process of exporting to Xero is the same whether you are exporting to the Xero Demo Account, historical data, or a day's scheduled export.
- Log in to Bp VIP.net.
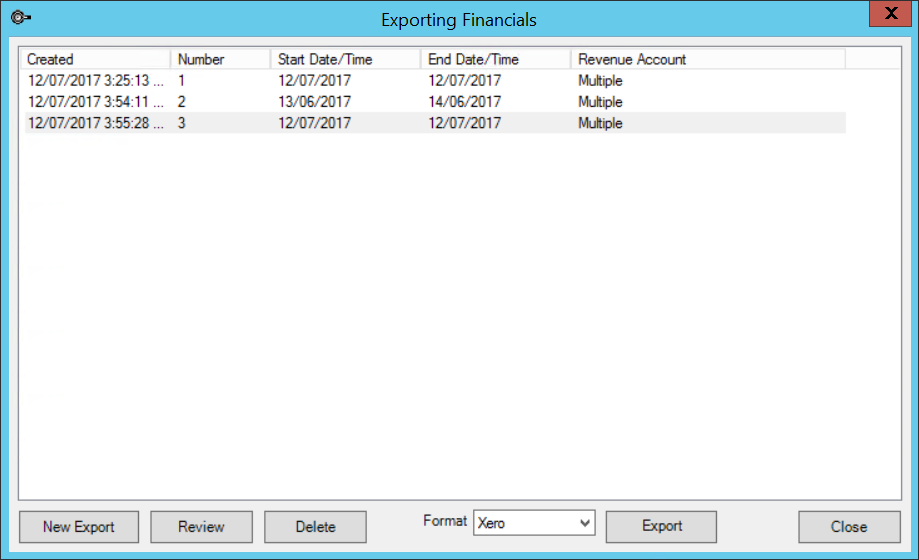
- Select File > Accounts > Export. The Exporting Financials screen will appear.
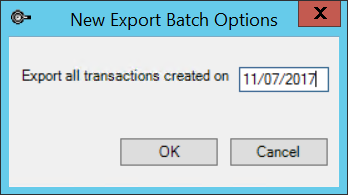
- Click New Export. The New Export Batch Options screen will appear.
- For a trial export, select a date well in the past that you know contains transactions. Click OK.
- If your practice has defined multiple revenue accounts, the Select Revenue Accounts screen will appear.
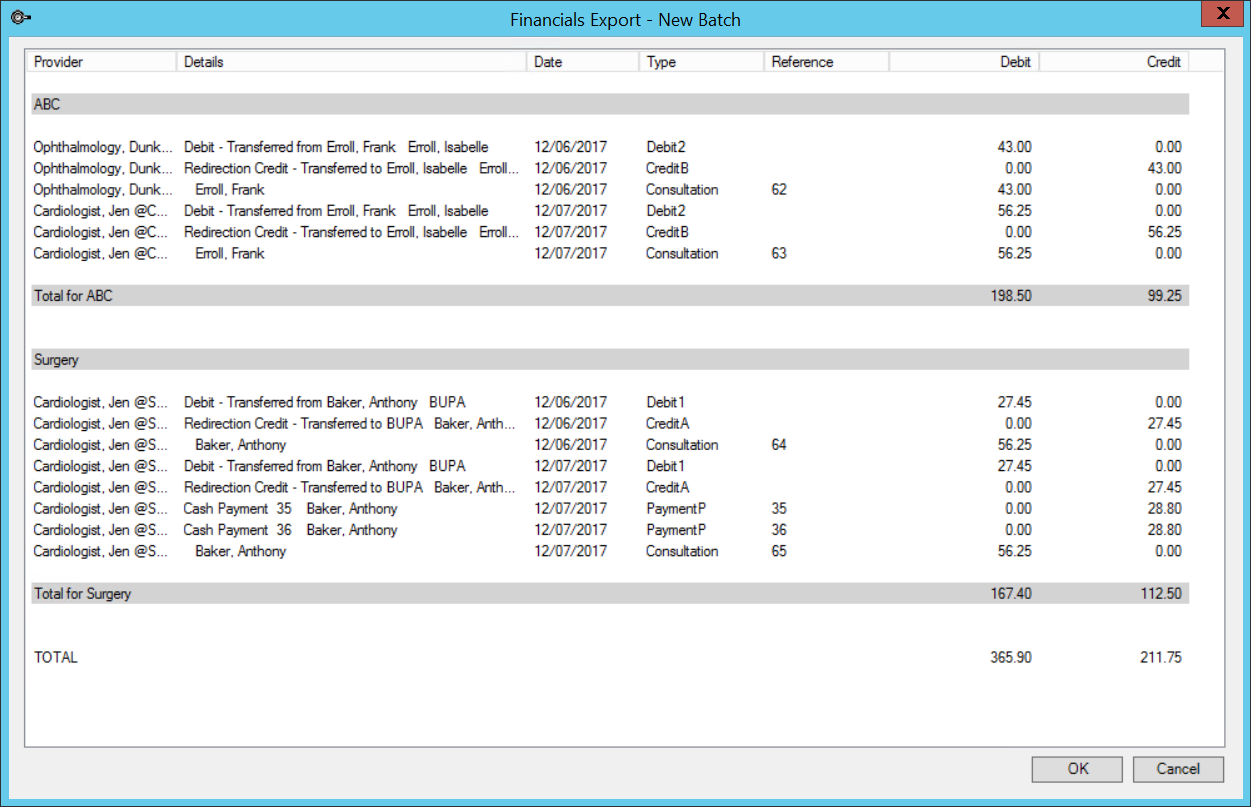
- Select the revenue accounts to include in the export to Xero and click OK. The Financials Export - New Batch screen will appear.
- Click OK to save the export file. The batch will be added to the Exporting Financials screen.
- Select the batch you want to export. Use Ctrl+click to select multiple batches.
- The option to select from the Format dropdown menu will depend on who manages your site's integration with Xero:
- Click Export. Bp VIP.net will report the number of lines and number of invoices exported for each batch exported. Click OK.
- Save the file to the same folder specified in Setup > Facility Preferences > Financial Preferences > Exports tab > Export Folder (set up in Export to Xero). If you are unsure of the file path to save to, consult your third-party services provider to confirm the file path.

This screen shows all of the export batches that have been created, but not yet exported.

The Export all transactions created on: field defaults to the date before the current date. This field indicates the date to batch all transactions for export. If all transactions for a date have already been batched, Bp VIP.net will report that there were no transactions found if you try to create a batch.
You can create more than one batch for the same day, however. For example, if the day's transactions were batched ready to export, but a late invoice was generated after hours, you can run a second batch for the date, and Bp VIP.net will create a batch containing the unexported late invoice only.

|
Xero integration |
Select this Format option |
|---|---|
|
Our Xero integration is managed by a third party services provider who import the files into Xero |
'Xero (log file only)' |
|
Our Xero integration is managed by our own practice |
'Xero' |
If the export was successful, Bp VIP.net will prompt for a location to save the .csv export file. If the export contained errors, Bp VIP.net will prompt you to save the log file for inspection.
Related topics
Last modified: 28 September 2021