Bp VIP.net can export financial data to the accounting software Xero. Revenue transactions are conducted in Bp VIP.net, but the data export transfers transaction data to your Xero account for more complex billing and analysis.
Version Topaz Service Pack 1 restores the ability to create a scheduled task to export financial data to a Xero account. Scheduled exports were temporarily unvailable in version Topaz.
Notes about the Xero integration
- The Xero Export scheduled task must be scheduled to run on the same Bp VIP.net with VIPService installed. This is usually the server.
- VIPService must be running for the scheduled export task to run.
- To prevent a series of failed exports that may be missed, the Xero interface checks to see if an export has occurred in the last seven days before it runs a scheduled export. If there has been no scheduled or manual export in that time, the scheduled task will not run.
- The authentication token for the Xero interface expires after 30 days. If a scheduled export fails because of authentication, a user must click the Clear Token button in the Xero setup (Practice Preferences > Financial Preferences. > Export) to resupply credentials and generate a new token.
If you haven't run a successful export for seven days, you will have to run a manual export to restart the check timer. Best Practice Software recommend that tasks are regularly reviewed to check for incomplete exports.
Scheduled export success
When a scheduled Xero export task runs, a new task is created in the task list to indicate success or failure:
- A successful export task will be marked as 'complete'.
- A failed or partially failed export task will remain incomplete and be marked as 'urgent' in the Inbox for user attention.
All details of the export are included in the task details.
On this page
Before you start
If you are considering exporting your financial data to Xero from Bp VIP.net, Best Practice Software recommend you:
- Assess your practice requirements against the Xero API limits.
- Thoroughly test the transactions export to a Xero Demo Company in a 'trial' export.
- Test transferring old transaction data to your live Xero account.
- Decide on a date for the 'go live' date and plan for the start of live integration.
Bp VIP.net should remain the master of all revenue information for your practice. The export allows Xero to mirror the revenue transactions recorded in Bp VIP.net and match the accrual revenue to accrued expenses, meaning true, daily accrual accounting of your practice’s profitability.
All modifications to revenue transactions must be made in Bp VIP.net first. Modifications will flow through to your invoices and receipts in Xero during the export.
The following procedures assume that your practice has purchased a Xero licence and has a Xero account set up for your organisation. For more information on setting up an account in Xero, consult the Xero user documentation at https://help.xero.com/au/ or https://help.xero.com/nz/.
Understanding Xero API limits
Xero's API has limits that may affect your practice's ability to export transaction data, or impose daily limits on the amount of data that can be exported.
Xero API limits are described in the Xero developer documentation at https://developer.xero.com/documentation/auth-and-limits/xero-api-limits.
The following is a summary of the limits that affect Bp VIP.net exports:
|
Function |
Limit description |
|---|---|
|
Calls / minute |
API calls are limited to 60 calls in a rolling 60 second window. |
|
Calls / day |
API calls are limited to 5,000 calls in a rolling 24 hour window. This limit applies per Xero organisation: if two separate Xero organisations are connected to an application, each connection would have 5000 API calls available in a given 24 hour period. |
|
Request size |
A single POST to the Accounting or Payroll APIs has a size limit of 3.5MB. A single POST to the Files API has a size limit of 10MB. |
|
Invoicing |
Xero is designed for volumes of up to 1,000 Sales invoices (Accounts Receivables) and 1,000 Purchases bills (Accounts Payables) per month. |
|
Banking |
Xero is designed for volumes of up to around 2,000 bank transactions per month. |
|
Inventory |
Xero recommends a maximum number of 4,000 tracked inventory items per organisation. |
|
Contacts |
Contact lists of greater than 10,000 could cause performance issues. |
If your practice has very high transaction volumes, the Xero integration may not be suitable, or may require a custom solution. Contact Best Practice Software Support on 1300 40 1111 (AU) or 0800 40 1111 NZ) to discuss Xero integration with your Bp VIP.net installation.
Set up the export interface
You will need the following items of information at hand to set up the interface:
- Your Bp VIP.net Xero account username and password (created by your practice or your IT services provider)
- Xero Redirect URI (displayed in Bp VIP.net and copied to Xero)
- Client ID (displayed in Xero and copied to Bp VIP.net)
- 6-digit Authenticator App code (sent to the email address of your Xero account or Google Authenticator, whichever you choose in your Xero account setup).
- From the main screen of Bp VIP.net, select Setup > Facility Preferences > Financial Preferences. Select the Exports tab.
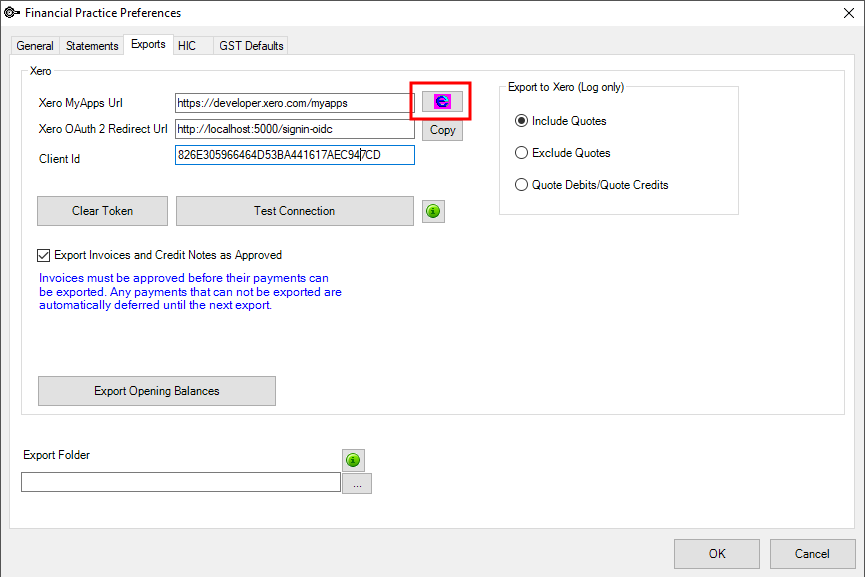
- Click the browser icon next to the Xero MyApps Url field. Your default browser will open and request a login, if you have not logged in recently.
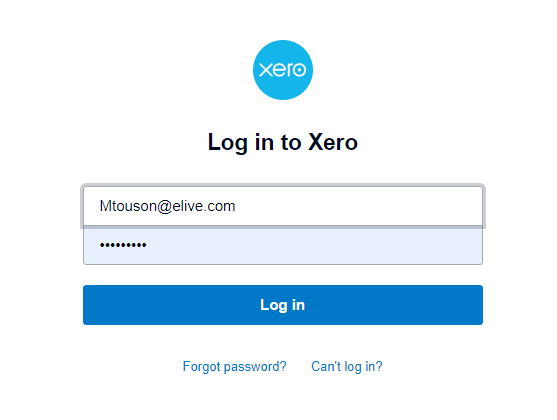
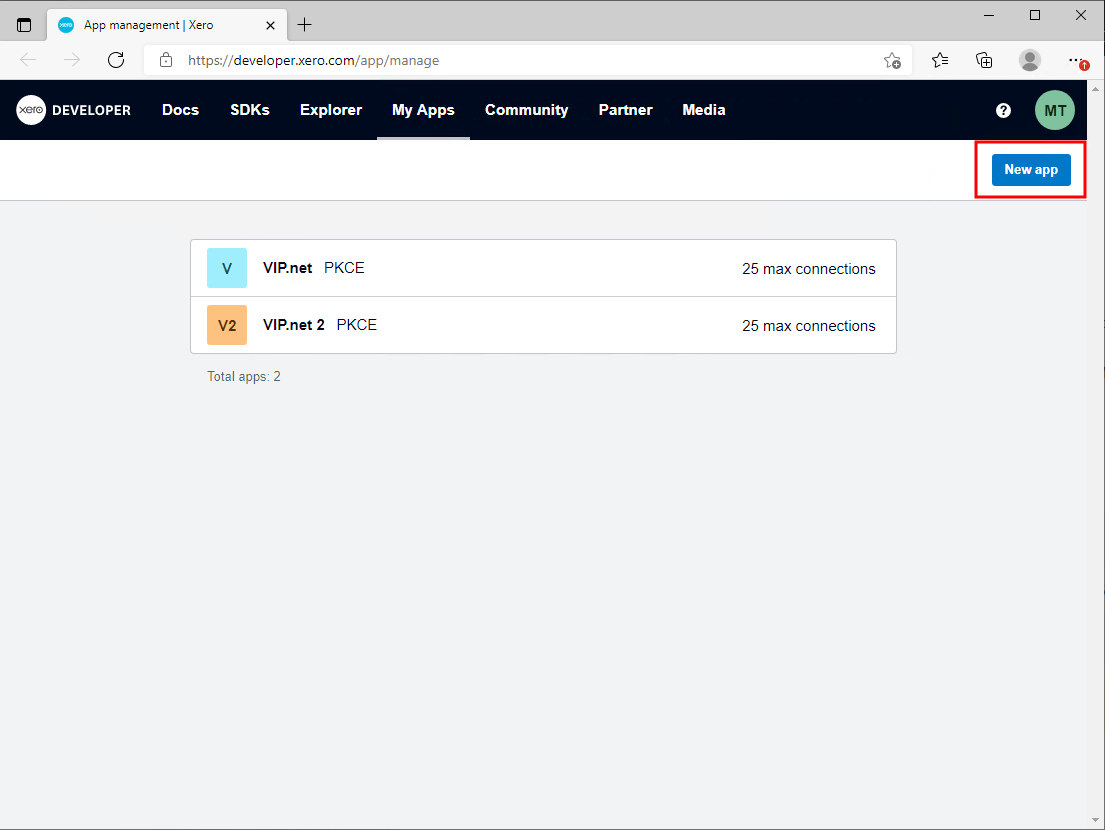
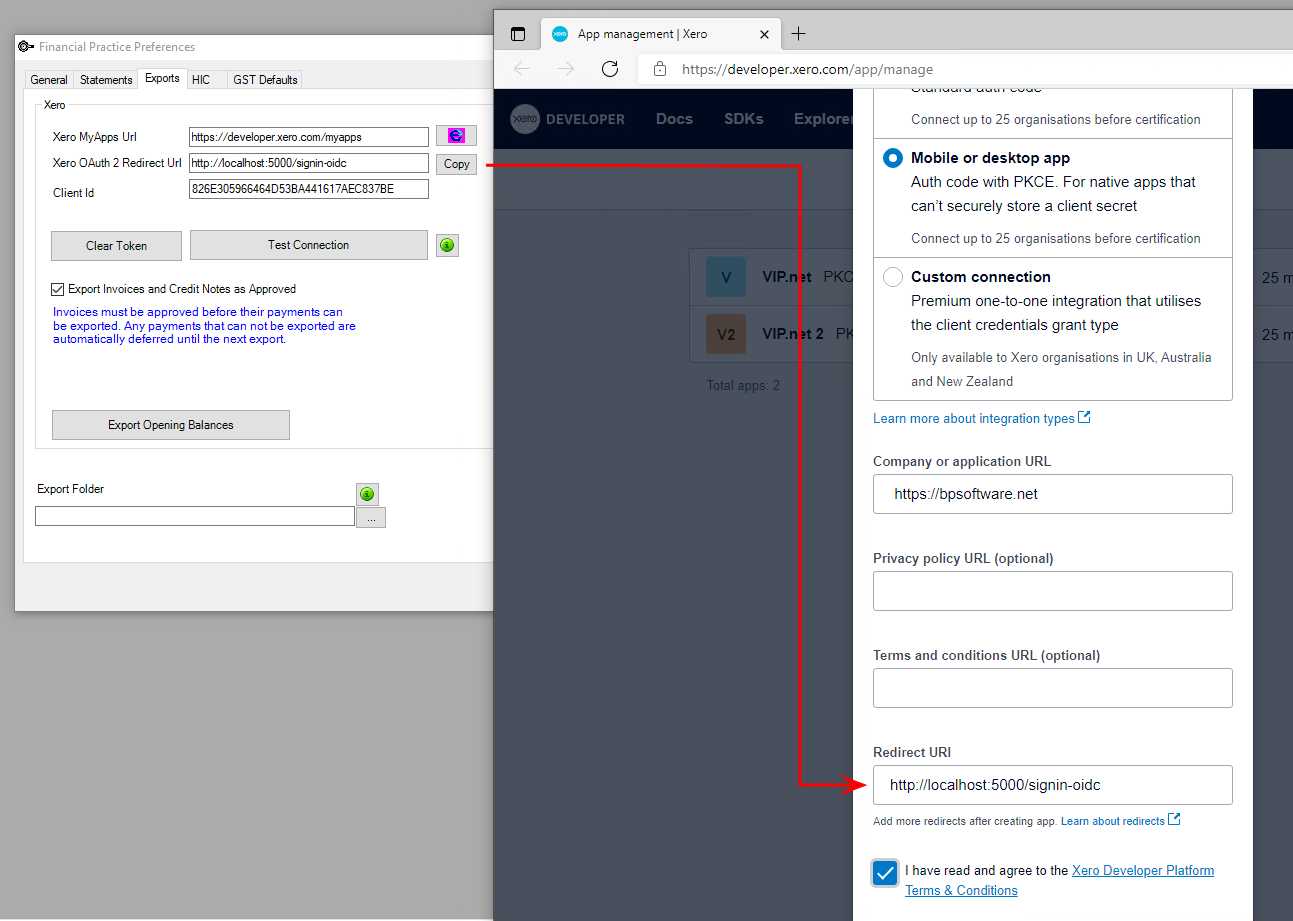
- Enter your Xero account username and password and click Log in. The browser will proceed to the Xero Developer Apps Management page. In the example below, two applications already exist, but your site will show no defined applications.
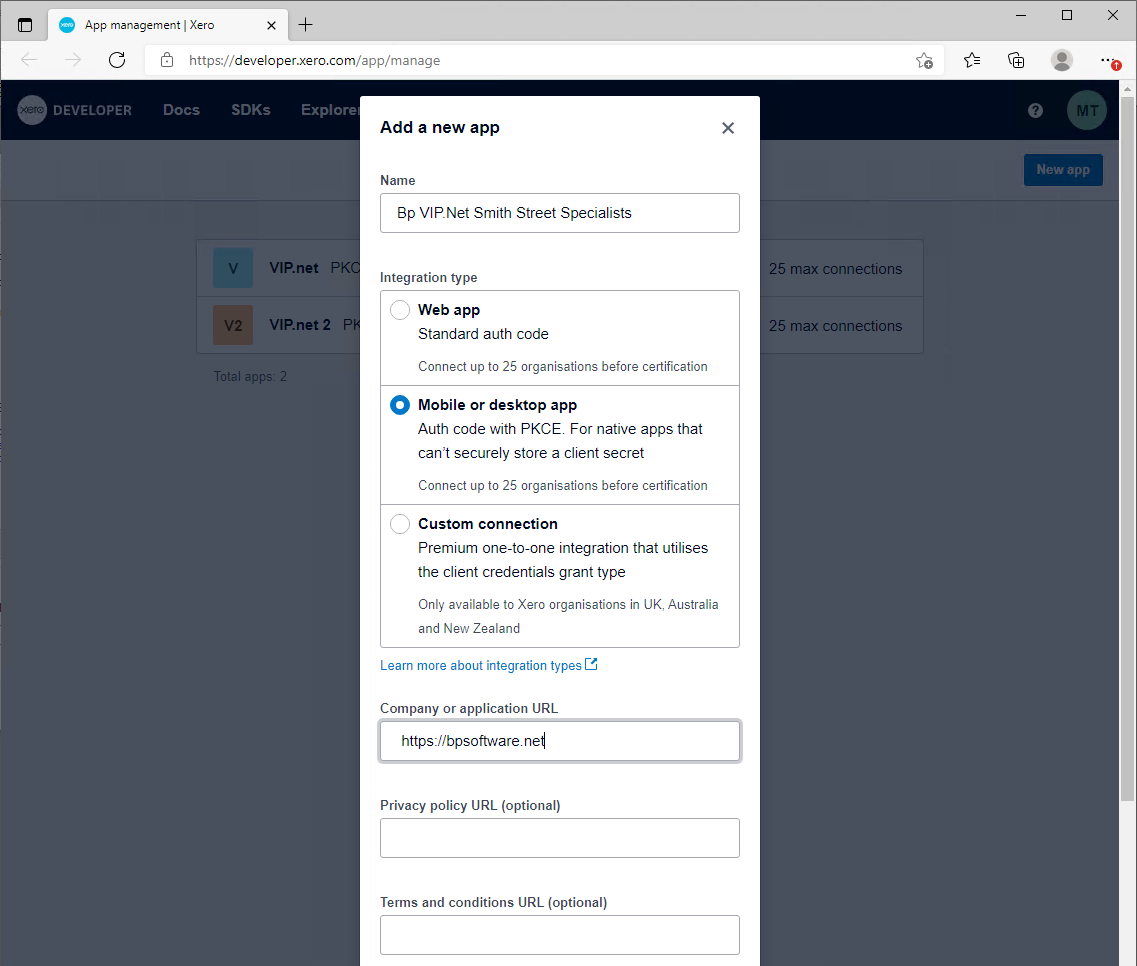
- Click New app in the top right. Add a new app will slide in.
- Add a descriptive Name for your practice's Xero integration.
- Select an Integration type of 'Mobile or desktop app'. Scroll down to view the rest of the form.
- Switch the focus back to Bp VIP.net and click Copy next to Xero OAuth 2 Redirect Uri...
- Switch the focus back to the browser and Ctrl+V to paste into Redirect URI.
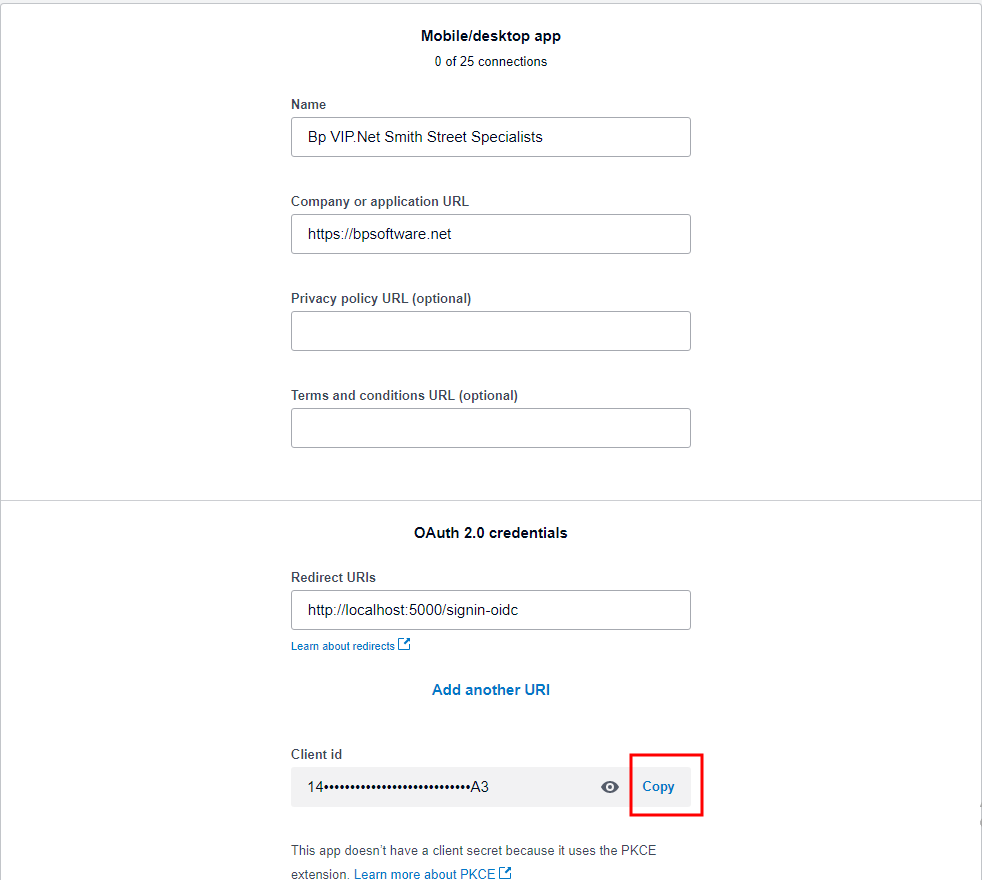
- Tick I have read ad agree to the Xero Developer Platform Terms and Conditions and click Create app. The App details page will open in the browser showing the details you just entered. Scroll down to see the Client id.
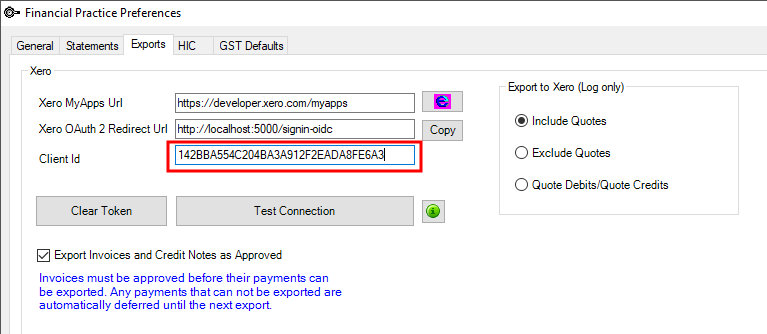
- Click Copy next to Client Id. Switch the focus back to Bp VIP.net and use Ctrl+V to paste into the Client id field.
- Click Test Connection to test your setup. An internet form XeroLoginForm will open and ask for your Xero account login and password (the same credentials required in step 2.).
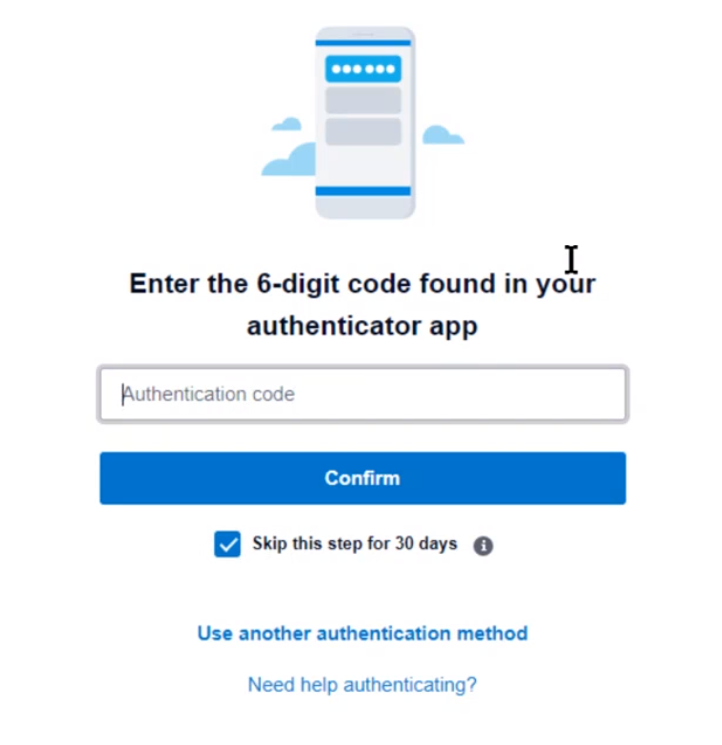
- The form will prompt for a 6-digit Authenticator App code. How this code is sent to you is configured as part of your Xero account, but can be sent to your Xero email address.
- Enter the code and tick Skip this step for 30 days to prevent being prompted for a code every time you export to Xero for the next thirty days. Click Confirm.
- After you log in, the form will present a summary of the connection request.
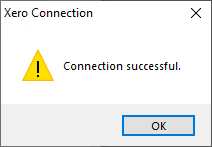
- Click Allow access. Bp VIP.net will alert that the Xero connection is successful.
- Click OK. You can now decide on what to include in your financial export to Xero.
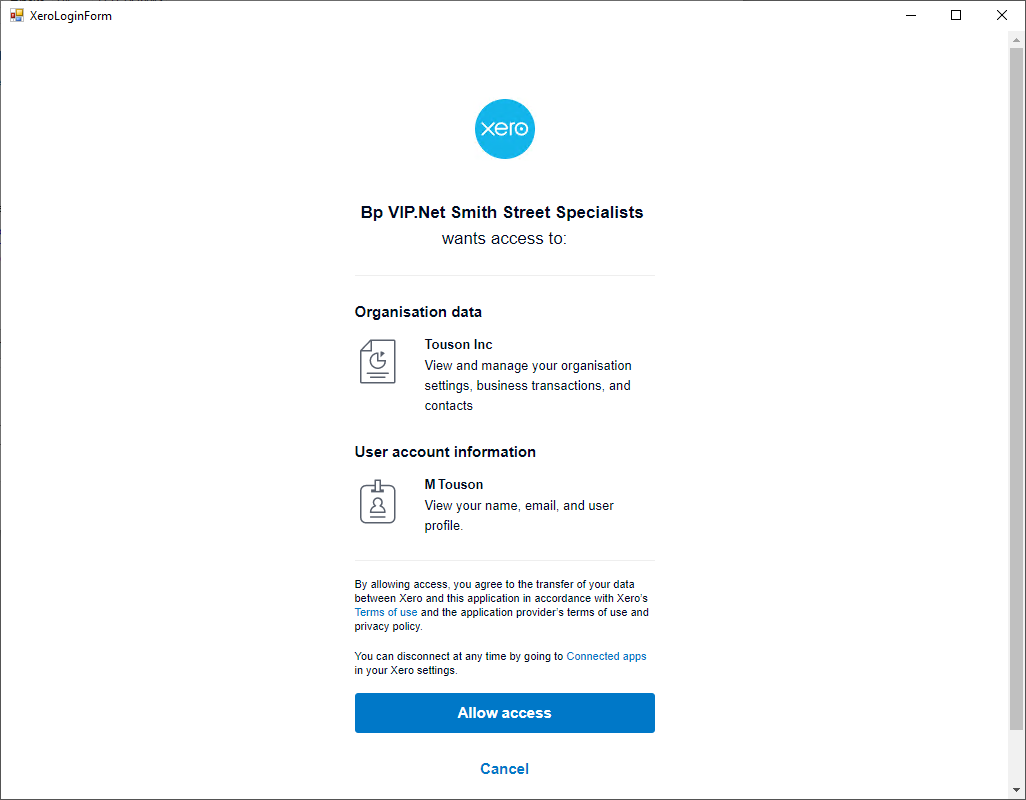
NOTE If you already have two applications set up for the Xero account, Xero will display this screen, but alert that you are at the maximum number of uncertified applications and Allow access will be disabled.
Ending a Xero trial
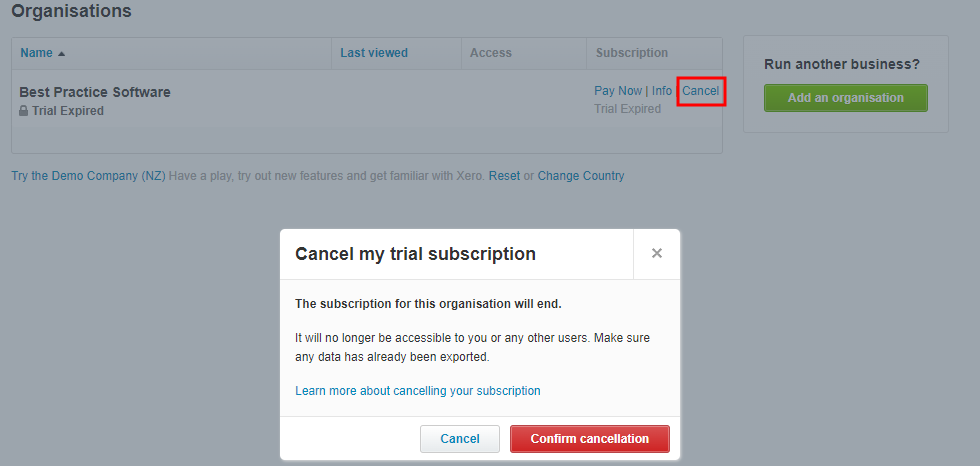
If your trial has expired, and you wish to move to a Production Xero integration, you do not need to delete and re-enter your app details in the Xero portal.
- Log in to your Xero account and cancel the Organisation with an expired trial
- Log in to Bp VIP.net and go to Setup > Practice Preferences > Financial Preferences > Export tab.
- Click Clear Token to clear the existing token that was attached to the expired trial.
- Set up the integration with the live or Production Xero account and click Test connection to generate a new token.
Select Xero export options
- From the Exports tab in Bp VIP.net, select the option to include quote information in the Xero export log:
- Include Quotes
- Exclude Quotes
- Quote Debits / Quote Credits.
If you select Quote Debits / Quote Credits, the following changes are made to the Xero export log to show quote information:
Item
Effect on export
Transaction Type
Change to type column in Xero Log File CSV.
Quote Debits
In the case of a Quote debit (such as excluding the component with a COH payment held against), indicate as QUOTE DEBIT instead of INVOICE.
Quote Credits
In the case of a Quote credit, indicate as QUOTE CREDIT instead of CREDIT NOTE.
Refund-C (Cash refunds)
REFUND is used for Refund-C transactions in Bp VIP.net, whereas Refund-T transactions use a normal combination of INVOICE and CREDIT NOTE for debit and credit entries respectively. Currently, both Refund-C and Refund-T come through as REFUND types.
Other data elements of existing REFUND types work as expected.
Delete Payment
No Change. Bp VIP.net cannot upload deleted transactions.
Write Offs
If a Credit transaction is tagged as a write-off by the user, indicate WRITE OFF as the transaction type, instead of CREDIT NOTE.
- Tick Export Invoices and Credit Notes as Approved. This checkbox allows payments to be exported by Bp VIP.net against previously exported invoices. Invoices must be approved in Xero to be able to have payments exported to them.
- Click ... next to the Export Folder field and browse to or create the folder you want to use for exporting transaction data.
- Click OK to save Xero configuration settings.
This step is optional. If you do not nominate a different export folder, Bp VIP.net will use the default system folder.
Add providers to Xero
Each provider needs to be set up as an account in Xero, so that the provider's name can be pulled through as a reference from the invoice created in Bp VIP.net.
- Log in to your Xero homepage through https://www.xero.com/au/login/ or https://www.xero.com/nz/login/. You will be prompted to enter a six digit authorisation code (sent to your Xero account email address).
- Click the Accounting menu and select Chart of Accounts.
- Click Add Account. The Add New Account screen is displayed.
- Select an Account Type of 'Sales'. Patient consults are interpreted by Xero as a sale.
- Type the provider's name in the Code field.
- Enter the provider's full name in the Name field, for example, 'Bob Flemming'.
- Enter a Description for the account (such as 'Bp VIP.net provider').
- Select the correct tax option to apply for this provider from the Tax drop-down menu.
- Select the tick boxes that apply to this provider:
- Show on Dashboard Watchlist
- Show in Expense Claims
- Enable payments to this account.
- Click Save to save the Chart of Accounts record.
- Repeat steps 6—10 for each provider that can be invoiced from Bp VIP.net. In the example in step 2, four Bp VIP.net providers have been added as accounts at the bottom of the screen.
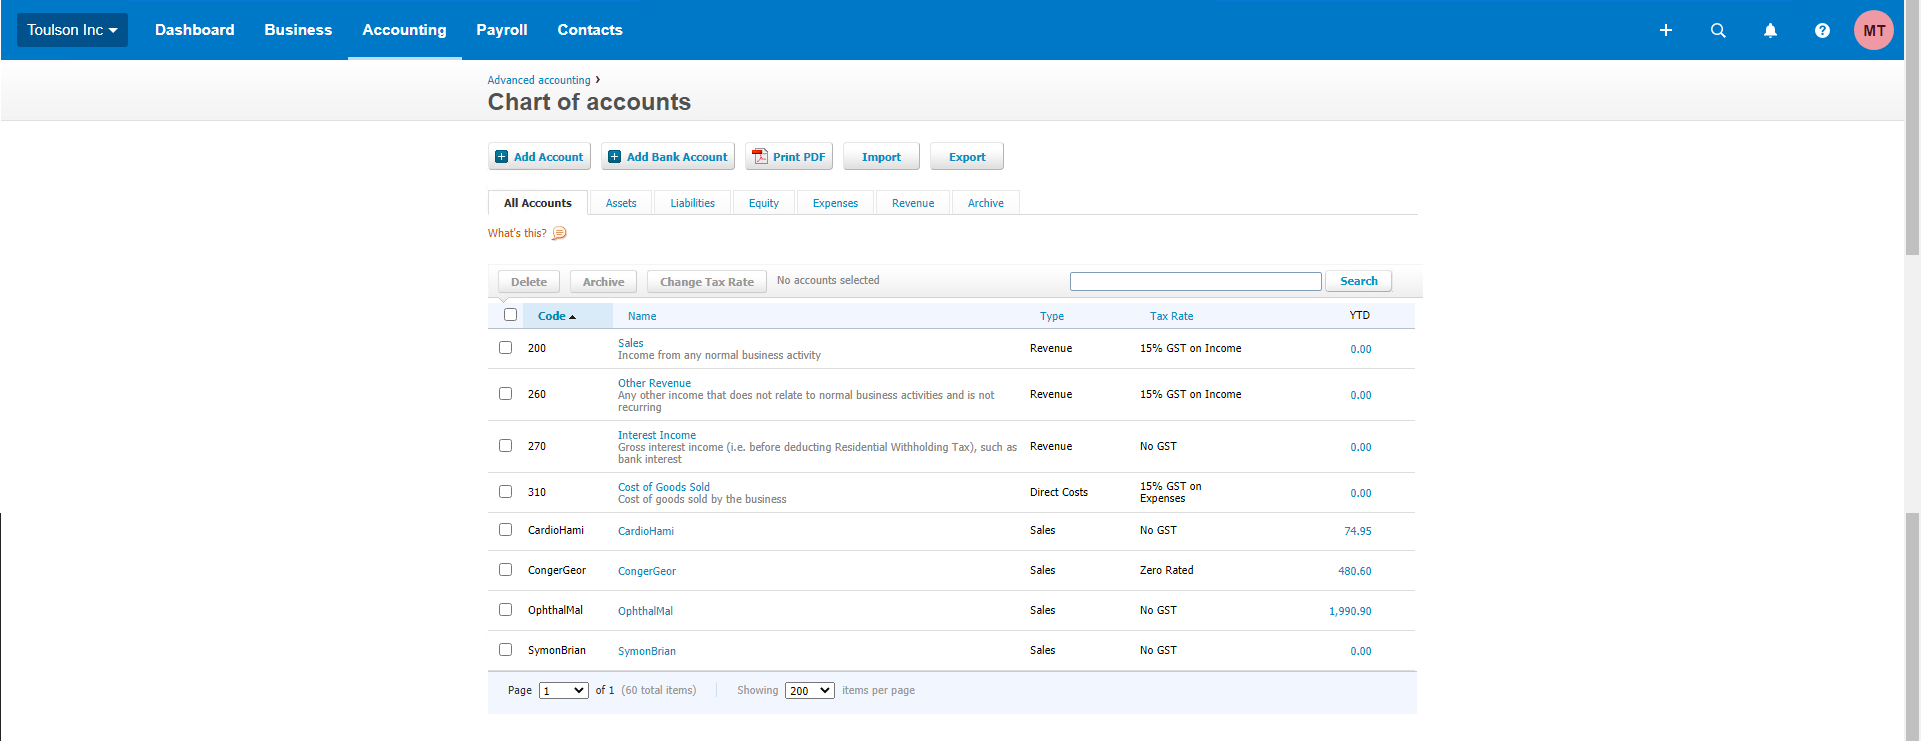
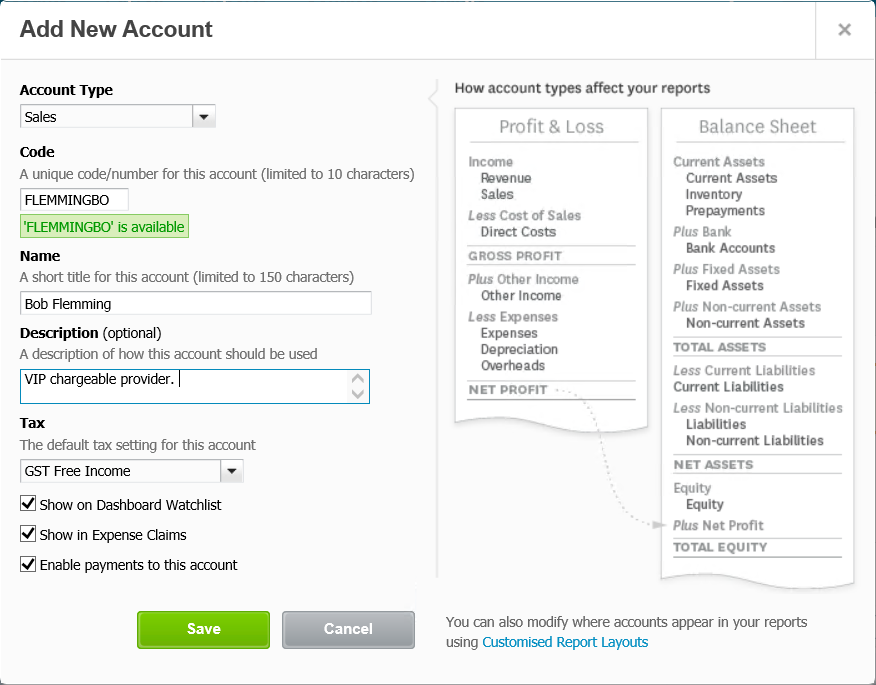
The Code field is restricted to 10 characters and will link to the provider name in Bp VIP.net. Enter the name as 'SurnameFirstname' (that is, matching capitals, no spaces). Xero will read the first 10 letters.
For example, if the provider's surname is 'Flemming' and first name is 'Bob', enter 'FlemmingBo' in the Code field. If the provider's surname is longer than ten characters, enter the first ten characters of the surname.
Set up bank account references
- Log in to Bp VIP.net as an administrator-level user with access to the Setup menu.
- Select Setup > Providers > Revenue Accounts to open the Maintain Revenue Accounts screen.
- Select one of the revenue accounts that contain transactions you will be exporting to Xero. Click Modify. The Details tab will open.
- In the Tags field, specify the Chart of Accounts code defined in Xero for the bank account in which all payments for this Revenue Account are to be settled.
- Click Ok to save the change for the revenue account.
- Repeat steps 3–5 for each revenue account in Bp VIP.net that has transactions you will export to Xero.
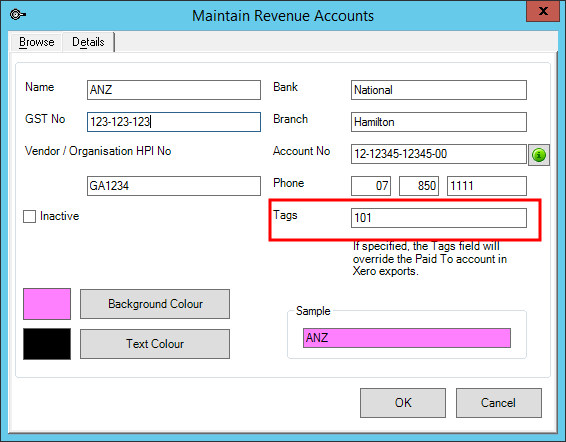
If your practice uses only one transaction bank account for all doctors, the default Chart of Accounts code for this Bank Account in Xero is typically '101'. However, always check if this code is correct, because the Chart of Accounts value is coded by the user.
For those practices that have separate Bp VIP.net revenue accounts for different doctors in the practice, complete the Tags field so that Bp VIP.net knows which Xero bank account is associated with which doctor and where the relevant invoices will be paid from. Your practice's accountant will be able to provide further advice on the Xero bank accounts that need to be mapped to your Bp VIP.net revenue accounts.
Configuration is complete. You can now run a trial export to test configuration.
Related topics
Last Modified: 15 February 2022