Tasks are internal reminders for a Bp VIP.net user to follow up or perform an action in the future. You can set the Task List for a user to appear every time that user logs in and when new tasks are created for which the user is a recipient.
Tasks can be one-off reminders or scheduled, such as a regular task notifying the user of an action every Monday at 9am.
If a logged-in user has incomplete tasks outstanding, the Task icon in the toolbar will have a red background ![]() .
.
Set practice task defaults
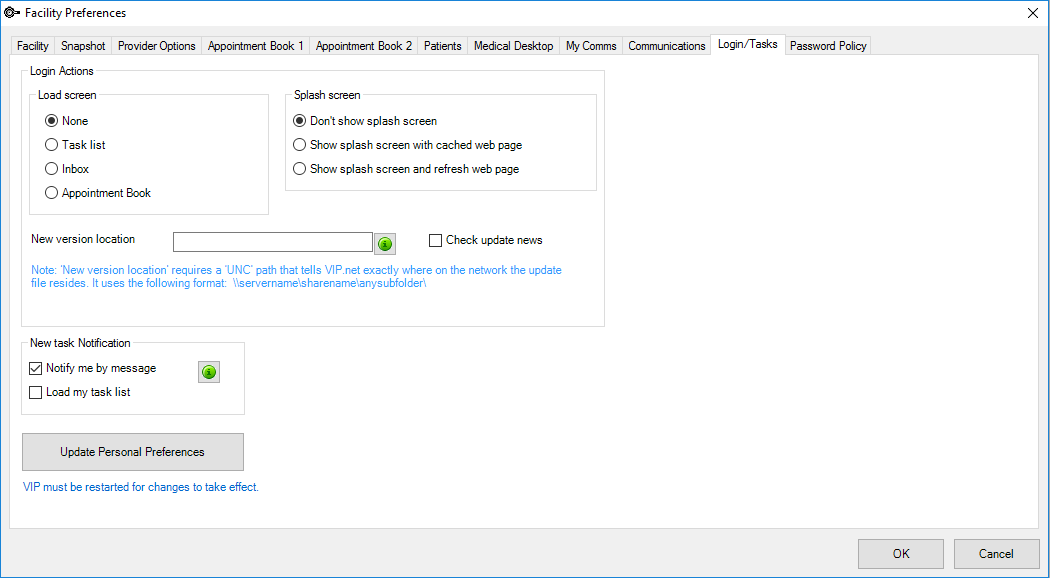
Practice task defaults apply to all Bp VIP.net users, unless a user has elected to override task settings in their personal settings.
- Select Setup > Facility Preferences > General Preferences > Login/Tasks tab.
- Select Task list to load a user's Task list every time they log on.
- Tick Notify me by message to send users a Bp VIP.net message every time they are a recipient for a new task.
- Tick Load my task list to open the Task List every time a user is a recipient for a new task.
- Untick Create new task on task reply to stop Bp VIP.net from automatically creating a new task for each individual reply to the original task.
- Click Update Personal Preferences if you want your personal default settings for tasks to match the selections made in this screen.
- Click OK to save changes. You must restart Bp VIP.net for changes to take effect.

NOTE Selecting this setting may redirect the focus from the current user's screen to the Task List, for example, if a provider is entering medical notes.
Set personal task defaults
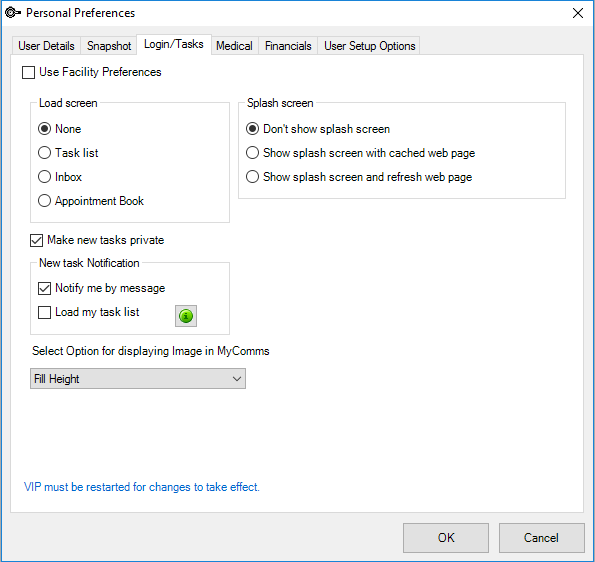
Task defaults for users offer a small number of additional settings.
- Select Setup > Personal Preferences > Login/Tasks tab.
- Untick Use Facility Preferences to enable the rest of the fields.
- Tick Make new tasks private to set the Task is Confidential flag on by default when a new task is created. Only the task owner and recipients can view the task.
- Select to load the Task List, the Inbox, or None when the user logs on.
- Tick Notify me by message to send users a Bp VIP.net message every time they are a recipient for a new task.
- Tick Load my task list to open the Task List every time a user is a recipient for a new task.
- Untick Create new task on task reply to stop Bp VIP.net from automatically creating a new task for each individual reply to the original task.
- Select the default size of images loaded into the viewing area in MyComms from the Select Option for displaying Image in MyComms dropdown.
- Click OK to save changes. You must restart Bp VIP.net for changes to take effect.

NOTE Selecting this setting may redirect the focus from the current user's screen to the Task List, for example, if a provider is entering medical notes.
Create a one-off task
- To open the Maintain... screen for practice-patient communications, select one of:
- select File > Tasks from the menu
- press Ctrl+F1
- click the T icon on the Bp VIP.net toolbar.
- The Maintain... screen will be displayed and default to showing Tasks.
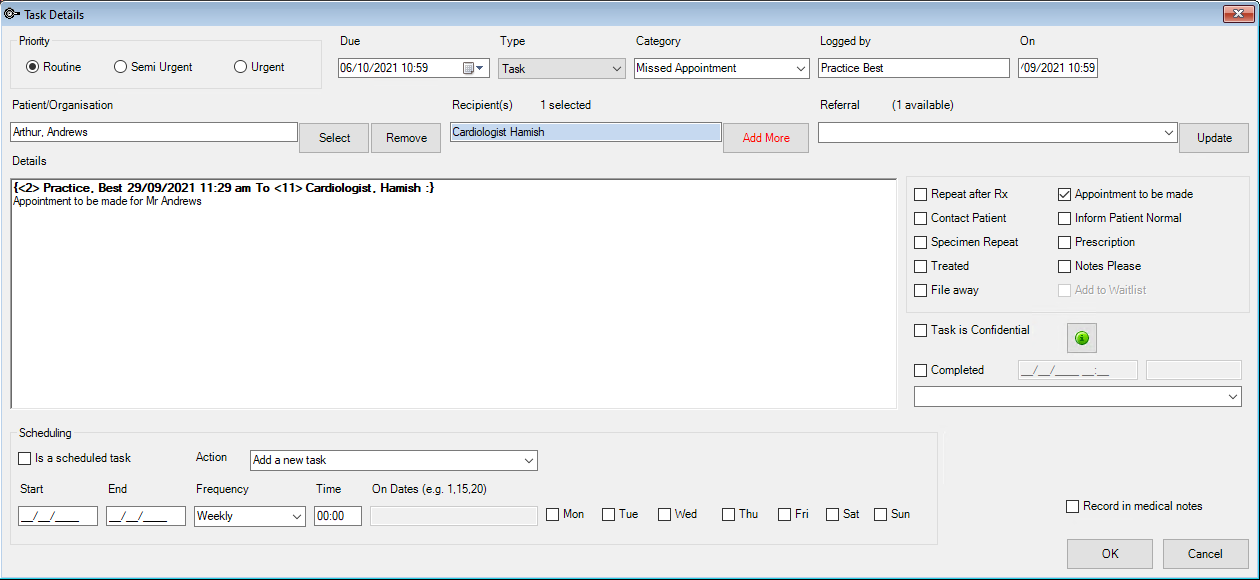
- Click New from the row of buttons along the bottom. The Details screen will appear.
- Complete the fields in this screen:
- Click OK to save the task.


|
Field |
Description |
|---|---|
|
Priority |
Urgency of the task. |
|
Due |
Date task should be completed by. |
|
Type |
Leave as 'Task'. |
|
Category |
User-created category of task. To create a new task category, right-click in this field and select Maintain List. |
|
Logged by / on |
Logged-in user and date when task was created. Read-only. |
|
Repeat after Rx and other options |
Ticking a checkbox will insert standard text into the Details text box. |
|
Recipients |
Click add more to add task recipients. |
|
Patient/Organisation |
Defaults to the patient or organisation shown in the Information Bar. Click Select or Remove to add and remove the patient or organisation that the task is about. |
|
Referral |
If the task is related to a referral, this dropdown will show all referrals related to the patient. Click Update to edit an existing referral or create a new referral. |
|
Completed |
Tick to indicate task has been completed on today's date. Select a Task Completed Reason from the dropdown. Right-click in the dropdown if you need to create new Task Completed Reasons. NOTE Ticking this field will complete the task for all recipients. |
|
Details |
Free text describing the action to be taken. |
|
Task is Confidential |
If ticked, only the task creator and the recipients will be notified of the task or be able to view task details. |
Create a scheduled task
- Open the Maintain... screen.
- Click New from the row of buttons along the bottom. The Details screen will appear.
- Complete the details as for a one-off task.
- Tick Is a scheduled task.
- Enter a Start and End date for the scheduled task to run.
- If you select a Frequency of 'Weekly', enter the Time of day to run the task and select the days of week on which to run the task.
- Select an Action of 'Add a new task'.
- Click Ok to save the task.
NOTE If you select a Frequency of 'Monthly', enter the Time of day to run the task and enter the dates of the month on which to run the task, separated by commas.
Complete a task
You can complete a task for all recipients, or for a single recipient (the logged-in user).
For example, say a doctor creates a task to locate and return x-rays for a patient. As soon as the x-rays are returned to the doctor, the task can be completed for all recipients. However, if each recipient needs to perform an action (such as review notes or a letter), a task should only be ticked as 'Completed' by each recipient.
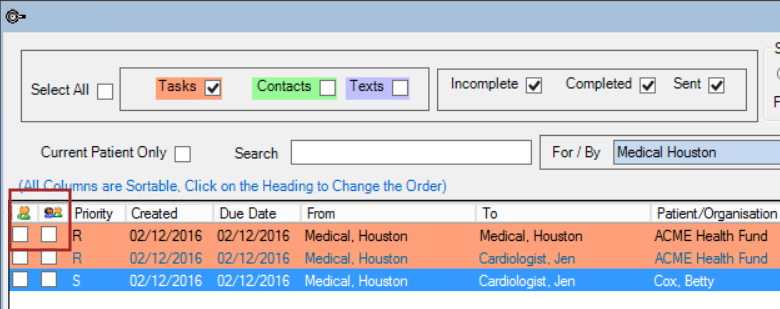
To complete a task from the Maintain... screen, tick the first column of the list to complete the task for the logged-in user only, or tick the second column to complete the task for all recipients.

Or you can double-click on a task to open the Details screen and tick the Completed checkbox, which will complete the task for all recipients and allow you to record a completion reason.
Last modified: 30 August 2022