Bp VIP.net can send emails from your practice email address to any email address you have recorded for a patient, provider, or organisation, or you can enter an email address as free text.
When creating an email, you can:
- Attach files from the patient's incoming or outgoing correspondence
- Attach files from outside of Bp VIP.net
- Add CC and BCC email addresses.
You can also send an email directly from the appointment book Print Bookings screen, so that you do not have to print an operations list and then scan or email the printed list.
All sent emails are logged and viewable, including attachments, from the Email Log report.
Send an email
- Wherever you see an Email icon
 or
or  , such as in the word processor, patient details, or organisation details, click to open the New Email Message window.
 - Start typing in any of the To, CC, or BCC fields to open a list of recorded email addresses to select from. Or you can type the email address directly into the text field to the right, separating multiple addresses by semicolon.
- Add a Subject line, if Bp VIP.net has not automatically populated the field for you. For example, if you are emailing from the word processor or appointment book, Bp VIP.net will populate the subject line with the document type.
- In the Attachments field:
- Click Attach Letters to attach one or more items from incoming or outgoing correspondence for a patient.
- Click Attach Files to open a file browser and attach one or more external files to the email.
- Type text directly into the Message field.
- Click SEND to send the email. Recipients will not include any BCC email addresses.

In some versions of Bp VIP.net, the From field in the email editor will show the facility's email address stored in Facility Preferences > Facility > Email and cannot be changed. This field will default to the logged-in user's email if recorded, and you can edit the From field. For providers, you can select any email address available from any of their @location records and all units and facilities associated with their provider group.
Email an invoice
An Email Invoice button is location in the Consultation (F5) and Transactions (F8) windows, and an Email button is located in the list of options along the bottom of the Payment (F6) window.
Click this button to send the selected invoice as an email attachment. If the Print Immediately option is not ticked for the invoice template, the user can modify the invoice attachment before emailing.
When emailing an invoice from one of these windows, the To: address will be retrieved from the patient details (F3), or blank if not present. The From: address will be retrieved from the provider's preferences, or the practice preferences if not present.
Email an operations list
You can now email operation lists from the appointment book, for example, to email a daily operations list directly to hospital.
- From the appointment book, click Ctrl+P to open the Print Bookings window.
- Select the Operations tab and click Email.
- Bp VIP.net will open the word processor in the background and create an operations list document from the default 'Appointment Operations List' template. A New Email Message window will appear with the operations list already attached as an external document and a Subject of 'Appointment Operations List'.
- Select or enter a To address. Complete any other fields in the New Email Message window and click SEND to email the operations list to the addressee.

View sent emails
All emails sent from Bp VIP.net's internal email are logged for auditing, even if the To email address is entered as free text and not stored in the database. The body of the email and any attachments are saved, and both are viewable from the Email Log report.
NOTE Only emails sent using Bp VIP.net's internal email are logged. If you have Use Outlook for Email ticked in Setup > Facility Preferences > General Preferences, emails sent from Microsoft Outlook will not be logged.
- Select Reports > Email log. The Email Log Report window will appear.
- Use the filters at the top of the report window to narrow the list of emails shown in the report.
- Click Run to run the report. Sent emails that match the filter criteria will be shown in the list.
- To view the contents of an email, including attachments, select an email from the list and click View/Print. The email and its attachments will be displayed.

Send a Fax through Email
Bp VIP.net sends faxes via the email function from MyComms.
-
With the document to be faxed highlighted, select the Fax/E-Mail icon.
-
Select Fax as the Correspondence type.
-
Select a file format.
-
Fill out the sender and recipient details, and add any additional desired content to the message.
-
Select SEND to transmit the email fax message.


Microsoft oAuth2.0 for Email
Users running Bp VIP.net Topaz SP3 can use Microsoft oAuth2.0 for email.
Open Authorisation 2.0 (OAuth2.0) is a standardised protocol that enables secure access to user data without requiring the user to disclose their credentials. It has become the preferred method for granting third-party applications restricted access to user accounts while maintaining robust security.
You can sign in with your Microsoft account via the Facility or Personal Preferences screens.
NOTE You may need to contact your email provider to enable OAuth2.0 for the functionality to work in Bp VIP.net Topaz SP3.
To link a Microsoft email to the Practice:
- Go to Setup > Facility Preferences > General Preferences > Email / Internet.
- Enter the SMTP Server as outlook.office365.com.
- Enter the SMTP Port as 25.
- Enter your Microsoft username and password in the SMTP fields.
- Click Sign in with Microsoft.
- Sign in with your Microsoft email address and password.
- Click OK to save and close.
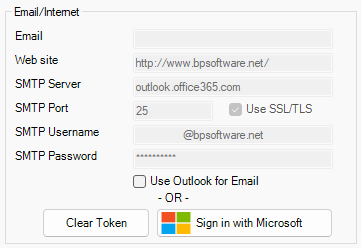
Once you have signed in with your Microsoft account, the email fields will be disabled. Select Clear token to reset the email preferences and enable editing.
Users may be required to re-authenticate periodically if functionality goes unused for extended periods of time.
To link a Microsoft email to a User:
- Go to Setup > Personal Preferences > User Details.
- Click Sign in with Microsoft.
- Sign in with your Microsoft email address and password.
- Click OK to save and close.
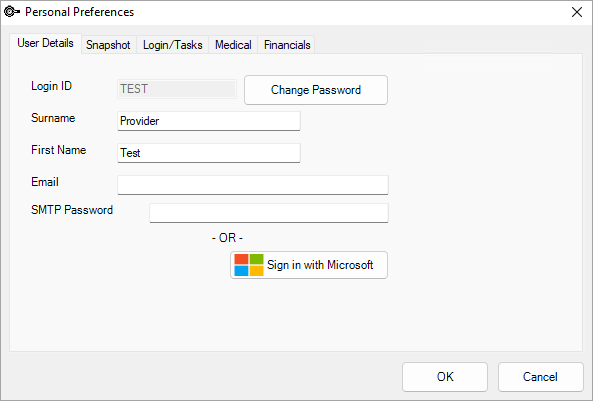
If no default is set in the Personal Preferences for a user, Bp VIP.net will use the Facility Preferences default.
Related topics
Last modified: 10 November 2022