On this page
Invoices Navigation Bar

|
Field |
Description |
|---|---|
|
Bill To |
Select the Bill to person or company from the list of available billers. This list will contain your client list as well as your Third Party Billers. To add a new Third Party Biller go to System > Data Maintenance > Third Party Billers. |
|
Go button |
An example relating to Invoices would be adding a Third Party Biller after the Invoices module was open. Clicking Go will reload the Bill to list so that the Third Party could be chosen as the Bill to party. |
|
New Invoice |
Click to create a New Invoice for the selected Bill To person or Third Party. |
|
New Payment |
Click to create a New Payment for the selected Bill To person or Third Party. |
|
Statement |
Allows a Statement of Account to be created for a Client. |
|
Transaction Search |
Allows you to search for an invoice or payment by Invoice or Payment Number/ID. |
|
Client Details |
Click Client Details to open the Client record of the selected Bill to Client. |
|
Refresh Client List |
Click to refresh the Client List if you have recently added a new client into the system and they are not showing in the Bill To list. |
|
Show Deleted / Voided |
Click to show deleted or voided invoices. |
|
Exit |
Click this button to exit the Bp Allied program |
Invoice editing
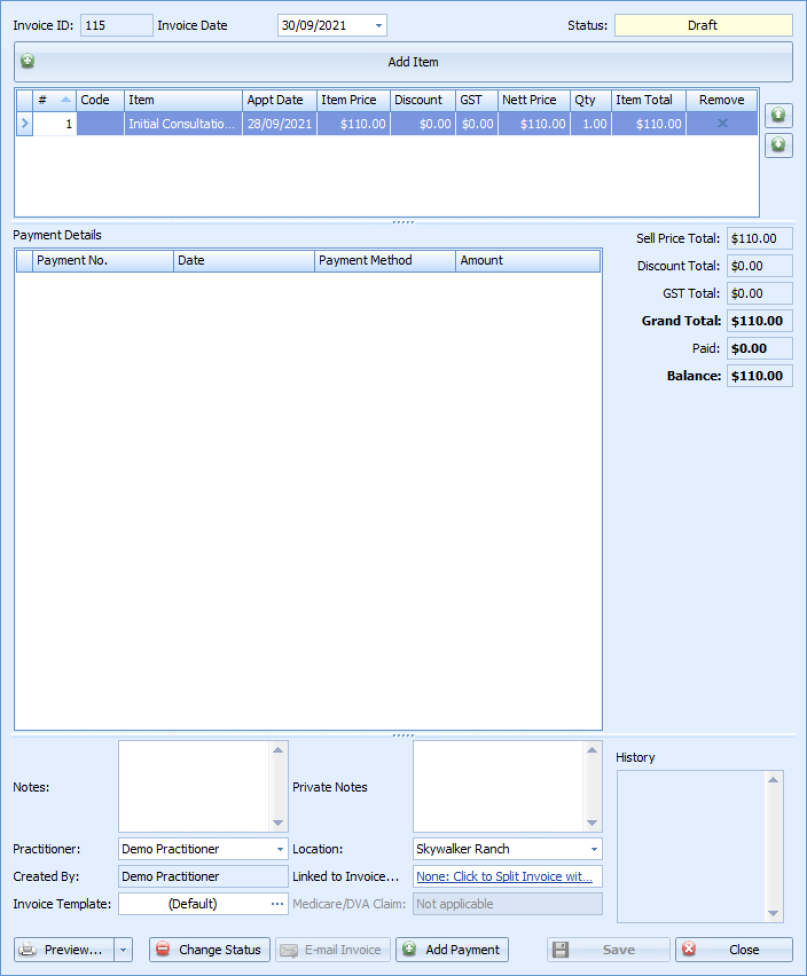
Invoices can be edited both at the time of creation or at a later date. The fields on the Invoice screen are explained below.
IMPORTANT To edit the Item Details in an invoice, the Invoice Status must be Draft. In any other status, the Item details are set to read only.
Other invoice details such as date can be edited in 'Awaiting Payment' status. Nothing can be edited when the Invoice has a status of Paid, Deleted or Voided.

|
Field |
Description |
|---|---|
|
Invoice ID |
Displays the Invoice ID number. NOTE This number is automatically generated but you can set your next Invoice ID and Payment ID under System > Options > Invoices > Invoice Numbering Options. This can also be searched on using the Transaction Search. |
|
Invoice Date |
Displays the date the Invoice was generated. This date can be changed by selecting a new date in either Draft or Awaiting Payment Status. |
|
Status |
The status determines where an invoice is in the invoicing process. This in turn determines whether information in an invoice can be edited. To edit the Item Details in an invoice the Invoice Status must be Draft. In any other status the Item details are set to read only. Other invoice details such as date can be edited in Awaiting Payment status. Nothing can be edited when the Invoice has a status of Paid, Deleted or Voided. |
|
Add item |
Click to add a New Item. This can be an item related or unrelated to an appointment. |
|
Item Details |
Displays a summary of your Item Details. From here the Item Price can be edited. Ensure Item Price Editing is enabled within System > Options > Invoices. A discount can be applied by typing in the discount field. |
|
Remove Item |
Removes the item from the invoice. |
|
Item Details Order |
These arrows allow the order of the items in the invoice to be changed. The items will then stay in the position allocated. |
|
Payment Details |
Displays the payment amount once a payment has been associated with the Invoice. Click here for details on how to add a payment. |
|
Totals |
Displays a summary of total costs. |
|
Notes |
Notes: These notes can be displayed on the printed invoice. Private Notes: These notes cannot be displayed on the printed invoice. |
|
History |
History is used to display any edits and changes made to an invoice and by whom. |
|
Practitioner |
Displays the Practitioner associated with the Client and the billed appointment. This information comes from the Appointment. |
|
Location |
Displays the Location of the Appointment. This information comes from the Appointment. If Invoice Numbering per Location is turned on, the Location can’t be edited on an invoice once the invoice is created. The invoice will need to be deleted and recreated with the correct Location so that the correct invoice number series can be associated to it. |
|
Split Invoice |
Click to Split an Invoice with a Third Party. Click to see more information here. This field does not display on a Third Party Invoice. |
|
Template Selector |
Allows you to select different templates to print your invoices. Set your default Client and Third Party templates within System > Options > Invoices. |
|
|
An Invoice can be printed, previewed via the Print button options or emailed from here. |
|
Change Status |
Use this to change an invoices status. |
|
Email Invoice |
Click to Email the Invoice. |
|
Add payment |
Click here for details on how to add a payment. |