The Letters module allows documents to be read and created within Bp Allied. Documents will be associated with a client. This section enumerates the options available from the main Letters menu for creating and editing templates, including page layout.
Letters Toolbar

|
Field |
Description |
|---|---|
|
New Editor |
Click to open a New Letter Editor which will open in a different tab to the one you are currently working in. |
|
New letter |
Click New to open a New Blank Document within the current tab you are working in. |
|
Open |
Click Open to open an existing document to view and/or configure for use with Bp Allied. |
|
Save to Client Record |
Click Save to Client Record to save the document you are working on into the Clients file. It can be found under the Docments/Phone Calls tab. |
|
Save to Computer |
Click to save the document onto your computer (i.e. outside of Bp Allied). Your specific Save location is set in Options > Documents > Default Document Save Location. |
|
|
Click to print your document. |
|
Print Preview |
Click to preview your document before printing. |
|
Email As Attachment |
Click to Email the document as an attachment. |
|
Send Securely |
This button will become enabled if you have entered details for your secure messaging provider under System > Options > Secure Messaging. Click this button to send your document to a health care provider via secure messaging. |
|
|
Click Email to email the document as the actual email body. This document will not be sent as an attachment but inserted into the body of the email. |
|
Manage Templates |
Click this button to manage the templates displayed in the template list. |
|
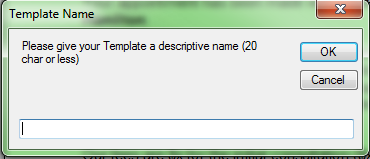
Save as Template |
Click to save the current document as a Template for future use within Bp Allied.
Give the template a name. Click OK. The template will display in the template list. |
|
Template Selector |
Choose your available templates from the drop-down list. For this drop-down list to work a Blank.doc (or .docx) must exist and MUST be blank. |
|
Client Selector |
Select the client you wish to merge with the template (if not already selected). |
|
Appointment Selector |
Select the appointment date that the letter will relate to. |
|
Merge button |
Click Merge to merge the template with the Client's details and appointment data. |
|
Reload Template button |
Click Reload Template to open up the template again and clear any changes/merges you have made. |
|
Refresh Client List button |
Clicking the Refresh Client List button if you have a recently added in a new client and they are not showing in this list of clients. |
Edit Toolbar

|
Field |
Description |
|---|---|
|
Clipboard toolbar |
Cut, Copy and Paste work as they would in any other editing package; |
|
Formatting Toolbar |
Use this toolbar to format your document. |
|
Spelling Toolbar |
Check the spelling within your document. |
|
Insert Toolbar |
The Insert toolbar allows you to:
|
Insert Toolbar

|
Field |
Description |
|---|---|
|
Page |
Put your cursor where the new page is to be inserted and click to insert the page. |
|
Table |
Insert a table. See Inserting tables for more information. |
|
Illustrations |
The picture will be inserted. The picture on the left has been inserted using the Inline Picture option and the picture on the right has been inserted using the Picture option.
|
|
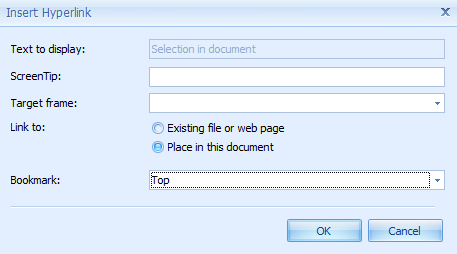
Bookmark |
A Bookmark is a point within a document that has been named so that hyperlinks can be assigned and used to jump to that location. To create a new bookmark
|
|
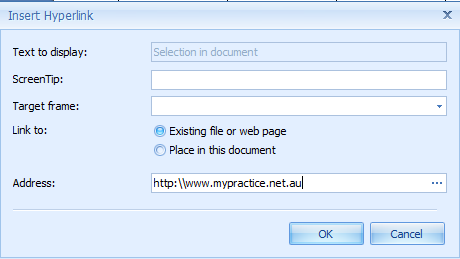
Hyperlink |
A Hyperlink is a link to another place within a document, file or location within an intranet or on the internet. To create a hyperlink
This uses any bookmarks created within the document to link to.
|
|
Header and Footer |
Adds header and footer to a letter. |
|
Text Box |
Adds a text box to a letter. |
|
Symbol |
Adds a symbol box to a letter. |


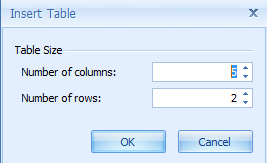
Inserting tables
- Put your cursor where the table is to be inserted.
- Click on the table picture
 to display the Insert Table dialogue box.
 - Select the number of columns and rows.
- Click OK. The table will be inserted.
OR
- Put your cursor where the table is to be inserted.
- Click on the bottom half of the button
 and the cell picture displays.
 - Drag to choose the size table to insert.
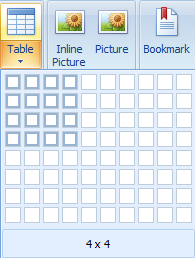
- Release the mouse to insert the table.
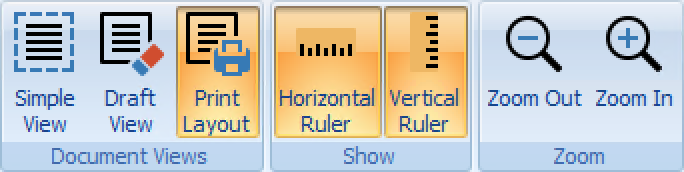
View Toolbar
The View toolbar includes some options to change how you view the Letter Editor.
|
Field |
Description |
|---|---|
|
Document Views |
These change the view of the document. It is set to Print Layout by default.
|
|
Show |
These are used to turns the rulers displayed in Print Layout view on and off. |
|
Zoom |
Zoom allows you to increase and decrease the size of the document you are viewing. |
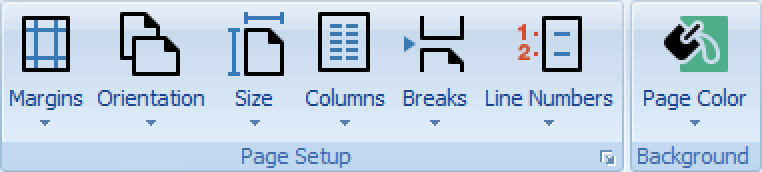
Page Layout Toolbar
Use the buttons to change how the page is laid out. These functions work in a similar way to those in Microsoft Word.
|
Field |
Description |
|---|---|
|
Margins |
Use either the default margin options or customise your own. |
|
Orientation |
Change between Portrait and Landscape. |
|
Size |
Change the page size. The standard default options are displayed or choose More Paper Sizes for an option not on the list. |
|
Columns |
Use this to split your page into columns in a similar way a newspaper is split up. |
|
Breaks |
Use this to insert page, column or section breaks. A Section (Next Page) break change be used if a different orientation is needed for a page within a document. |
|
Line Numbers |
This is used to show the number of lines used on a page. |
|
Page Colour |
Use to change the background colour of the document page. By default this is set to No Colour. |
Click the pop out icon in the bottom right-hand corner to open the Page Setup window for further menu options.


Last Updated 24 November 2023


 AU
AU 