The Xero Export report allows BpAllied to connect directly to your Xero account via the Xero API and transfer Invoices, Payments and Refunds that have been created in Bp Allied into Xero. The transfer of these is dependent on the transfer of basic client and Products and Services information.
On this page
Before you start
There is some initial information that needs to be set up in both BpAllied and Xero prior to the export going ahead. Once this is done, then the transfer is done in the following order:
- Clients (known as Contacts in Xero)
- Products and Services (known as Items in Xero)
- Invoices
- Payments
This Xero export is not compatible with customers using the NDIS report export, as each system requires different GST values to be transferred.
If a practice has over 100 practitioners, they can not use the Xero export as the Xero tracking categories are limited to 100 options.
Please also refer to the Xero limitations section for more details on how this API works.
- Export clients to Xero
- Export Products and Services
- Email address error
- Update details for Products and Services item
- Export Sales
- Export Payments
Initial Setup in Bp Allied
Xero connection and bank account set-up
Set up the Xero account connection and enter in your Xero bank account code in Options > Financial Exports > Xero.
NOTE You will need to add your Bank Account into Xero.
Allocate a Client ID to all clients
The import sets the Bp Allied Client ID as the Account Number in Xero. Clients without Clients IDs assigned will not be imported.
This step needs to be carried out prior to each import of Sales and Payments under the assumption that your practice continually gets new clients.
- To allocate Client IDs to all clients without one go to Options > Client Details > Allocate Client IDs. Any matching records will be updated and any clients that do not have Client ID's will have them created.
- Third Parties also require a Client ID and the only way this can be allocated is via the option above.
Update Third Party Billers
Ensure all Third Party Billers have both the Organisation (Last name) and Attention (First name) field filled in. Both fields are required to be able to export to MYOB.
- Open the Xero Export report in Reports > Exports.
- Clicking Preview Error Report will display any that do not meet the appropriate criteria.
- This report can be printed or saved.
![]()
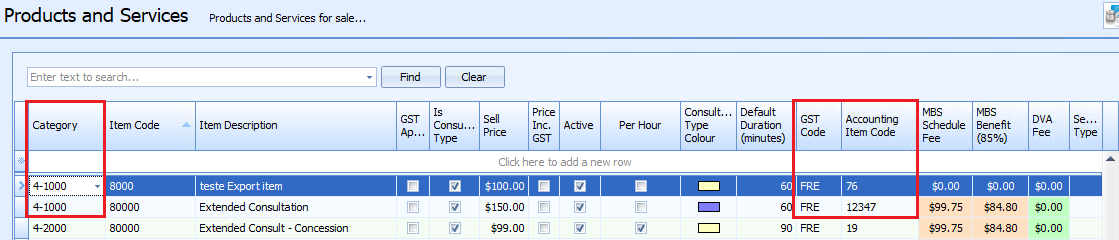
Update products and services
The following fields need to be populated in Bp Allied. Any Products or Services without a Category, Accounting Item Code or GST Code assigned will not be imported. If new Products or Services have been entered or prices have been changes, this will need to be imported prior to the export of Sales and Payment information. Item Descriptions can be a maximum length of 35 characters.
- Open the Xero Export report in Reports > Exports.
- Clicking Preview Error Report will display any that do not meet the appropriate criteria. This report can be printed or saved.
How to update the required fields
|
Bp Allied field |
Xero Field |
Data Type |
|---|---|---|
|
Accounting Item Code |
Item Code |
A unique number to individually identify each product or service. Bp Allied Item Code can not be mapped to this field as Bp Allied does not require it to be a unique number. Type in a unique number for each line. |
|
Category |
Sales Code |
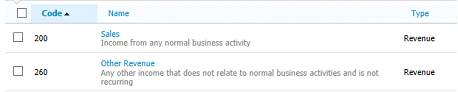
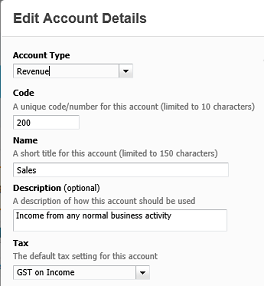
The Xero, the Sales Code is the account that sales are recorded against in the Chart of Accounts. For example: this is 200 by default. Multiple accounts can be set up in Bp Allied for different types of income to be tracked against.
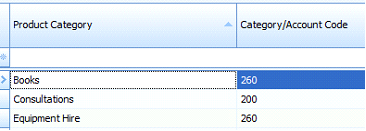
Create Product Categories in Data Maintenance > Product Categories based on each sales account required.
In Data Maintenance > Products and Services assign a category to each product from the drop-down list. |
|
GST Code |
Tax Rate |
A GST Code must also be entered before any sales can be exported. This is the Tax Rate field in Xero that states whether an account is taxable or not. This value is used if there is no GST in the Invoice to set the default GST rate. If there is GST on the invoice, then this amount is sent to Xero and the GST code set appropriately by the Xero export. Products attracting GST must be assigned a value called “GST” as this is mapped to the Xero GST on Income account.
In Data Maintenance > Products and Services assign a GST code to each product line. |
|
Item Description |
Item Name |
Maximum number of characters 35. |
Tracking Categories
A Tracking Category is a way Xero allows customers to create custom information for manipulating Invoices and Payments. This will be the User or Practitioner’s name that is marked as the creator of the invoice.
NOTE Xero only allows a maximum of two tracking categories.
The Bp Allied Xero export requires one tracking category so that the Practitioner information can be transferred with the Invoice.
To ensure a Tracking Category is automatically set, the User or Practitioner must have a First Name and a Surname entered in their Contact Details. If they are a Practitioner, they must also be marked as such.
IMPORTANT ALL Practitioners MUST have a first and last name, otherwise an error will occur with the export.
When the initial Client export is created, the Practitioner Tracking Category is created along with Category Values for each User in Bp Allied. This is updated automatically as required each time the Client export is run. There is no user intervention required.
As with the current functionality, any Invoices that include appointments related to multiple practitioners will be attributed to the practitioner related to the first appointment invoiced.
Xero also limits the number of options under a category to 100, therefore practices with more than 100 practitioners will not be able to use the Xero export.
Prepend Client ID to Invoice and Payment Numbers
Xero will not allow an invoice or a payment to have a duplicate Invoice Number or Payment Number. There are two situations in Bp Allied where these can occur, and hence prepending the Client ID to the Invoice or Payment number has been done to ensure that this number is unique.
Send Clients to Xero
Clients are called 'Contacts' in Xero. Due to the Xero API not allowing duplicate Contact Names, the BpAllied Client ID is appended to the contact name.
The fields transferred are:
|
Bp Allied Field |
Xero Field |
Conditions |
|---|---|---|
|
Client ID |
Account Number |
Mandatory |
|
First Name + Last Name + Client ID |
Contact Name |
|
|
First Name |
Primary Person First Name |
Mandatory. Can ONLY include apostrophes and hyphens. Errors will occur if other special characters are in these fields. E.g. brackets or quotes can't be used. |
|
Last Name |
Primary Person Last Name |
|
|
Email Address |
Email Address |
|
- Open the Xero Export in Reports > Exports.
- Select Clients radio button.
- Click Get Data.
- Use Preview Error Report to ensure that all Clients have Client IDs and all Third Parties have first and last names.
- Select All or New option.
- Click Export to Xero.
All - sends all Clients whether they have been exported before or not. Will update Xero with any name changes.
New - Sends only clients with a XeroGUID set to 00000000-0000-0000-0000-000000000000.
This carries out an initialisation that includes connecting to Xero and creating the Tracking Categories along with the Client export.
When a User and a Client has been successfully exported, the XeroGUID is written back into the table to stop it being exported again. Clients that have not been exported have a Xero GUID of 00000000-0000-0000-0000-000000000000.
Send products and services to Xero
Products and services are called 'Items' in Xero. Due to the API requiring that the Item Code field be unique, we require a unique number to be added into the Account Item Code field, as discussed above. However, this is not helpful when view items in the Xero interface, hence the Item Code and Description are concatenated onto this.
![]()
Bp Allied Field | Xero Field |
|---|---|
Accounting Item Code | Item Code |
Item Code + Item Description (max 50 characters) | Item Name |
Income Account | Code |
Selling Price | Unit Price |
GST Code | Tax Rate |
- Open the Xero Export in Reports > Exports.
- Select Products and Services radio button.
- Click Get Data.
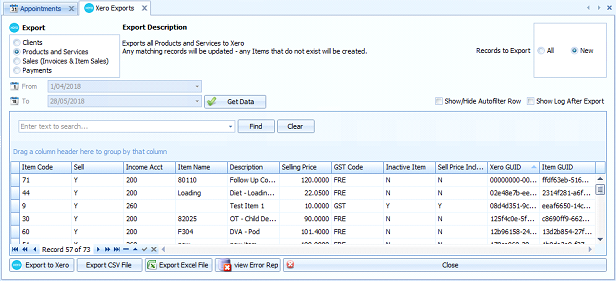
- Use Preview Error Report to ensure that all items have an Accounting Item Code, Income Account and GST Code on all items prior to export.
- Select All or New option.
All - sends all products and services whether they have been exported before or not. Will update Xero with any name or price changes
New - sends only products and services with a XeroGUID set to 00000000-0000-0000-0000-000000000000.
- Click Export to Xero.
When a product or services has been successfully exported, the XeroGUID is written back into the table to stop it being exported again.
Send invoices to Xero
After setting up the clients and products and services above, all the Invoices for the selected period will be able to be sent through to Xero with exception of:
- Draft invoices
- Quotes (via Tyro HealthPoint claiming process
- Deleted & voided invoices can be seen in the data grid but will only be exported if the original invoice prior to being deleted or voided was exported.
To send Invoices:
- Open the Xero Export in Reports > Exports.
- Select Sales radio button.
- Select the From and To dates.
- Click Get Data.
- Click Export to Xero.
- Sends only Invoices with a XeroGUID set to 00000000-0000-0000-0000-000000000000.
- Sends Practitioner as a tracking category.
- An entry is written in the Invoice log to show that the invoice has been transferred to Xero.
-
The Client ID is added to the Invoice Number.
- When an Invoice has been successfully exported, the XeroGUID is written back into the table to stop it being exported again.
- Review the data in Xero.
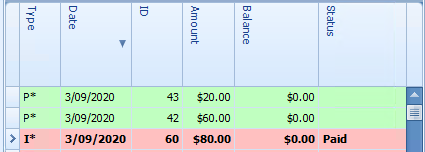
When looking in the Transactions grid in the Invoices section, any Invoice, Payment or Refund with an * after the Type letter means that it has been exported to Xero (or MYOB).
If you have updated or changed an Invoice in BpAllied, that change will need to be manually replicated within Xero.
Send payments to Xero
After sending Invoices, all the payments for the selected period will be able to be sent through to Xero with exception of Medicare Bulk Bill and DVA claims that are not at a status of Processed or Completed.
- Your Xero Accounts Receivable (system) account code MUST be set to 610. This setting can be found in the Xero software under Chart of Accounts. If the account code is not set to 610 an error will occur. See Xero - Changes to Exported Data and Understanding Error Messages for more information.
- Payments that relate to multiple invoices are split and allocated to the invoice. They are not displayed as the whole payment amount as they are in Bp Allied.
Allocation of payments
As a result of sending the payments as overpayments, at the end of the payments export, the script allocates the payments sent to Xero to the Invoices in Xero. Occasionally a validation error can occur if the Invoice has already been paid, for example if a payment has been manually added to Xero for the invoice.
To send Payments:
- Open the Xero Export in Reports > Exports.
- Select Payments radio button.
- Select the From and To dates.
- Click Get Data.
- Click Export to Xero.
- Sends only payments with a XeroGUID set to 00000000-0000-0000-0000-000000000000.
- Sends Practitioner as a tracking category.
- That the payment has been transferred to Xero is noted in the log against the payment.
-
The Client ID is added to the Payment Number.
- When a payment has been successfully exported, the XeroGUID is written back into the table to stop it being exported again.
- Review the data in Xero.
Managing refunds and overpayments
Refunds will get sent to Xero when the payments get processed, however, there is some manual intervention required. There is a reminder in Bp Allied when you go to remove the Invoice from the Payment that the same action must be carried out in Xero.
If the refund is for the full amount:
- Then use the Remove & redo option needs to be used to remove the payment in Xero.
- Then re-export the payments and refunds.
If the refund is for a partial amount, i.e. the invoice has been overpaid:
- Then the overpayment will added to Xero.
- But the refund for that amount will need to be manually created in Xero.


 AU
AU 