
Cervical screening investigations are requested from the patient record like other pathology investigation requests.
However, cervical screening results must be manually added to the Cervical screening section of the patient record, rather than being allocated from the Investigation reports screen and actioned from the provider Inbox. Cervical screening requests are still listed in the Investigation requests screen.
Cervical screening results and reminders can be added outside of the patient record from the main screen of Bp Premier, Clinical > Cervical Screening.
Enhancements to include Self-collection options for Cervical Screening in Spectra SP1
Cervical screening participants now have the choice to self-collect their own Cervical Screening Test sample. Enhancements have been implemented in Bp Premier version Spectra SP1 to accommodate the recording of results from tests where the patient themselves collected sample.
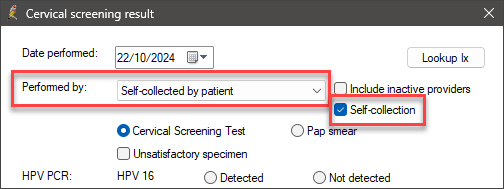
In Spectra SP1, the Cervical Screening Results screen has been enhanced to include a new check box, Self-collection, allowing clinicians to specify whether the patient has collected the sample themselves. A new option, Self-collected by patient, has been added to the Performed by field.
The recommended workflow for recording Self-collection in the Cervical Screening Results screen is as follows:
- When the sample is Self-collected without the assistance of a Clinician, set the Performed by field to Self-collected by the patient and tick the Self-collection check box.
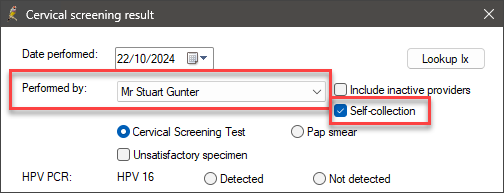
- When the sample is Self-collected with the Clinician's assistance, update the value in Performed by to the Clinician and tick the Self-collection check box.

For more information, see Self-Collection for Cervical Screening or frequently asked questions about Cervical Screening in Spectra SP1.
In this article:
Request a cervical screening investigation
Guidelines for completing a pathology request under the National Cervical Screening Program can be found on their website for Healthcare providers.
- From the patient record, select Request > Pathology. The Pathology request screen will appear.
- Select one of the cervical screening tests from the Test name list:
- Cervical Screening test
- Co-test (HPV & LBV)
- LBC only
- HPV test
NOTE Other cervical screening tests may be added through regular data updates.
- Select any Cervical screening clinical information fields that apply to the patient.
- Complete the rest of the screen as for any pathology request.
- Click Print to print the request for the patient.
Or select from Favourite tests if you have added a test to your favourites. The fields in the Cervical cytology section in the bottom right will be enabled.
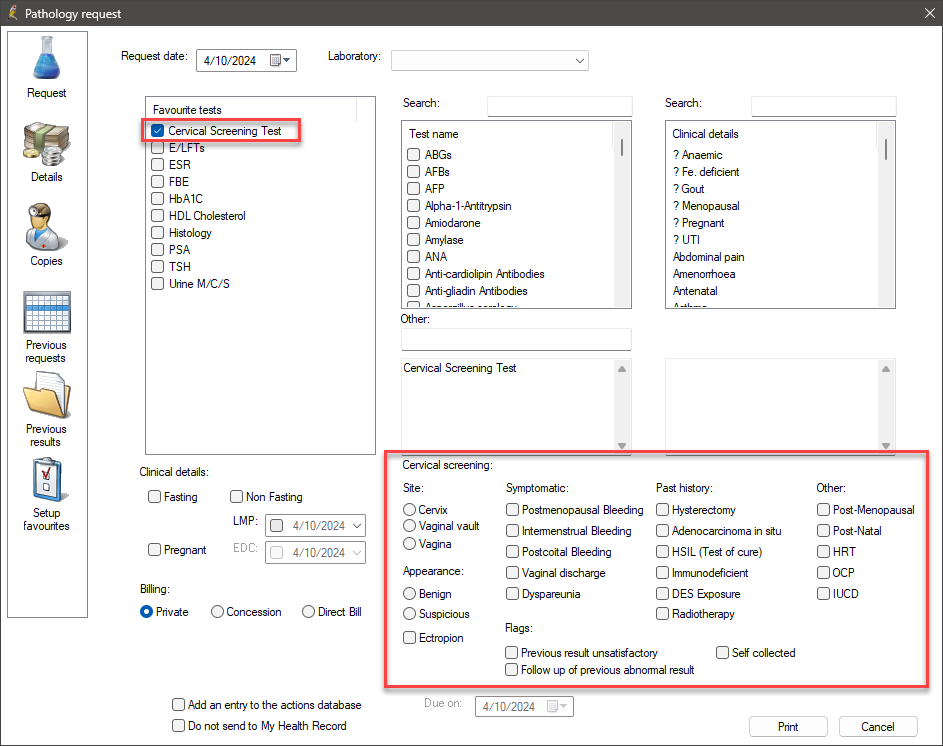
IMPORTANT If you are requesting pathology outside of a patient’s regular cervical screening schedule (for example, as part of treatment followup), you must supply additional clinical information to indicate this, or the patient may have bear the cost of the test.
Record cervical screening results
In Bp Premier version Spectra SP1, the Cervical Screening Results screen in the patient record has been enhanced to include options for recording Self-collection. For more information, see Self-Collection for Cervical Screening.
Cervical Screening results can be recorded in the following areas of Bp Premier:
- From the main screen of Bp Premier > Clinical > Cervical screening
- From the main screen of Bp Premier > View > Inbox
- From the patient record > Cervical Screening
The workflow described below outlines the steps required for recording Cervical Screening Results in the Patient record. This process remains the same regardless of whether you are recording Cervical Screening Results from the Inbox or Clinical > Cervical screening.
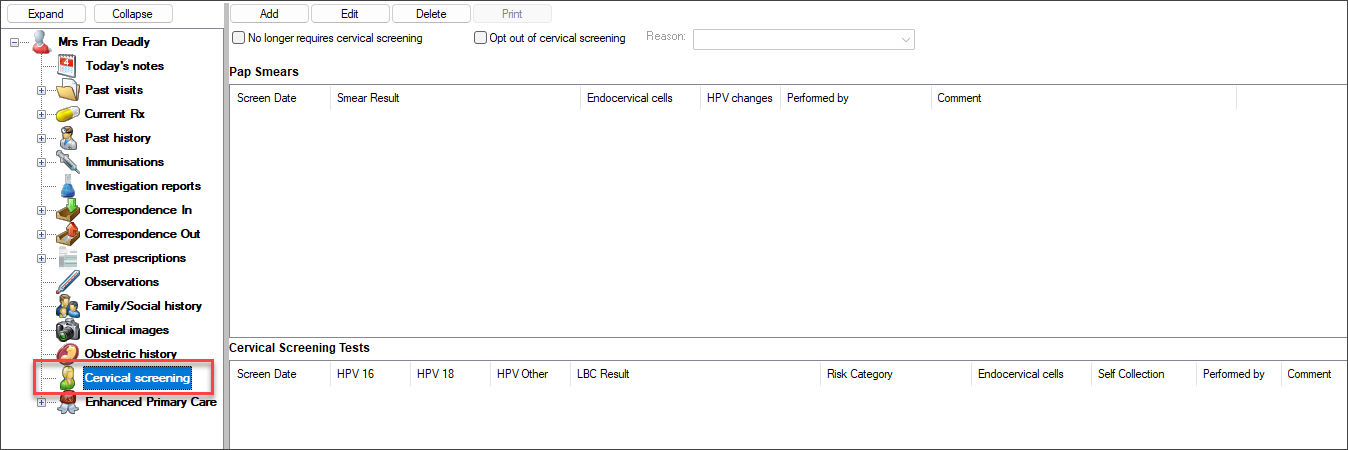
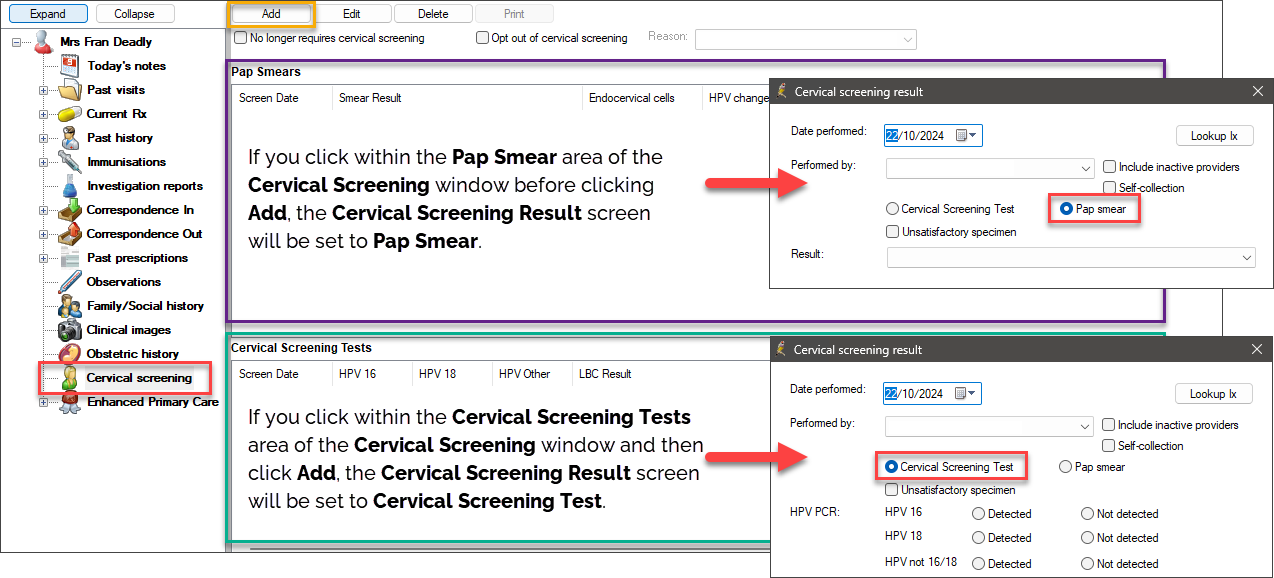
- From the patient record, select Cervical screening from the left hand tree.
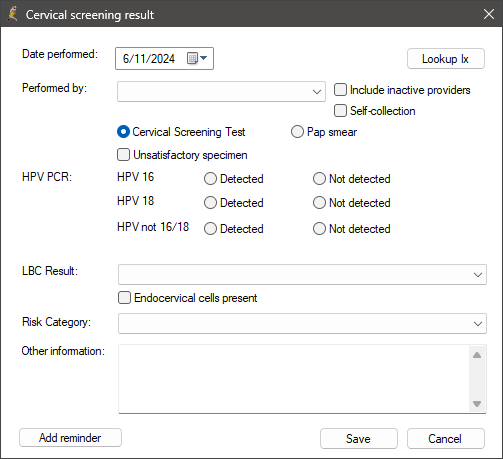
- To record cervical screening and pap smear test results, click Add. The Cervical Screening Result screen will appear.
- Record the Date performed.
- Cervical Screening Test will be selected by default; leave this selected to record results for cervical screening tests, or select Pap smear to record Pap smear test results.
- If you click within the Pap Smear area of the Cervical Screening window before clicking Add, the Cervical Screening Result screen will be set to Pap Smear.
- If you click within the Cervical Screening Tests area of the Cervical Screening window and then click Add, the Cervical Screening Result screen will be set to Cervical Screening Test.
- Complete the Performed by field:
- If the clinician collected the sample, select the Clinician from the Performed by field.
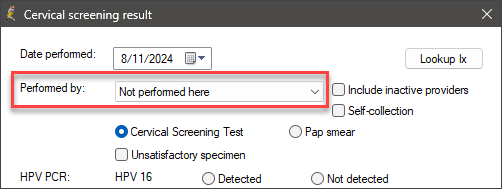
- If the test was conducted elsewhere, select Not Performed here from the Performed by field.
- In Spectra SP1, if the sample was Self-collected without the clinician's assistance, set the Performed by field to Self-collected by patient and tick the Self-collection check box.
- In Spectra SP1, if the sample was Self-collected with assistance from the clinician, update the value in Performed by to the Clinician and tick the Self-collection check box.
- Select the options that apply to the test result:
- HPV PCR
- LBC Result
- Endocervical cells present
- Risk category.
- Free-type any Other information.
- Click Add reminder to add a followup appointment reminder for the patient.
- Click Save to save the results to the Cervical screening window.
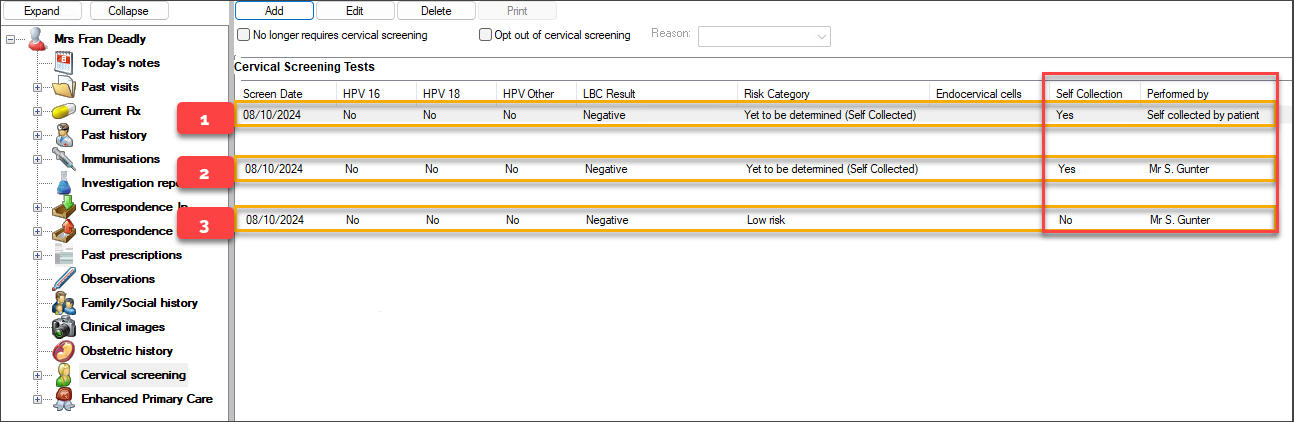
- In Spectra SP1, the Cervical Screening window has been enhanced to include a new column, Self-collection, that will display whether a cervical screening participant opted to collect their own Cervical Screening Test sample.
- Scenario 1: shows that the Cervical Screening participant has opted for Self-Collection and correctly obtained the sample independently, without any help from the clinician.
- Scenario 2: shows that the Cervical Screening participant has opted for Self-Collection; however, the sample was obtained with the clinician's assistance.
- Scenario 3: shows that the Cervical Screening participant has opted against Self-Collection, and the sample was collected by the clinician.
The Cervical Screening Result screen will automatically default to either Cervical Screening Test or Pap Smear in the following circumstances:
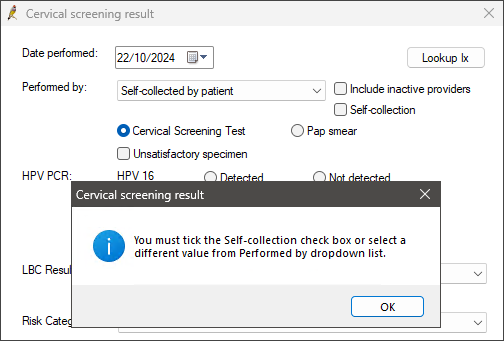
If the Performed by value is set to Self-collected by patient, and the Self-collection check box is not selected, when clicking Save on the Cervical Screening Result screen, the user will be prompted to tick the Self-collection check box or select a different value from the Performed by drop-down list.
The image below shows an example of how Cervical Screening Self-collection options are displayed in the Cervical Screening window within the patient record in Spectra SP1:
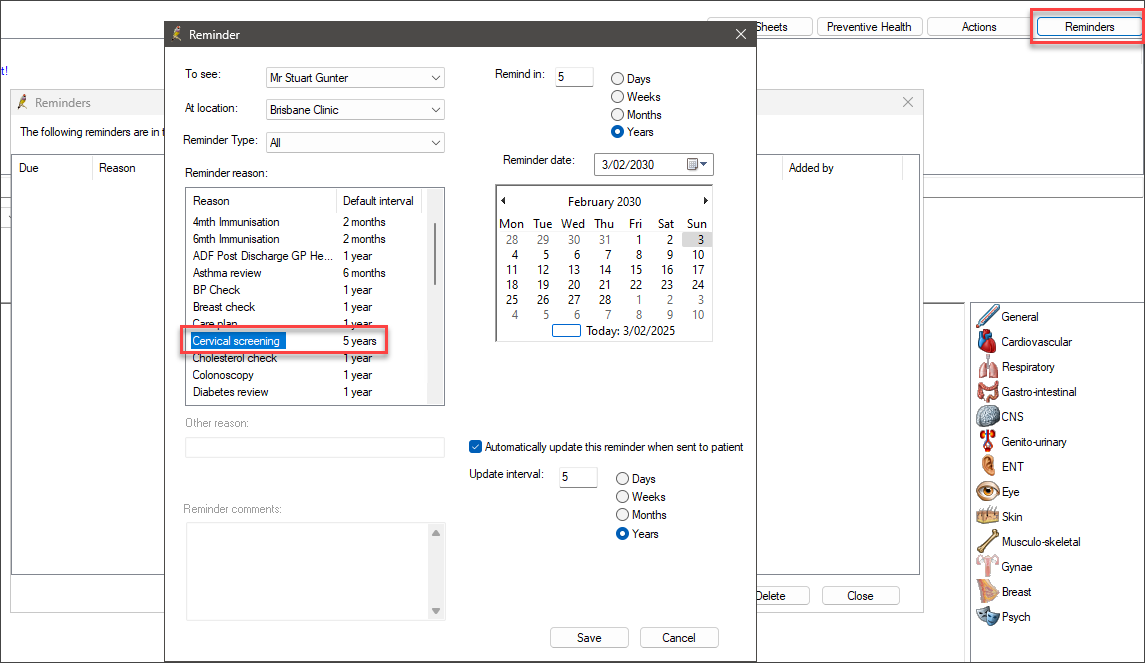
Add a cervical screen reminder to patient
The ‘Cervical screening’ reminder reason can be assigned to female patients who take part in regular cervical screening.
- From the patient record, click Reminders in the top right. The Reminders screen will appear.
- Click New. The Reminder screen will appear.
- Select 'Cervical screening' from the Reminder reason list. The date fields on the right hand side will be populated with the default values for the pap smear reminder.
- Tick Automatically update this reminder when sent to patient.
- Click Save. The reminder will be added to the patient record.
See Add a Clinical Reminder for a Patient for more information.
Opt a patient out of cervical screening
Cervical screening notifications appear in the Preventive Health Notifications list for a patient, and are enabled from the Cervical screening section of the patient record.
A patient may choose to opt out of cervical screening at your practice. For example, the patient may have reached the established exit age for the cervical screening program, have their cervical screening conducted elsewhere by a specialist, or opt out for personal reasons.
- From the patient record, select Cervical screening from the left hand tree.
- Tick No longer requires cervical screening if regular cervical screening no longer applies to this patient. Reminders will no long show in the Notifications list.
- If the patient is still eligible but is opting out of cervical screening at your practice, tick Opt out of cervical screening and select a Reason. You can also enter a free-text reason if the default reasons do not apply.

Practice staff who do not have access to the patient record can also record a patient’s opt-out. Select Clinical > Cervical Screening from the main screen, select a patient, and record the opt-out in the Cervical screening screen.
Manage cervical screening results outside of the patient record
- From the main screen, select Clinical > Cervical Screening. The Select patient screen will appear.
- Search for and select a patient and click Select. The Cervical screening screen will appear.
- Click Add to add test results. See Record cervical screening results for more information.
- Click Patient to search for another patient.

Information correct at time of publishing (31 January 2025).


 AU
AU 