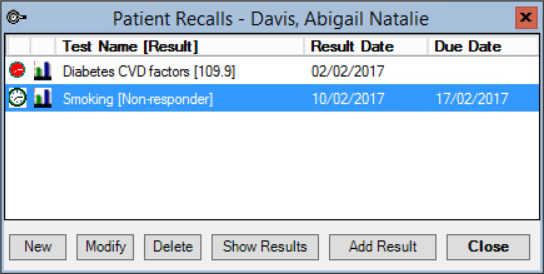
Tests with a recall cycle and ongoing results can be recorded from the Patient Recalls screen (Alt+F11).
To generate bulk SMS or mail merge patient recalls, you can run the Recalls report.
NOTE If you need to send out general patient appointment reminders rather than test recalls, use appointment reminders instead. See Send appointment reminders to multiple patients for more information.
Add a test to a patient
- Press Alt+F11 or select Medical > Monitoring/Recall to open the Patient Recalls list.
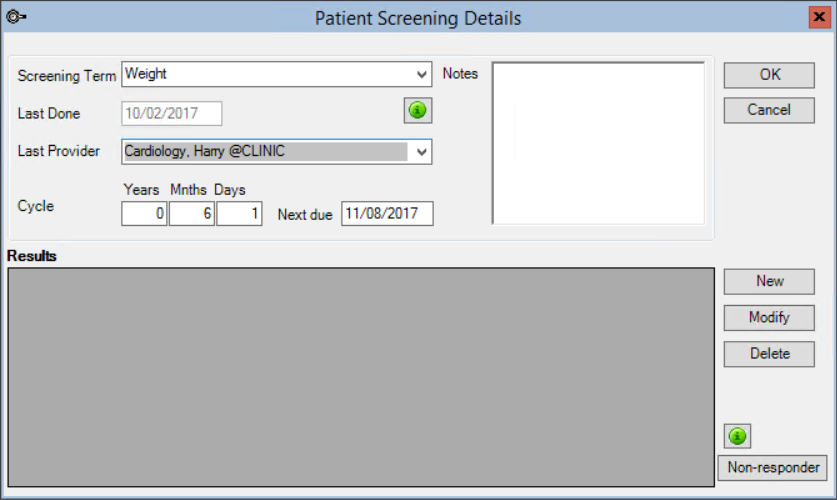
- Click New. The Patient Screening Details screen will appear.
- Select the Screening Term you are testing. You can assign only one screening term of a type to the Patient Recalls screen, and then record multiple results against that screening term.
- The Last Done field defaults to today's date after you have added the test.
- Change the Last Provider from the default value if the test was or will be administered by a different provider.
- The Cycle and Next due date will default to the cycle defined for the screening term, but can be changed.
- Enter any additional Notes about this test for the patient.
- If results exist, click New to add a result. Or click OK to save the test to the patient's Recalls list.


The Show Results button toggles between showing the most recent results for all tests and showing the test and due date.
Once the test has been saved, you cannot modify the Screening Term, Last Provider, or Cycle. If you made an incorrect selection, you must delete the test and create a new one.
Record a result for a patient test
- Press Alt+F11 or select Medical > Monitoring/Recall to open the Patient Recalls list.
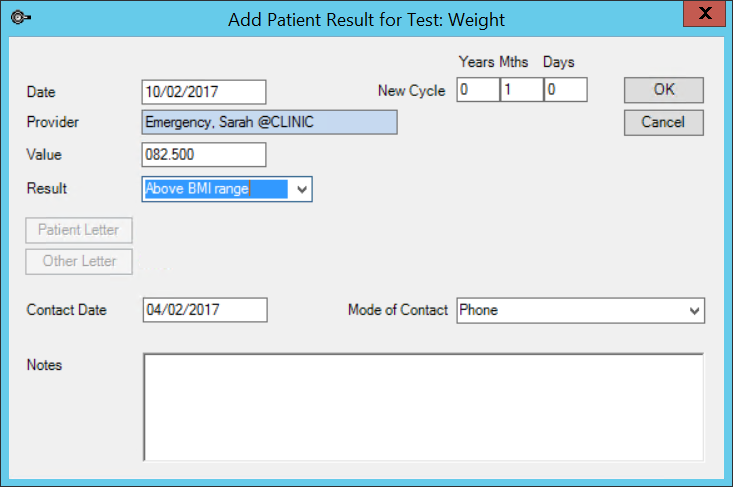
- Select the test you want to record a result for and click Add Results. The Add Patient Result for Test screen will appear.
- Change the Provider from the default if another provider obtained the result.
- Enter the result Value and select the Result.
- The Patient Letter and Other Letter templates default to the selections made from the definition of the screening test.
- If the patient has been informed of the result, indicate the Contact Date and the Mode of Contact.
- Enter any additional Notes about the result and click OK. The result will be added to the Patient Recalls screen.

Run the Recalls Report and generate recalls
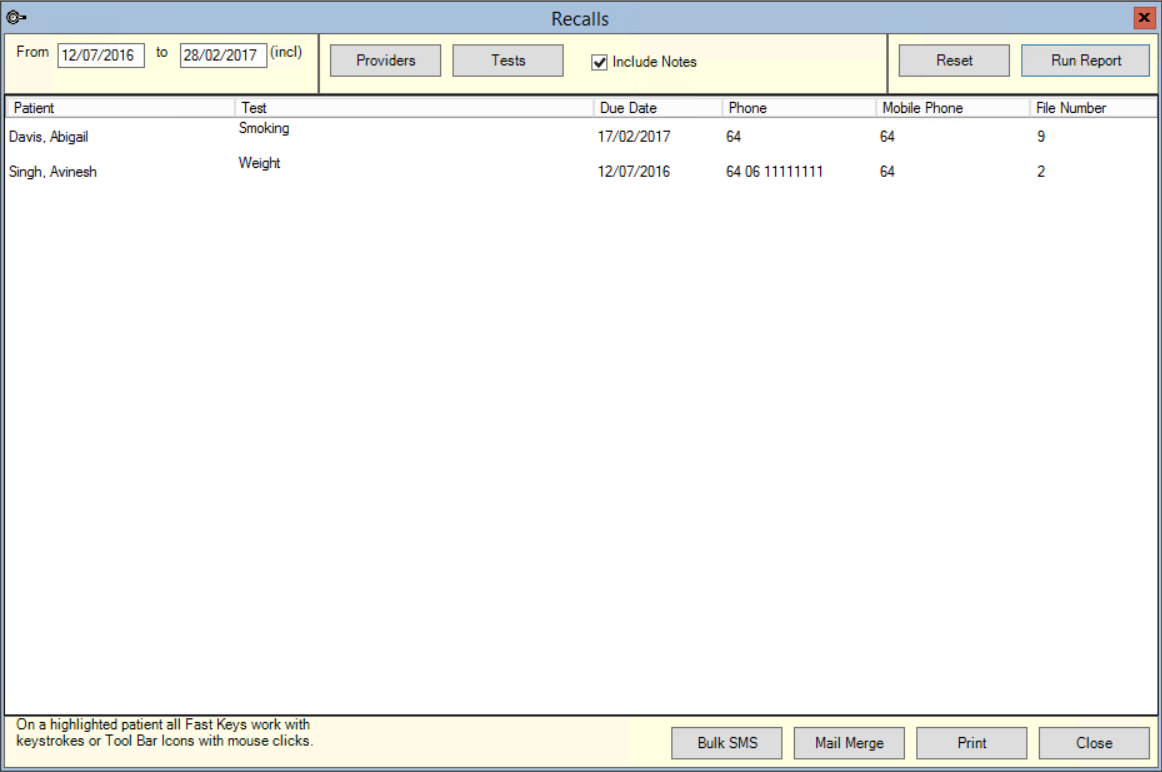
The Recalls report lists patients who have a test due date in the select time period. You can filter patients by provider and test type.
- Select Reports > Medical > Recalls. The Recalls report will appear.
- Enter From and to dates to search for due dates.
- Click Providers to filter patients by provider. Click Tests to filter by screening test type.
- Tick Include Notes to include Notes from the Patient Screening Details screen for a test.
- Click Run Report to generate the list.

Send Recalls by SMS
You need to set up an SMS messaging provider to send bulk SMS recalls.
- Click Bulk SMS. The Send TXT Messages screen will appear.
- Patients from the recall list will be loaded into the list of patients to send. To add additional patients to the send list:
- Type a name to search for in the Enter Search field and press Enter. The Search screen will be displayed for you to search for and add patients.
- Type a mobile phone number directly into the Enter Search field and press Enter. The number will be added to the send list.
- Start typing the Autotext entry you want to use as the recall message into the Choose/Enter Message field. The Search screen will appear. Select an autotext from the list and click OK.
- Change the Date/Time to Send Message if you want the message to be sent at a future time.
- Click Send.
If you don't want to use an autotext, enter the message text into the text box below. Click Insert Field to insert lookup fields into the message.
TIP Remember to consider items like patient and provider name length when creating a message under 160 characters.
Send Recalls by Mail Merge
- Click Mail Merge. MyComms will be loaded at the Maintain Templates screen.
- Select the recall letter template to use from the left hand list and click Select. The template will be loaded.
- The Letter Details screen will appear to prompt for the Name and Date of letter to store in the patient record. Click OK.
- Depending on the selected template, Bp VIP.net may prompt for other information to complete the template, or ask you to confirm the recipients for the letter.
- The word processor will show the completed template, ready to edit or print.
- Make any final changes to the letter and click Print to print a mail merged letter for all patients shown in the Recalls report.
Add the Recall List to a Medical Desktop
You can add the Recall List preset field to a Medical Desktop UDF, if you need to monitor screening tests and add results from the patient record as well as the Recalls screen.
- Select Setup > User-Defined Forms. Select the Medical Desktop UDF to modify and click Modify.
- Click
 on the left side of the Form Designer toolbar. The Insert Preset Field screen will appear.
 - Select Monitoring and Recalls > Recall List and click Insert. The field will be added to the UDF.
- Save the UDF and refresh the Medical Desktop to test your changes.
The Recall List field lists all of the recall tests assigned to the patient. Click on a test to add or modify a result for that test. You can only add a recall to a patient from the Recalls (Alt+F11) screen.
Related topics
Last modified: July 2020