Staging is the process of moving a patient through arrival, consultation, and billing, as well as any other stages that your practice requires. Staging allows you to monitor who has arrived and is waiting, and which appointments are ready to be ended.
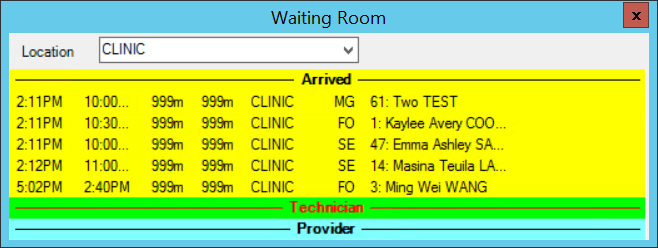
The Waiting Room component of the appointment book shows all patients who have been arrived by staff and who have not had their appointment ended.
Set up staging for your practice
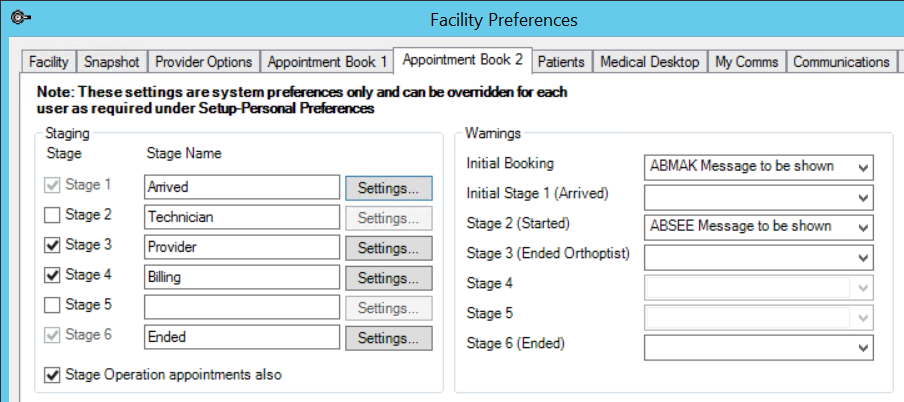
- Select Setup > Facility Preferences > General Preferences. Select the Appointment Book 2 tab.
- Tick the stages you want included in the Waiting Room. The first and last stage must always be present, although you can supply a Stage Name other than 'Arrived' and 'Ended'.
- Tick Stage Operation appointments also if you want patients who arrive for operations to also appear in the Waiting Room.
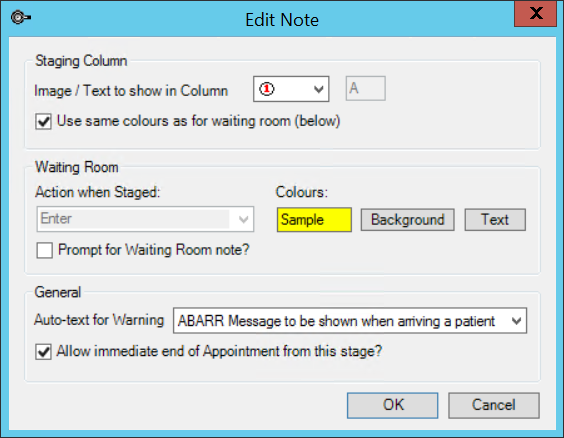
- Click Settings next to the first stage you are using. The Edit Note screen appears.
- Select the Image / Text to show in Column. The icon or letter you select will appear in the S column of the appointment book, showing which stage the patient is at.
- Tick Use same colours as for waiting room to show the staging icon in the same colours you select in step 8.
- Select the action to take when a patient is moved into this stage: No action, Enter the patient into the Waiting Room, or Leave the patient from the Waiting Room. The final stage should be set to 'Leave'.
- Do not select any Auto-text for Warning here. You will nominate a warning autotext for stages in step 12.
- Tick Allow immediate end of Appointment from this stage? to allow operators to end appointments other than at the final stage.
- Click OK to save the settings for this stage.
- Repeat steps 4 to 10 for each stage that your practice will use.
- In the Warnings section of the Appointment Book 2 tab, specify a warning for each stage populated by an autotext. . For example, you could display an autotext that shows the referring doctor when making a booking, or if the patient has an outstanding balance owed when arrived.
- Click OK to save staging settings. The Waiting Room will be updated.


TIP Best Practice Software recommend ticking this option for all stages. This helps prevent unended appointments from remaining in the appointment book.
Move patients through the Waiting Room
Press Ctrl+W from the appointment book to open the Waiting Room, which will appear by default in the top right corner.

Select a Location to see only the patients who have been arrived at that location. By default, the Waiting Room will show all patients at all locations.
The following keyboard shortcuts will move a patient through the Waiting Room when their appointment is selected:
|
Shortcut |
Action |
|---|---|
|
Ctrl+A |
Arrives a patient, or unarrives an arrived patient. |
|
Ctrl+S |
Moves a patient to the next stage. |
|
Ctrl+Backspace |
Moves a patient to the previous stage. |
|
Ctrl+E |
Ends the appointment. |
You can also select a patient in the Waiting Room and click and drag to move a patient between stages.
Related topics
Last modified: July 2020