Setting up the appointment book for use requires setting up appointment book pages, rosters, booking types, and workflow defaults.
To successfully use the appointment book of Bp VIP.net, you need to set up several components:
- Create appointment book pages
- Set up provider locations, if your facility has multiple practices or rooms from which a provider consults. See Set a provider's appointment book location for more information.
- Add booking types for your practice
- Set waiting room staging defaults for your practice.
- Create rosters (only if your practice uses a rostering system for shifts)
- Create page-owner groups (optional).
You can also set up staging, which allows you to monitor patient movement through the process of arrival, consultation, and billing.
What is an appointment book page?
The appointment book is made up of pages of bookable appointment slots. Each page is 'owned' by a provider, a Bp VIP.net operator, or is a custom page:
- Provider pages show only the appointments booked for the page-owner.
- Operator pages are for Bp VIP.net users at your practice who do not have a provider record e.g., a nurse.
- A custom page is independent of both providers and operators. For example, your practice might have a general examination room which is used by all providers and is bookable by all operators.
How does the appointment book default which provider should be charged?
When making notes or charging from the appointment book, Bp VIP.net will default to a provider based on configuration settings:
- If you are charging from a provider page, Bp VIP.net will always default to the page-owner.
- If you are charging from a custom page, Bp VIP.net will default to the Link to Provider field set for the appointment type.
- If there is no linked provider for the appointment type, Bp VIP.net will default to the Provider specified for the logged-in user in the Setup Users screen.
- If you are charging from anywhere in Bp VIP.net other than the appointment book (for example, pressing F5 to open the Consultation screen), Bp VIP.net will default to the patient's Primary Provider in the Patient Details screen.
Create an appointment book page
- Select Setup > Appointment Book > Page-Owners. The Maintain Page-Owners screen will appear.
- Click New. Bp VIP.net will prompt for the type of page-owner. Select Provider, Operator, or Custom and click Ok. The Details tab will appear with the Provider or Operator's Name filled in, or the name of the page.
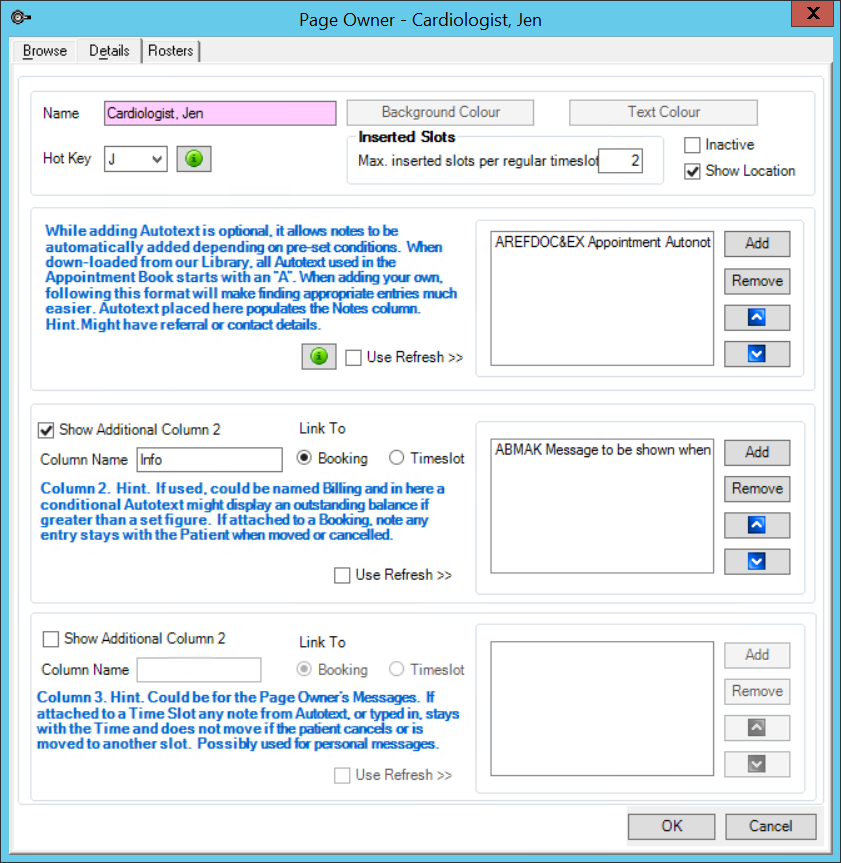
- Select a Hot Key to quickly switch to this page from the appointment book .
- Select a Background Colour and Text Colour to identify the page in the appointment book.
- The Max. inserted slots... field indicates the maximum number of new slots that can be inserted after an existing slot.
- Tick Show Location to display the page-owner's main Location along with their name in the list of tabs along the bottom of the appointment book.
- The first column is always called 'Notes'. Click Add in the first column panel to open the Choose Autotext popup. Select an autotext value to populate the Notes column and click OK.
- Tick Use Refresh to automatically update autotext values in this column while this page is being viewed.
- Tick Show Additional Column 2 to add a second column to the page. Enter a Column Name.
- Select whether the column is linked to a Booking or the Timeslot.
- Repeat to show a third column in this page.
- Click OK to save the page for display in the appointment book.
Add columns to the page
Page-owners can add up to three additional columns populated by autotext values. For example, you could add a column that shows the referring doctor for booked patients.
NOTE Depending on the complexity of the autotext, automatic refresh may impose a slight performance impact when viewing the appointment book.
Disable a page
Tick Inactive to remove a page from the appointment book but keep the record.
Create a roster for a page-owner
- Select Setup > Appointment Book > Page-Owners.
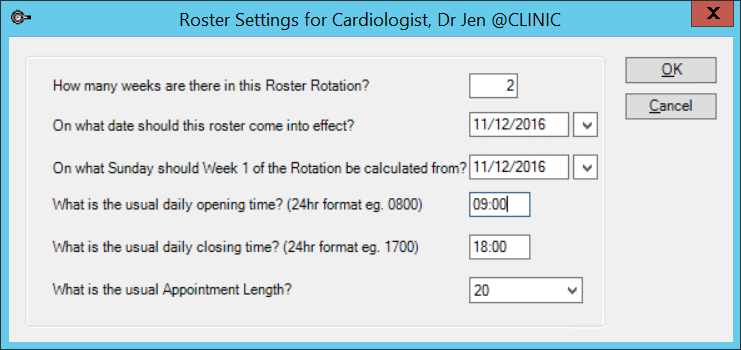
- Select the page-owner to create a roster for. Select the Rosters tab and click New. The Roster Settings popup will appear.
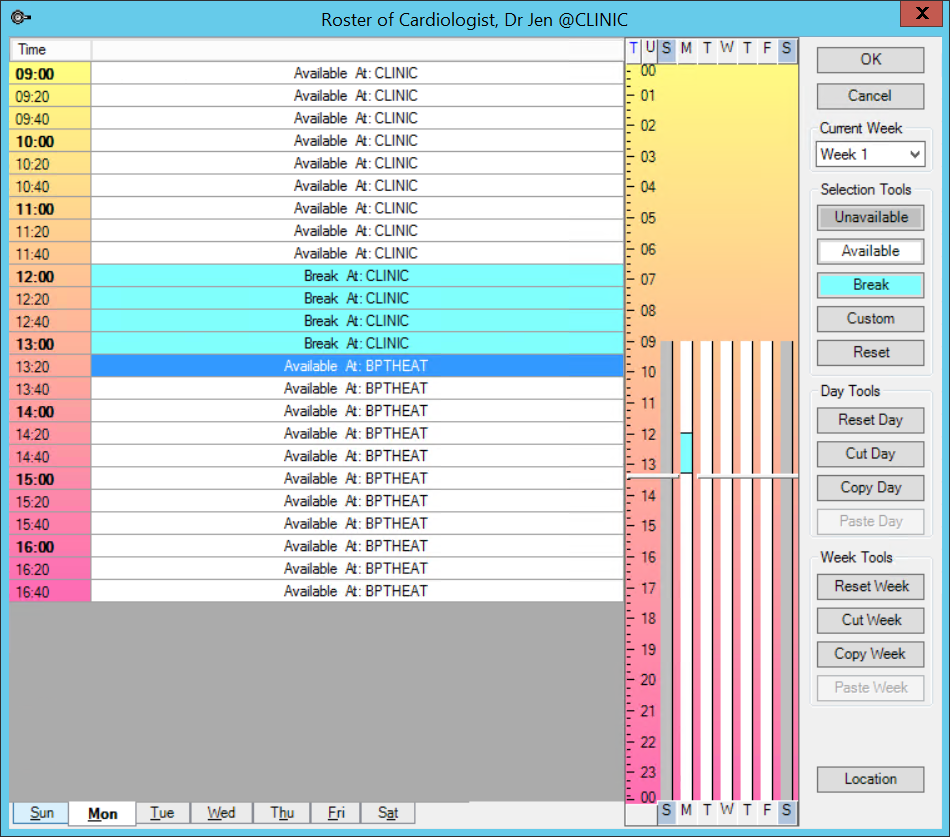
- Complete the roster details for the page-owner and click OK. The Roster screen will appear, similar to how the roster will look from the appointment book.
- Select the Current Week at top right to set roster times for, if the roster cycle has more than one week.
- Select the Day from the tabs along the bottom that you want to set roster times for.
- Use Ctrl+click or Shift+click to select blocks of appointment slots. Select the appointment type to apply to the block of slots from the Selection Tools panel. To apply a user-defined appointment type, click Custom to open the Modify Shift popup.
- Select the Appointment Type and Located at for this block of slots from the Modify Shift screen and click OK.
- If the page-owner has a regular daily schedule, use the Copy Day and Paste Day buttons in the Day Tools panel to copy rostered days.
- Use the Copy Week and Paste Week buttons in the Week Tools panel to copy whole rostered weeks, if the roster cycle has more than one week.
- Click Ok to save the roster for the page-owner.
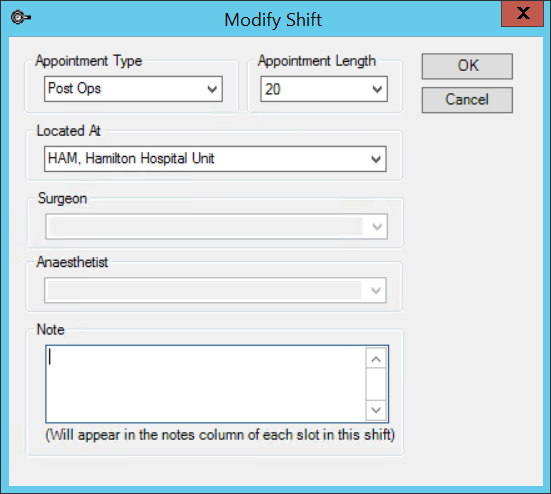
If you do not select a Location here, Bp VIP.net will default to the provider's Unit in Provider Details.
In the example screen shot in step 3, there is a break from 12:00 to 13:00, and Jen Cardiologist relocates to the Best Practice Theatre (BPTHEAT) from 13:00 to 17:00.
Create a page-owner group
You can group page-owners and filter the appointment book to show only members of a specific page-owner group. For example, you could group all cardiologist page-owners into a single 'Cardiology appointments' group.
- Select Setup > Appointment Book > Page-Owner Group.
- Click New. The Details tab will appear.
- Enter a Name for the group and select a Hot Key for the appointment book to switch between groups.
- Click Add and Remove to add and remove page-owners from the group.
- Click OK to save the group.
Deactivate a group at any time by ticking Inactive. Disabling a page-owner group will not affect individual page-owners.
Add a booking type
Bp VIP.net is installed with several system booking types, but you may want to add additional types to reflect the different kinds of consultations available at your practice. You can only modify the background and text colour for the system types installed with Bp VIP.net.
- Select Setup > Appointment Book > Booking types from the menu. The Appointment Types screen appears.
- Click New, or select an existing type and click Modify. The Details tab will appear.
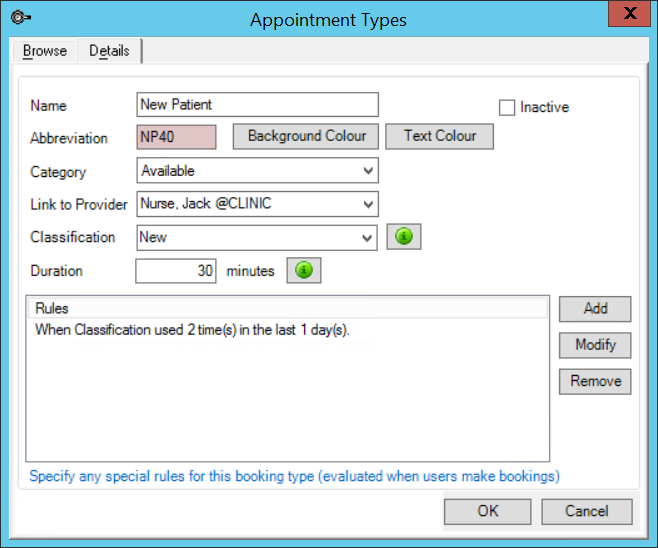
- Complete the fields in the tab:
- 'Available' for normal consultation types
- 'Unavailable' for breaks, leave, and absences
- 'Operations' for all booked operations.
- Click Add to add a booking rule for this appointment from the list of default rules. For example, you could limit the number of appointments of a type or classification booked in one day, or prevent the appointment type from being changed in the appointment book.
- Click Ok to save the appointment type.
|
Field |
Description |
|---|---|
|
Name |
Full descriptive name of the appointment type. |
|
Inactive |
Tick this checkbox to disable the appointment type, removing it for selection from menus. |
|
Abbreviation |
Abbreviation shown in screens and the appointment book. |
|
Background Colour / Text Colour |
Determines how slots of this type will appear in the appointment book. Use background colours to differentiate visually between different appointment types. For example, a background colour should make it quickly obvious to an operator if a slot is an operation type, a regular consult type, or a provider is on a break. The Background Colour and Text Colour should have high contrast to ensure the appointment book is readable by operators. Use light colour text against dark colour backgrounds or the reverse. |
|
Category |
Select: |
|
Link to Provider |
Default to this provider when making notes or charging from this appointment type in the appointment book. |
|
Classification |
User-defined category for the type. You can use the classification to create rules for bookings. In the example screen above, the type 'New Patient' has a rule that appointment types of the Classification 'New' cannot be used more than twice in 24 hours. Bp VIP.net will alert a user that two New Patient appointments have already been booked for a day if a third booking is attempted. |
|
Duration |
Default booking duration for the type. This value overrides the Usual appointment length field set in the Facility Preferences screen. NOTE Best Practice Software recommend that appointment type durations should be a multiple of the usual appointment length value. For example, if the default practice length is ten minutes, default durations for any appointment type should be 10, 20, 30, 40, 50, or 60 minutes. This avoids overlapping appointments of different types in the appointment book. |
Set appointment book defaults
The Facility Preferences screen contains two tabs for setting appointment book workflow defaults. A Bp VIP.net administrator can adjust the settings to suit your practice. The settings in this screen are system-wide and apply to all users.
- Select Setup > Facility Preferences > General Preferences. The Facility Preferences screen will appear.
- Select the Appointment Book 1 tab and change any fields. See Set practice preferences for more information.
- Select the Appointment Book 2 tab. Complete the following fields:
- Usual opening time
- Usual closing time
- Usual appointment length.
- See Staging and the Waiting Room for more information on the Staging and Warnings fields.
- Click OK to save settings.
What do I do next?
Last modified: July 2020