The Waiting List is a queue for organising patients who can be rescheduled if appointments are cancelled. The Waiting List can also be used by clinicians to nominate patients who require surgery, but leave the details of appointment booking to front desk staff.
How do I open the Waiting List?
Each appointment book page owner has a separate waiting list, found within the Monthly Planner (press Ctrl+M from the appointment book).
TIP You can also add a patient to a waiting list without specifying a provider. The patient will appear on all page-owners' waiting lists. You can use this where a patient needs to see a doctor urgently and do not care which doctor.
The Waiting List is different to the Waiting Room, which is used to arrive and stage patients through your consultation and payment process.
Do I need all of a patient's details?
When adding an item to the Waiting List, you can choose to add as much or as little information about the future booking as required. For example, front desk staff may not have the immediate time to enter all the details, so might create a Waiting List entry with just the patient's name to be completed later, or when more information has been obtained from the doctor. Bp VIP.net will prompt you if you want to add a Waiting List entry with incomplete information.
Wait a patient from the Appointment Book
- Right-click on the patient's name in the appointment book. Go to Booking and select one of the two options:
- Add to Waiting List — Creates an entry in the Waiting List but keeps the original booking in the appointment book.
- Move to Waiting List — Creates an entry in the Waiting List and deletes the original booking. All booking details are stored in the entry in the Waiting List and will be transferred to the new appointment when the patient is rescheduled.
- If you selected Move to Waiting List, Bp VIP.net will prompt to confirm that you want the original booking deleted. Click Yes. The patient's appointment history will show the appointment as 'Rescheduled'.
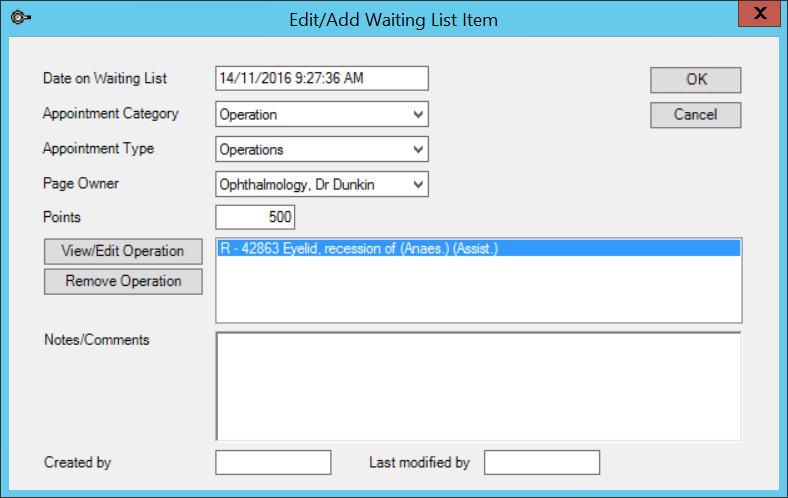
- The Edit/Add Waiting List Item screen appears.
- Change the Appointment Category, Appointment Type, and Page Owner from the default if necessary.
- Enter a Points value if your practice uses points to prioritise the waiting list.
- For operation-type appointments, any operation details in the original appointment will be carried over to the waiting list. Otherwise, click Choose/Add Operation and select the operation the patient is waiting on.
- Add any additional notes.
- Click OK to add the patient to the Waiting List. Press Ctrl+M to open the monthly planner and view the waiting list.

Wait a patient from Medical Desktop
- From Medical Desktop, click Operations or press Ctrl+F9 to open the Operations screen.
- If you do not need to change operation details, select the unplanned operation that the patient requires and click Add to Waiting List.
- Click OK to add the patient to the waiting room. Administration staff will schedule the operation.
If you need to edit operation details, modify the selected operation and click Go to Waiting List. The Edit/Add Waiting List Item screen appears.
Wait a patient from Monthly Planner
- From the appointment book, press Ctrl+M to open the monthly planner. The Waiting List is the list on the right hand side.
- Use the Add, Edit, Delete, and Filters buttons at the top of the list to add and edit Waiting List entries. Click Add to search for a patient. Click Filters to change which appointment types and priorities are shown.
Create new appointment from Waiting List
- Open the Monthly Planner (Ctrl+M) from the appointment book.
- Find an available appointment slot you want to use that is of sufficient length for the appointment or operation type.
- Click the patient in the Waiting List you want to book and drag the patient's name from the Waiting List to the slot on the monthly planer.
- Bp VIP.net will display a warning if the booking criteria from the Waiting List does not match the available appointment. Click Yes to continue.
Related topics
Last modified: July 2020