Any provider or staff member who will be logging into Bp VIP.net to book appointments, bill patients, or take medical notes requires a user account.
How access permissions to users are granted
Users are grouped into Security Groups. Access to functionality in Bp VIP.net is controlled at the security group and the user level:
- The security group determines the screens and menu items that are made visible to group members, and whether group members can view other groups' financial data.
- The user account determines whether the user can view, modify, delete, and add new records from the records granted access by the security group.
For example, if your practice comprises a number of different specialties, you could create a series of user groups such as Cardiology, Dermatology, and Endocrinology, and an Administration group for non-clinical staff. You might remove the Medical Desktop menu item and screens for the 'Administration' security group, who will never need to record clinical data. A nurse may be able to view some clinical data, but not edit any records.
Clinical record edit limits
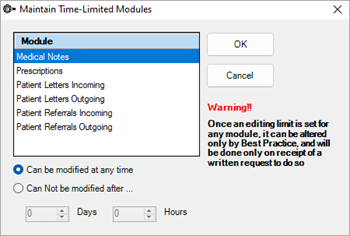
A Bp VIP.net administrator can also set the edit time limits for patient notes, prescriptions, and letters. Edit limits determine the period of time, after being printed or recorded, that an item can be modified before being permanently locked for editing to preserve data integrity.
Add a new security group
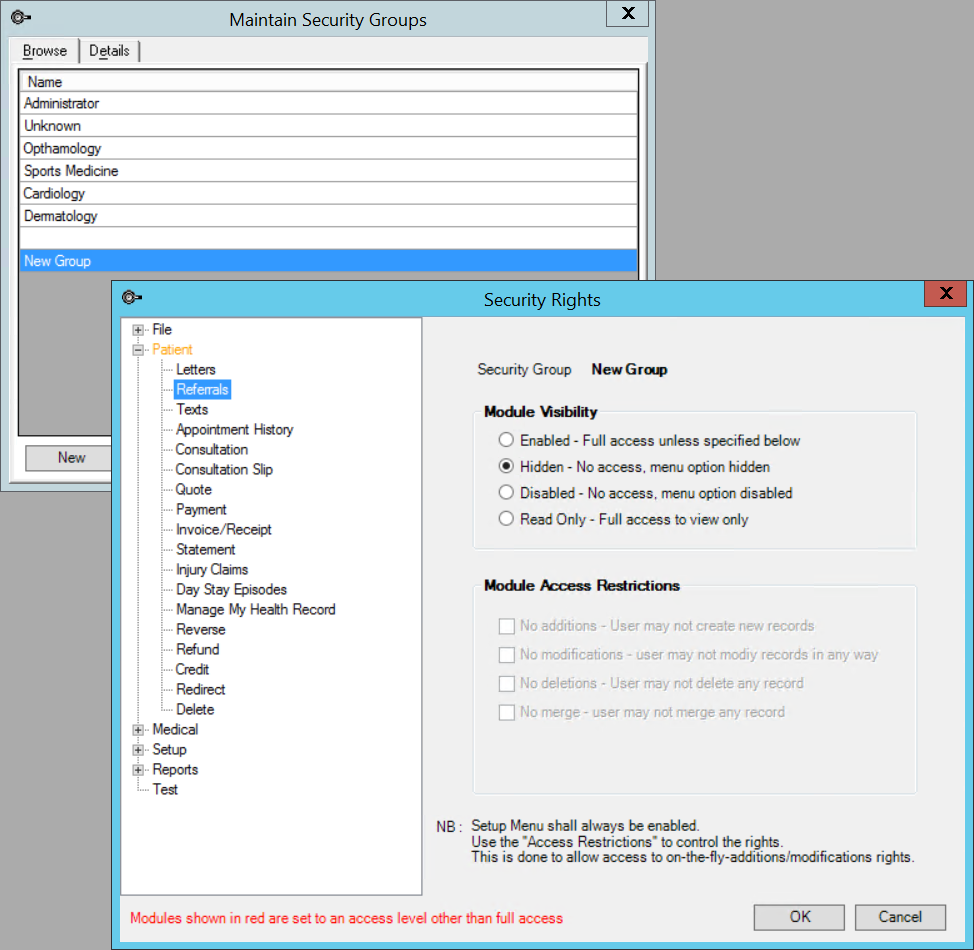
- Select Setup > Security > Maintain Groups. The Maintain Security Groups screen will appear.
- Click New. The Details tab will appear.
- Enter a descriptive Group Name and describe the group in Comments.
- Tick Only show financial data for other providers in this group if you do not want members of other security groups to be able to view billing and financial data for this group in reports and screens. See Provider confidentiality for more information.
- Click Access Rights. The Security Rights screen will appear.
- For each functional area that you want to limit for this user, select the function from the tree and choose the level of Module Visibility: Read Only, Disabled, Hidden, or Enabled.
- Click Ok to save the security group.

The tree on the left hand side lists all of the functional areas in Bp VIP.net, organised by menu.
Add a new user
- Select Setup > Security > Maintain Users. The Setup Users screen will appear.
- Click New. Complete the fields in the Details tab and set an initial password for the user.
- If the user is a nurse or reception staff member that regularly makes notes or bills for a single provider, select the Provider. When the user charges from a custom page, the provider to charge against will default to this value.
- If the user is a provider, enter their HPI-I Number if the provider uses online services.
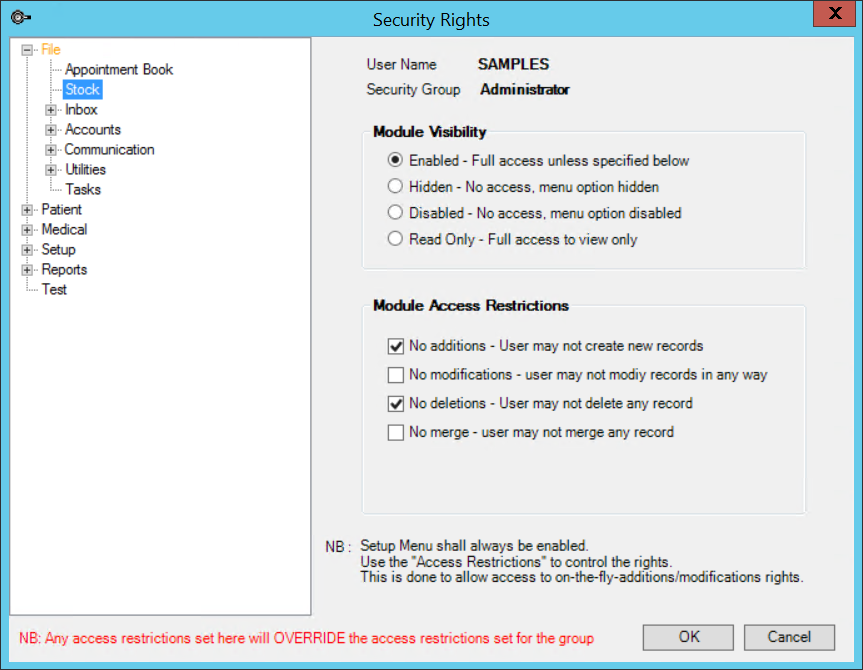
- If you want to fine-tune the level of access this user has to the VIP functionality available to the selected Security Group, click Access Rights. The Security Rights screen will appear.
- Select the VIP function from the tree. For functions that are set to Enabled, select the level of editing access the user has: create new records, modify records, delete records, and merge records. In the example above, this user may not create new records or delete any records from the Maintain Stock screen, but they can merge stock records and modify existing records.
- Click Ok to save the access rights and OK again to save the user record.
TIP For a first-time installation, Best Practice Software will set the username and password for all users to their initials as indicated in the returned deployment forms. Users can change their own passwords after logging in for the first time.

Deactivate a user
- Select Setup > Security > Maintain Users. The Setup Users screen will appear.
- Select the user you want to deactivate and click the Details tab.
- Tick the Inactive checkbox. The user will no be able to log in, or appear in screen lists by default.
Change a user's password
Administrators can change a user's password at any time from the user's Details tab in the Setup Users screen.
To change your own password:
- Select Setup > Personal Preferences. The Personal Preferences screen will appear.
- Click Change Password.
- Enter and confirm the new password and click OK.
Set editing time limits for patient records
IMPORTANT Editing limits are permanent once changed from the default. If you set an editing limit for any module, only Best Practice Software Specialist Product Support can change it again.
- Select Setup > Security > Maintain Editing Limits. The Maintain Time-Limited Modules screen will appear.
- Select the module you want to set an edit limit for.
- Select Can not be modified after... and specify a time in Days and Hours.
- Click OK.

Related topics
Last modified: July 2020