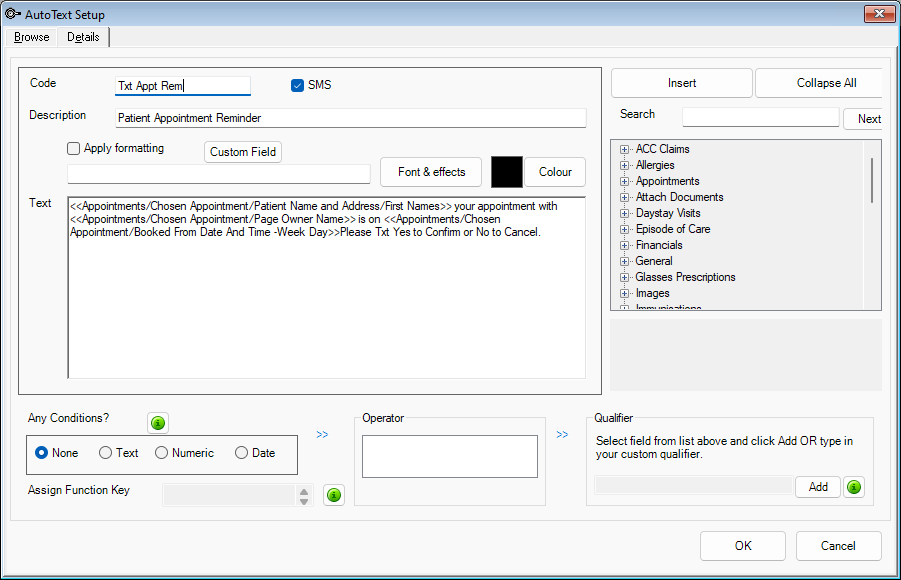
Autotext entries allow you to create snippets of text populated with values from the Bp VIP.net database. For example, a text message appointment reminder sent to a patient might pull the patient's name, next appointment date, and booked provider from the database:
<<Appointments/Next Appointment/Patient Name and Address/First Name>>, your appointment with <<Appointments/Chosen Appointment/Page Owner Name>> is on <<Appointments/Chosen Appointment/Booked From Date And Time -Week Day>>. Please Txt Yes to Confirm or No to Cancel.
<< >> indicates a lookup field to insert in the message. Autotext lookup fields are the same as template lookup fields. You can also insert a custom or smart field that prompts the user for information when the autotext is 'called', and insert conditional text; for example, include a patient balance only if the patient owes money to the practice.
Where can you use Autotexts?
Autotexts can usually be selected in Bp VIP.net where a text alert or message is displayed to the user or sent to a patient, such as:
- In warnings that can appear when staging patients through your practice.
- Patient appointment reminders by SMS message
- Patient appointment delay notifications by SMS message
- The Warning field of the information bar.
NOTE Australian practices can create SMS autotexts. New Zealand users must use the SMS autotext templates supplied by Best Practice Software via the Live Update import. See the Knowledge Base article Bp SMS Autotext (NZ) for more details.
Import Autotext definitions through VIP Live Update
Bp VIP.net is installed with a set of Autotext templates ready to use. You can modify the existing templates, or create your own. You can also import Autotext templates from Bp VIP.net's online library, which is updated regularly by Best Practice Software.
To import Autotext entries from the Best Practice Software library:
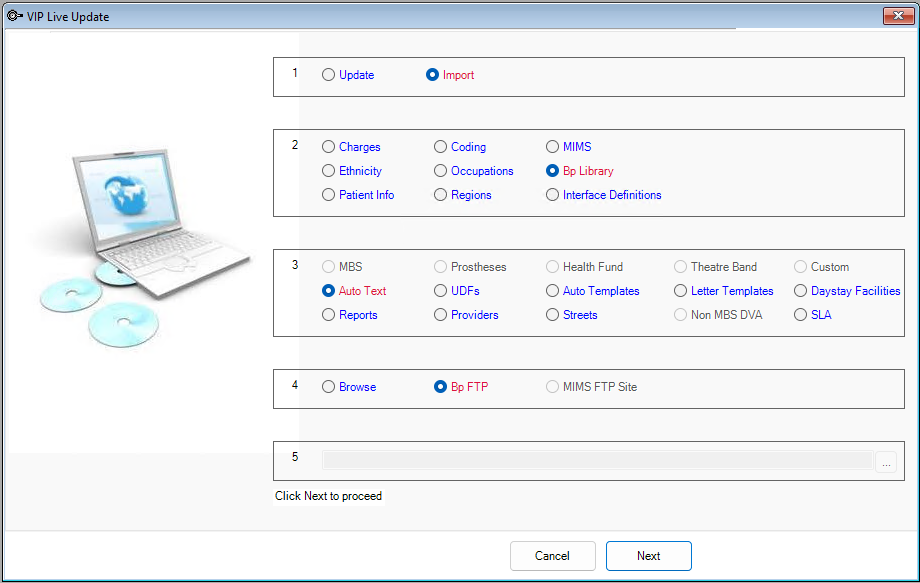
- Select File > Utilities > Live Update. The VIP Live Update screen will appear.
- Select the following fields:
- Section 1 — Import.
- Section 2 — Bp Library.
- Section 3 — Auto Text.
- Section 4 — Bp FTP.
- Click Next. You will be prompted to select one or more folders to import.
- Choose folders to import and click OK. Autotext templates can be viewed from Setup > Autotexts.

Create an Autotext
- Select Setup > Autotext. The AutoText Setup screen is displayed.
- Enter a short Code for the Autotext for use in Bp VIP.net screens.
- Enter a meaningful Description for the autotext.
- Select the SMS check-box if the autotext is to be used for SMS messaging. For New Zealand users, this field is disabled. See the Knowledge Base article Bp SMS Autotext (NZ) for more details.
- Tick Apply formatting if you want to apply font and colour formatting to the autotext (formatting might be ignored, depending on the medium, such as a text message).
- Click Font&Effects to modify the font size and appearance, and click Colour to change the text colour.
- Type the body of the message in the Text box.
- Position the cursor where you want to insert the first field. Browse the tree of fields on the right hand side by clicking the + symbol until you find the field you want.
- When you have found the field you are looking for, select the field in the tree and click Insert, or double-click the field. The field will be inserted at the cursor.
- Repeat steps 7—8 for each field you want to insert into the message.
- Assign a Function Key to the autotext if you need. Click the i information icon next to the field to see how to enter function key combinations.
- Click OK to save the autotext.

TIP Best Practice Software recommend adopting a naming convention for your practice's autotexts, so your users can quickly identify the right autotext to use. You could create 'dummy' entries with codes such as 'AAA' or 'TXT' to separate appointment book autotexts or text message autotexts, for example. Best Practice Software recommend prefixing all appointment book autotext codes with 'AB' for easy identification.
NOTE Only autotext entries with the SMS checkbox enabled will display in the selection of available autotexts when sending SMS messages in Australia.
Apply formatting to text
To only change the appearance of part of the autotext, click and drag the mouse to select text, and then click Font&Effects or Colour to apply the change to the selected text.
Insert fields from the database
To search for a field by name, enter the name you want to insert into the Search field, and click Next. The focus will shift to the field if found.
TIP For SMS autotexts, consider the length of the data that could be populated in each field to ensure that the 160-character limit is not exceeded. For example, a doctor or patient may have a long name, or an appointment type might occupy several characters. Your practice name is added to all messages. To avoid excess charges, limit total message size, including the practice name, to 140 characters.
Apply a condition to an Autotext
An autotext with a condition applied will only display the text in the autotext if the field meets the condition criteria. You can only apply a condition to one lookup field in an autotext. A condition is indicated in an autotext by the '[C[' and ']C]' start and end characters.
Examples
For a text field , you could compare the autotext field to another field to see if they are exactly the same (exactly equal to), if the first field comes before the second field alphabetically (alphabetically before), or if the first field contains the entire second field (contain).
For a numeric field, you can check if the autotext field is equal to, greater than, or less than the second field.
If you were testing to see if a patient owes the practice money, you could test that the numeric field <<Statement/Statement Debtor/Account Details/Account Balance - CURRENT>> is greater than the user-defined qualifier '0'.
If you were testing to see if the patient's next appointment is after the expiral of their referral, you could test that the date field <<Appointments/Next Appointment/Booked To Date & Time>> is after the date field <<Referrals/Last Incoming/Expiry Date>>.
Create a conditioned autotext
- Create an autotext as normal.
- Wrap the text with the characters '[C[' and ']C]', as shown in the example below. The field that you are testing against a condition must be within these characters.
- In the Any Conditions panel, select the condition required for the selected field type:
- None — No quantifier to compare against.
- Text — Compares the result of a text field with user-defined text or another text field.
- Numeric — Compares the result of a numeric field with a user-defined number or another number field.
- Date — Compares a date field with a user-defined date or another date field.
- Select the Operator. The operator will depend on the condition type you selected in step 3.
- Select or enter the Qualifier to compare against the autotext field. Enter a value to compare against in the field, or select a lookup field of the same type and click Add.
- Click OK to save the autotext condition.
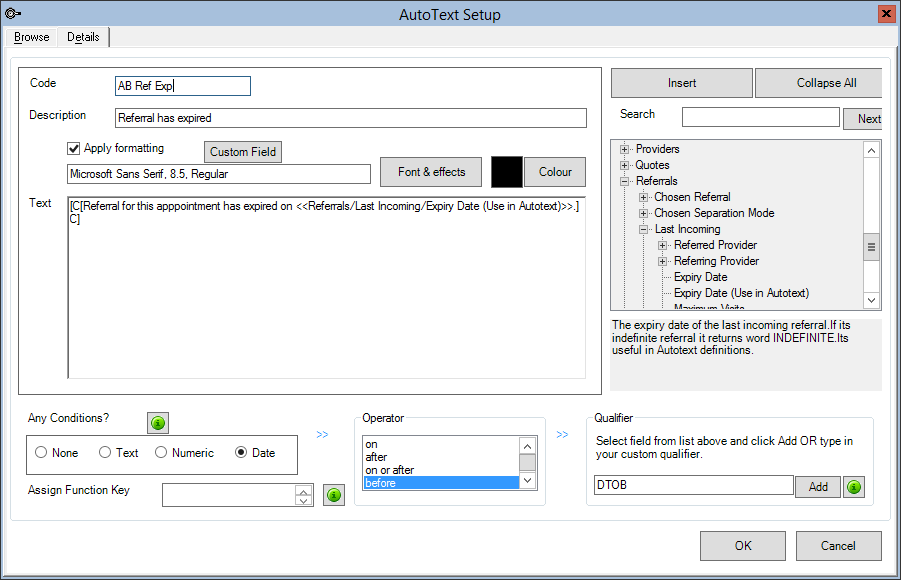
In the following example, the expiry date of the last referral for the patient is being compared to the value 'DTOB'. DTOB is a special value that returns the date and time of the selected appointment. If the expiry date of the referral is before the date of the appointment, the condition resolves to 'True' and the autotext between [C[ and ]C] will be displayed.
Click the information icons in this window to see more information about operators and special comparison values. The code for the autotext begins with 'AB' to indicate that the autotext applies to actions in the appointment book.

Conditions with no operator
If you insert a [C[ ... ]C] conditional block into an autotext, but select a condition type of None, the conditional text will only be included in the autotext if the conditional field exists. For example, the following conditional text:
will include the name of the referred provider of the last incoming referral for the patient only if the field is not null.
Using a conditioned autotext
Use conditioned autotext wherever you can use normal autotexts. Part or all of the autotext will be displayed, depending on whether the condition evaluates to true or false.
The example above has been used as the 'Initial Booking' autotext for the appointment book. When an appointment is booked, Bp VIP.net will check if the last referral for the patient is before the booked appointment date. If true, the warning autotext will be displayed to the Bp VIP.net operator so he or she can tell the patient to book an earlier appointment.
If false, the autotext will not be displayed.

Merge multiple autotext fields
Merge multiple sections by processing each step separately, then merging all into one sentence or paragraph to allow different colours and font settings.
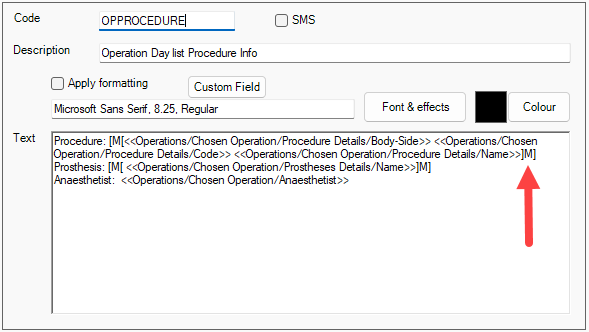
Multiple sections that need to be merged are encapsulated with the [M[ ... ]M] special characters. These special characters can be used in any autotext and can be combined with a conditions.

What do I do next?
Last modified: 10 January 2024