You can create two types of templates:
- Letter templates, which are usually edited and reviewed before being sent. A letter to a patient indicating receipt of referral from their GP with possible appointment times, or a letter to a patient about investigation results, are examples of letter templates.
- Autotemplates, for items that are formatted to a standard layout and populated with billing and clinical data, such as prescriptions, invoices, quotes, or Medicare forms.
You can create your own templates from a blank document, or modify templates that have been imported from the Bp VIP.net online library.
How do I access templates?
To create a template, select Setup > Letter Templates or Auto Templates. The word processor will open, showing the first template from the list on the left hand side. Click New to open a new template, or select a template and click Modify to edit an existing template.
The Bp VIP.net word processor provides a similar look and feel to other word processing software, such as Microsoft Word. The toolbar along the top allows you to format paper and margin sizes, adjust field lengths, insert images and tables, and edit headers and footers.
NOTE Opening and saving a Bp VIP.net template file in any other application may render the template unusable in Bp VIP.net. You can, however, nominate a template to be edited in Microsoft Word.
How Bp VIP.net searches for default autotemplates
A number of Bp VIP.net functions will look for an autotemplate beginning with specific text in the database when triggered. For example, if you print an invoice from the Payment screen, Bp VIP.net will look for an autotemplate starting with 'Invoice' to use as the default template for printing invoices.
|
Template name starts with |
Default template for |
|---|---|
|
'Appointments Day List...' |
Printing the Day List (normal slots) for providers from the appointment book. |
|
'Appointments Operations List...' |
Printing the Day List (operations slots) for providers from the appointment book. |
|
'Consultation Slip...' |
Printing a consultation slip for patients from the main toolbar (Ctrl+F5). |
|
'Invoice...' |
Printing a single invoice from the Consultation, Payment, or Transactions screens. |
|
'Transactions...' |
Printing a single transaction from the Transactions screen. |
|
'Quote...' |
Printing a quote. |
|
'Statement...' |
Printing a patient statement from the Transactions screen. |
|
'Prescription... |
Printing a regular prescription. |
|
'Prescription Authority...' |
Printing an authority prescription. |
|
'Pathology Request...' |
Printing a generic pathology request letter. |
|
'Radiology Request...' |
Printing a generic radiology request letter. |
IMPORTANT The Prescription autotemplate must only contain up to and including 3 items in Australia. The fourth prescription item - Medications/Prescriptions/Chosen Prescription/Prescription Item 4 (Print), can only be used in New Zealand.
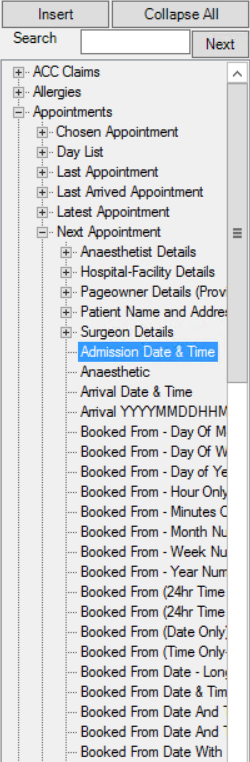
What is a 'Chosen' field?
If a field path has 'Chosen' in the description, the user must select from a list of objects when the letter is created, to determine which data to insert.
For example, the field above is Appointments / Chosen Appointment / Admission Date & Time. When a letter template includes this field, the user will be prompted to select which appointment should be used to insert data.
Similarly, if a template includes the field ACC Claims / Chosen Claim / ClaimNo, the user will be prompted by the Choose Claim screen to select the ACC claim to extract data from.
Other examples of template fields that require choosing a Bp VIP.net object include Investigations, Images from patient notes, Allergies, Medical Notes, Medications, and Procedures.
What is a 'Columns' type field?
Rather than inserting single lookup fields into user-created tables to format a template, you can insert a 'Columns' type field, which inserts a preformatted table of related fields.
For example, say you are creating a custom Appointments Day List template, which shows the timetable of appointments for the day from the appointment book.
- Position the cursor in the template where you want to insert a columns field.
- From the lookup field list, select Appointments > Day List > Day List Columns and click Insert.
- Double-click on the field in the template. The Column Design screen will appear.
- Tick the fields in the Available Columns list that you want to insert.
- Tick Include Column Captions in Generated Data to improve readability of the final table.
- In step 2), click and drag to rearrange the order of the columns.
- In step 3), select a column in Step 2) and change the Column Alignment from the default if required. For example, dollar amounts might be aligned to the right.
- Click OK to update the field columns.

The field Appointments/Day List/Day List Columns will be inserted into the template.


NOTE Some column view fields, especially Appointment fields, contain information that is produced from an autotext. Blue text in the middle of the Column Design screen lists the information that is produced from autotexts. In the example in step 3, the Patient Info column is generated by the ADBLPATIENT autotext.
The Day List template will now produce a formatted table of your fields when printed from the appointment book.

Import templates from the online library
- Select File > Utilities > Live Update. The VIP Live Update screen will appear.
- Select:
- 1 — Import.
- 2 — Bp Library.
- 3 — Auto Templates or Letter Templates.
- 4 — Bp FTP.
- Click Next.
- Tick the categories of templates you would like to download and click OK. There may be several layers of category folders to select from.
- Imported templates will be available from the word processor on the left hand side.

If you import a template with the same name as an existing template, the most recent template will have a date and time appended to the template name. If the templates are duplicates, you can delete one.
Export a template
You can export templates to be used at another Bp VIP.net installation.
- Select Setup > Auto Templates or Letter Templates, depending on which template you want to export.
- Select a template and click Tag to mark a template for export. Tag as many templates as you need.
- Click Export from the list of buttons along the bottom. Select a location and filename to save the templates to. The templates will be saved as a zip file.
To import templates, click Import and browse to the location of the zip file you exported the templates to. Bp VIP.net will list all of the templates saved in the zip file for you to import.
Insert a Lookup field
When you select New or Modify from the word processor, a blank or selected template will become editable and a list of fields will be displayed to the right.
The list of fields is called the 'Lookup list' or 'Ctrl-L list'. Press Ctrl+L to hide or show the lookup list. Click a + sign to open a list or sublist of fields, and double-click on a field name (or click Insert Field on the toolbar) to insert it at the cursor position in the template.
TIP It is good practice to use fields to insert as much variable data as possible. For example, instead of typing your practice's address and phone manually into letters, use fields to insert these values into templates. If your practice details ever change, you will not need to update every template with new details; the fields will automatically insert the new values from the database.
The double arrow icon  on the toolbar toggles between full field descriptions and abbreviated lengths to improve readability.
The example template below shows a letter from a specialist to the referring GP. The lines in purple are Ctrl+L fields. After the header, the first field is today's date in the 'Long' format (which looks like '7 January 2016'). The next fields will insert the patient's full name, and the patient's address over multiple lines.
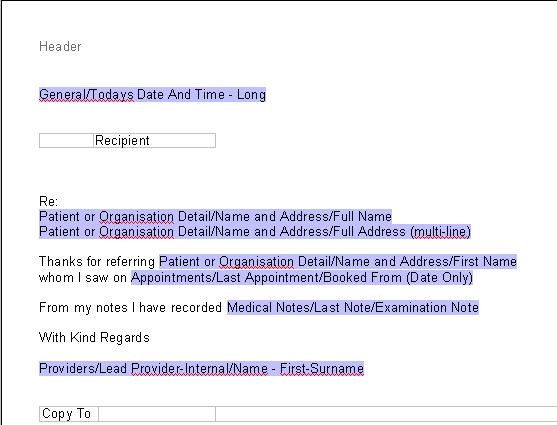
A field indicates the path in the Ctrl-L list. For example, the field 'Patient or Organisation Detail/Name and Address/Full Name' indicates the path Patient or Organisation Detail > Name and Address > double-click Full Name to insert this field from the Lookup list.
The Recipient field in the table is replaced with the name and address of the person you are writing to and the way they like to be addressed (for example, by title or by a known name).
The Copy To table under the doctor’s signoff displays all the other people to whom this piece of correspondence is sent. The full name and address of the recipient is printed in the second cell, so that the letter can be placed inside a window envelope. All other parties are listed in the third cell.
Insert a custom field
Instead of populating fields with data extracted from the database, custom or 'smart' fields prompt the letter author to supply information when a new document is created. Custom fields allow you to insert data that is not normally stored in the Bp VIP.net database and would not be known until the time of letter creation.
To insert a custom field in a template:
- Position the cursor in the template where you want the information to be inserted.
- Click the Custom Field icon in the word processor toolbar.
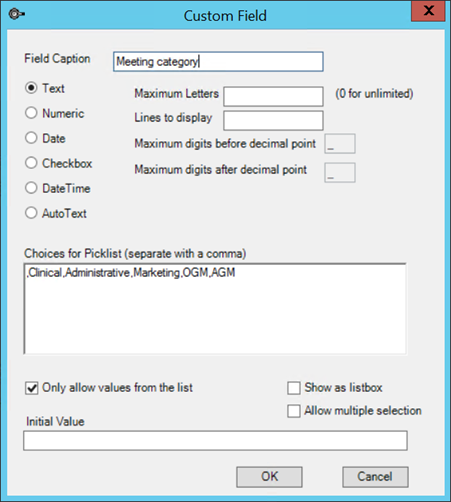
- The Custom Field screen will appear. The example below shows a drop-down menu for 'Meeting category' being inserted.
- Complete the fields in the Custom Field screen, depending on the type of data you want to capture:
- Click OK. The custom field will be inserted in the template surrounded by <<? and >> tags.
- Edit the template and save and close.

|
Field |
Description |
|---|---|
|
Field Caption |
label displayed in the template and on the Custom Field Data screen when entering the field value. |
|
Maximum Letters |
Maximum number of characters permitted in freeform text fields. |
|
Lines to display |
Display this number of lines of text in the letter for freeform text fields. |
|
Maximum digits... |
Number of digits that can be entered on either side of the decimal point for Numeric fields. Set the 'after' limit to two digits for monetary amounts. |
|
Only allow values from the list |
Don't allow letter authors to add their own values to a list. |
|
Show as listbox |
Show pick lists as list boxes rather than a drop-down list. |
|
Allow multiple selection |
Allow letter author to select multiple options from a pick list. Values will be inserted separated by commas. |
|
Initial Value |
Default value for custom field. |
To edit an existing custom field in a template, click anywhere in the field and click the Custom Field icon in the toolbar.
When a new document is created from this template, the Custom Field Data screen will appear, prompting the writer to supply the information that populates the fields. In the example below, a Meeting Notes template asks for three pieces of information:
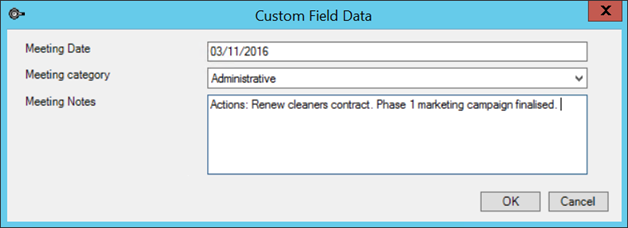
NOTE After you have entered your values and clicked OK from the Custom Field Data screen, the values are inserted as text in the letter. If you want to edit the values you entered, you must edit the inserted text. There is no way to bring the Custom Field Data screen back again without creating a new document.
Save and set template options
After you have created your template, use one of the options in the toolbar to save:
- Save — Saves the template but keeps it open for editing.
- Save and Close — Saves the templates and closes the editor. The template can now be used for outgoing communications.
- Save As (
 ) — Saves the template under a different filename than opened with. Use this option if you used the Modify or Copy options to modify an existing template.
TIP For instruction on how to set up Fastkeys for Letter and Auto Templates see Set printing preferences for templates.
Insert Macron Characters into letter templates
To insert macron characters into templates in Bp VIP.net, a Text Frame must be inserted.
- Go to Setup > Letter Templates.
- Select the template to update, and select Modify.
- Go to Insert > Text Frame.
- Place the Text Frame in the desired location on the template, and adjust the height and width as required.
- Double-click on the Text Frame to open the Text Frame Attributes screen.
- Tick No line in the Frame and Color tab, and select OK.
- Paste the Formatted text with Macrons inside the Text Frame.
- Select Save and Close.


Related topics
- Set printing preferences for templates
- Create Multi-Recipient Templates
- RSD Preferences and Attachments
- Common lookup fields
- Using MyComms
- Track correspondence status
- VIP Live Update
Last modified: 10 January 2024