Multi Recipient templates let the user select multiple recipients for a letter. There will be one main addressee and the other recipients will be inserted as Copy To: recipients.
When you create a letter from a template, Bp VIP.net will prompt for the recipients of the letter. For example, a letter notifying a patient of investigation results may be copied to a specialist involved in the patient's treatment through RSD, or a communication may be sent to a group of allied health professionals who are managing a patient's chronic illness.
This article assumes you are familiar with basic template creation. Multiple recipients are inserted in a template not by using lookup fields, but 'dynamic tables' in which preset text is replaced with the recipient list at printing time.
- Open the multi-recipient template for editing.
- Create the Recipient box at the top of the letter.
- At the bottom of the letter below the last line of text, create a table with one row and three columns.
- Type 'Copy To' into the first column, as shown.
- Save the template and click the Options button at the bottom of the Maintain Templates screen.
- Click the Recipients tab.
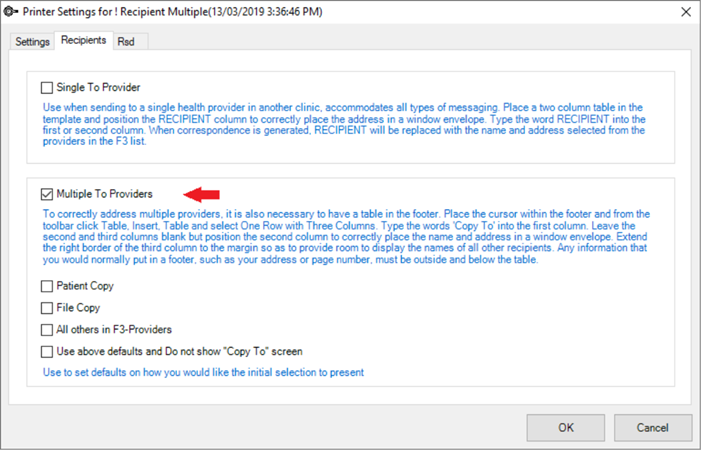
- Select Multiple To Providers.
- To automatically select the patient as a recipient, select Patient Copy.
- To keep a copy in MyComms, select File Copy.
- To automatically select all of the providers associated with the selected patient as recipients, select All others in F3-Providers.
- To use the recipients indicated in this screen and prevent the Letter Recipients window from appearing when a letter is saved, select Use above default and Do not show ‘Copy To’ screen. You will not be able to change the recipients when the letter is sent.
- Click OK to save the options.
Insert a table with one cell only, and type the text 'Recipient' into it with the default left alignment, as shown.


The options at the bottom of the screen will automatically select the defined recipients in the Letter Recipients screen.
Unless you have selected Use above default and Do not show ‘Copy To’, the following Copy To screen will appear when the letter is saved, based on your selections.
The Copy To function and its table at the bottom of the template is a dynamic field designed to pull the recipients you chose for the letter.
Accomodating recipient fields in templates
Best Practice Software recommend that you do not insert a multi-recipient dynamic table in a header or footer, because this will interfere with the header or footer contents.
If a letter could be sent to multiple recipients, or the patient is associated with multiple providers that may appear on an invoice, the template design must take this into account. Template headers and 'CC' lists must allow for multiple providers to be inserted. Single-line lookup fields with provider names should be replaced with a 'Copy to' table to make sure that all intended recipients are listed as intended.
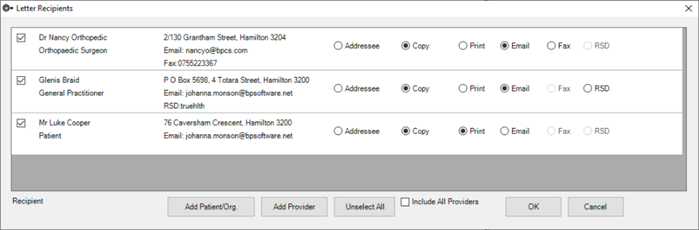
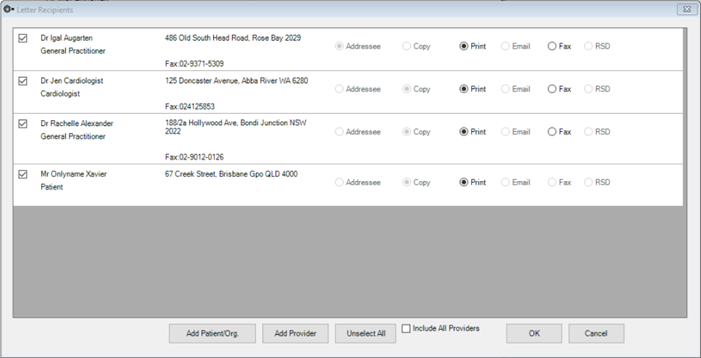
In the example below, all four recipients have been selected. The Addressee is generally the referring Provider; in this case, the patient's GP. All other recipients are ‘cc’d’ into the letter.
If you try and manually enter in recipients by typing them into the Copy To table, Bp VIP.net will strip them out of the field as it will only populate the list from the following screen. The Add Provider button at the bottom of the selection screen enables you to cc in providers that are not initially displayed on the list. The Letter Recipient list is patient specific.
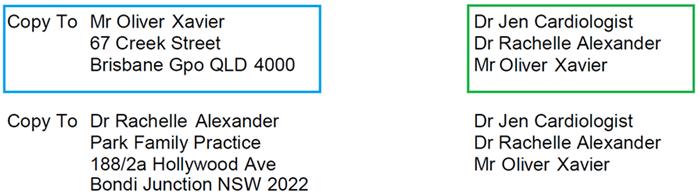
The examples below show how the Copy To field prints on two of the copies for the patient Recipient and the other GP. You can see the address details on the left and the cc list on the right.
The screen shot is edited from TWO separate copies of the letter just as an example.
Related topics
Last modified: July 2020