Financial preferences include billing defaults for:
- the Payment (F6) and Transactions (F8) screens
- printing financial statements
- calculating GST.
These preferences are practice-wide.
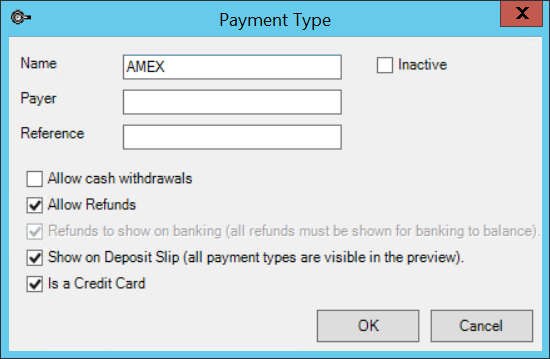
Your practice may also need to add Payment Types to the default types installed with Bp VIP.net (EFTPOS, Cash, Cheque, Direct Credit, and Adjustments), for example, to create a payment type specifically for American Express.
Set preferences
- Select Setup > Facility Preferences > Financial Preferences. The Financial Practice Preferences screen will be displayed.
- Adjust the settings to suit your practice.
- Click OK to save settings.
General tab
|
Field |
Description |
|---|---|
|
Payment Types |
Use the arrow keys to order the payment types as they appear in the Payment screen. You an also add a payment type from this section. |
|
Discount Rounding |
Sets the default for rounding discounts applied from the Payment screen. |
|
Transactions (F8) |
Sets the items to show by default on the Transactions screen. You can also apply filters from this screen. See Working with the Transaction History for more information. |
|
Payments (F6) |
Sets the behaviour of the Payment screen:
|
|
Show items for... |
This setting controls how much description you want to include on an invoice or receipt. When printing invoices and receipts from the Consultation, Payment, or Transaction History screens, include item descriptions as follows:
TIP If you select Debits and Credits, the invoice may supply too much detail and be unclear to the patient. Best Practice Software recommend starting with Debits only, which will only provide descriptions for the items charged to the customer in the consultation. Your practice can change this setting at any time if more or less detail is required. |
|
Include item codes in item description |
Print the item code also where the item description appears on the invoice or receipt. |
|
Show Charges with Receipted amount (even if...) |
Show paid charges with receipted amount even if the charge has been invoiced earlier. |
|
Allow multiple providers per Invoice/Receipt |
The default is to only allow one provider per invoice or receipt. Tick this checkbox to allow multiple providers on a single invoice or receipt. If you tick this option, you cannot print to invoice and receipt templates that use Provider lookup fields. |
|
Show Refund Reason |
Include Refund Reason if refunds are present on the invoice or receipt. |
|
Update Personal Preferences |
Update Bp VIP.net operator personal preferences with the changes made in this tab. You will be prompted to confirm. |
Statements tab
|
Field |
Description |
|---|---|
|
Statement Separation |
Sets how to print statements:
If you selected Print one combined statement of all providers and revenue accounts, the following fields determine which provider and revenue account is printed on the combined statement: Nominated Provider — Provider to use in the Provider lookup field used in the statement template. Nominated Revenue — Revenue account to use in the Revenue lookup field used in the statement template. If these fields are blank, the Provider and Revenue lookup fields printed on the invoice will default to the first provider and revenue account encountered when printing the statement. When the statement is run, the user is prompted to Filter by Provider. Select a provider to run the statement for a specific provider, or leave blank to run the statement for all providers. NOTE The provider filter honours an operator's Provider group security policy. If the logged-in operator is not allowed to view the selected provider's transactions, a statement will not be created. |
|
Don't print a statement where... |
Specify the criteria for not printing a statement when a statement run is generated. |
|
Collection Number |
Archiving collection number for statements, if used. |
|
Account Fees |
Sets fees for printing statements, if any customers are charged account fees. |
|
The overdue statement fee gets added |
Sets the criteria for charging an overdue statement fee, if any customers are charged account fees. |
|
Overdue period definitions |
Set the overdue periods for up to three notices. |
|
Statement Messages for Overdue Balances |
Default statement message for up to three overdue period notices. |
GST Defaults tab
|
Field |
Description |
|---|---|
|
Services |
Sets GST calculation for services. |
|
Materials |
Sets GST calculation for materials. |
|
Prosthesis |
Sets GST calculation for prosthetics. |
|
Update All |
Updates all Bp VIP.net instances of GST calculated for services, materials, or prostheses. Bp VIP.net will prompt for you to confirm the action. |
Add a Payment Type
- Select Setup > Facility Preferences > Financial Preferences. The Financial Practice Preferences screen open at the General tab.
- In the Payment Types section, click New. The Payment Type screen will appear.
- Enter a descriptive Name for the type.
- Enter a default Payer and Reference for the payment type to populate the Payment screen (F6). These fields are optional.
- Tick to Allow cash withdrawals through this payment type (for example, EFTPOS types).
- Tick to Allow Refunds through this payment type.
- Tick for the payment type to Show on Deposit Slips.
- Tick if the payment type is a Credit Card.
- Click OK to save the payment type.

To deactivate a payment type, tick the Inactive checkbox in the top right. The payment type will no longer be available for selection from the Payment screen.
ABN, revenue GST
Related topics
Last modified: July 2020