Setting up Bp VIP.net to use a Referral, Status, Discharge (RSD) messaging service, such as Argus or HealthLink, involves three steps:
- Install the messaging software.
- Configure the batching options in Facility Preferences.
- Set the RSD Address for providers who prefer to communicate by RSD.
NOTE As of March 31, 2025, Argus services have been discontinued following their acquisition by HealthLink. To ensure uninterrupted functionality, we encourage all users to transition to HealthLink's services without delay. Further information and assistance can be found on the Telstra Health website.
Install the messaging software
Contact the messaging software vendor you want to use for secure inter-provider messaging. Purchase and install the software on the Bp VIP.net server only, following the instructions from the product documentation and vendor support.
Confirm the folders that the software will use to store incoming and outgoing message files. You will need to supply these folder locations to Bp VIP.net in the next step.
Best Practice Software Specialist Product Support cannot provide guidance on installing third-party messaging software, only on setting up Bp VIP.net for messaging.
Configure batching options
On the Bp VIP.net server:
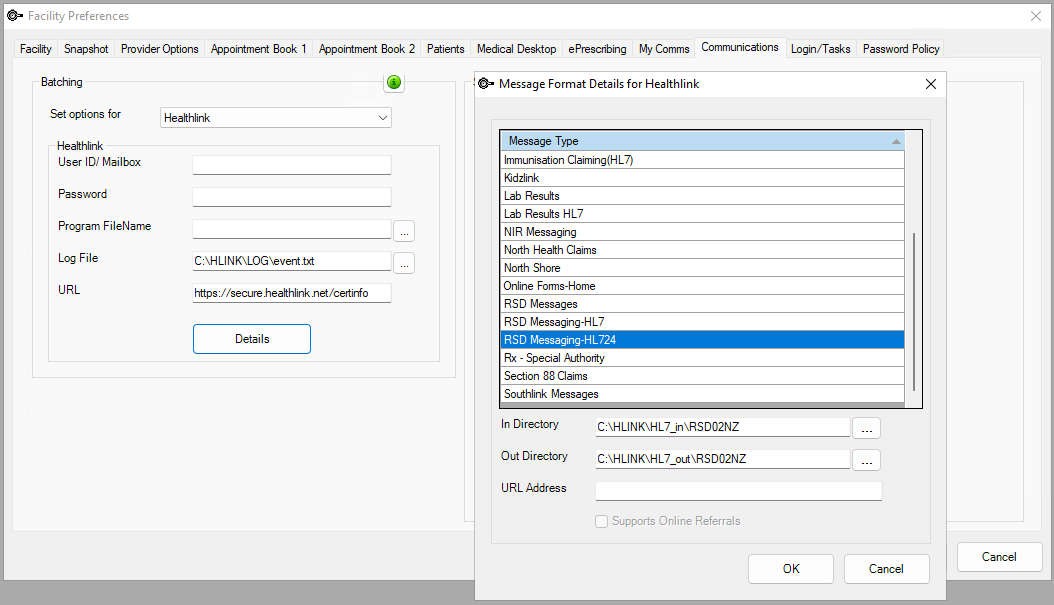
- Select Setup > Facility Preferences > General Preferences > Communications tab.
- Select the transmission service to use from the Set options for drop-down field.
- Click Details. The Message Format Details screen will appear.
- Select from the Message Type list:
- For Bp VIP.net NZ, select RSD Messaging-HL724.
- For Bp VIP.net AU, select RSD Messaging-HL7.
NOTE If your practice's secure messaging software uses SMD-HL7, you can select 'SMD-HL7' as the message type, but you must complete and validate the HI Service Details fields of the Communications tab, and the HI Provider fields of the Provider Details screen for each provider using RSD.
- Browse for the In Directory and Out Directory that the messaging software will use to handle incoming and outgoing messages.
- Click OK to return to the Facility Preferences screen. Click OK to save the changes.

NOTE You do not need to complete the other fields in the Batching section, only the fields in the Message Format Details screen.
Healthlink directory folders
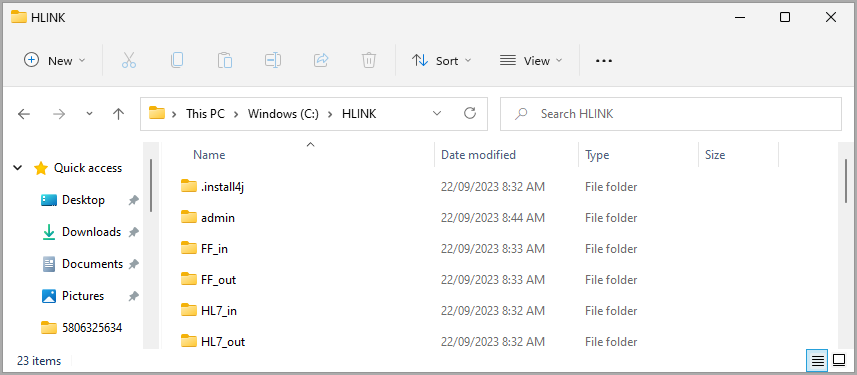
When the Healthlink software is installed, incoming and outgoing directory folders are created on the workstation or server. The folder locations must be recorded in Bp VIP.net to use RSD messaging via Healthlink.
- Open Windows File Explorer.
- Navigate to Windows (C:) and open the HLINK folder.
- Note the folder locations for the message type.
- Enter the folder location paths in Bp VIP.net from Setup > General Preferences > Facility Preferences > Communications > Healthlink > Details.

Incoming directories
- RSD Messaging-HL7 - C:\HLINK\HL7_in\RSDAU (Australia)
- RSD Messaging-HL724 - C:\HLINK\HL7_in\RSD02NZ (New Zealand)
Outgoing directories
- RSD Messaging-HL7 - C:\HLINK\HL7_out\RSDAU (Australia)
- RSD Messaging-HL724 - C:\HLINK\HL7_out\RSD02NZ (New Zealand)
Set the RSD Address
For each provider who needs to correspond using the secure messaging service:
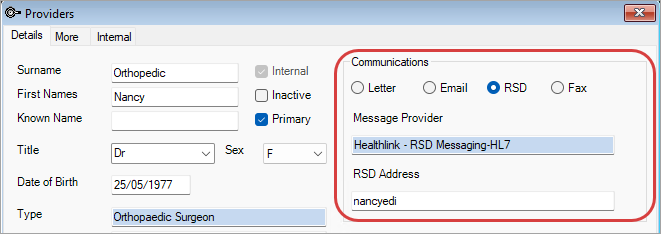
- Select Setup > Providers > This Clinic. Double-click the provider you want to update from the Providers screen.
- In the Communications section, select RSD.
- Start typing the Messaging Provider in the field. Bp VIP.net will display a list of possible messaging providers. Select the messaging provider to use and click OK.
- Type the provider's 'mailbox' or RSD address. The format of this address will depend on the messaging service used.
- Click OK to save changes.

Repeat the steps for external providers (Setup > Providers > Other Clinics) who use RSD to correspond with your practice. You may wish to confirm with any external providers so that they expect messages through the service.
You can now send correspondence to configured providers using RSD from MyComms.
Related topics
Last modified: 01 April 2025