Bp VIP.net Kiosk saves your practice time by enabling patients to complete your registration process on a tablet or mobile device in the waiting room, freeing up reception staff.
Patients are directed through a set of user-defined forms (UDFs) unique to your practice. Questions can be enabled and disabled depending on the type of patient and consultation; for example, different questions for male and female patients, or a section might require completion for a WorkCover consultation.
Before you begin
To set up Kiosk, you need to:
- Create the user-defined forms of type 'Kiosk Main' and 'Kiosk Page' to capture the information you need from patients.
- Insert the Kiosk Launcher onto an existing UDF, usually from Patient Details (F3).
- Set a Bp VIP.net workstation (often a tablet or laptop) to act as a dedicated kiosk.
After you have set up Kiosk, a staff member can create the new patient record on a tablet or mobile device, enable Kiosk on the device, and hand the tablet to the patient to complete the UDF forms.
Create Kiosk UDF
The main Kiosk UDF will be of type 'Kiosk Main'. Any flow-on pages opened up from the main Kiosk page will be of type 'Kiosk Page'.
- Select Setup > User-Defined Forms. The User-Defined Forms screen will appear.
- Click New. The Form Designer will appear.
- Click the Properties icon toward the end of the Form Designer toolbar.
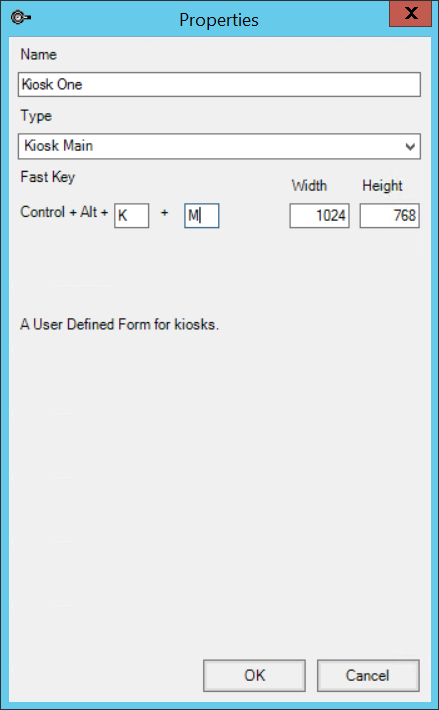
- Enter a meaningful Name for your Kiosk form and select 'Kiosk Main' from the Type dropdown.
- Enter a shortcut key if you wish and a default opening size for the Kiosk form. Make sure the form size is appropriate for the viewport size of the tablet or laptop.
- Click Ok to create the form. The Form Designer will show a blank UDF.
- Insert UDF components to capture the information your practice requires from patients. See Create a UDF for more information.
- If you create subpages for your Kiosk that are linked from the main page, the linked pages must be of type 'Kiosk Page'.
![]()
The Properties screen will appear.

Insert the Kiosk Launcher
After you have created your Kiosk pages, you must insert a link so that the Kiosk form can be opened. For example, insert a link to Kiosk from the 'AUSNumbers' UDF section of the Patient Details screen, because you need this screen open to record patient details.
- Select Setup > User-Defined Forms. The User-Defined Forms screen will appear.
- Select the UDF you want to insert a Kiosk link into and click Modify. The Form Designer will appear.
- Click the Link icon
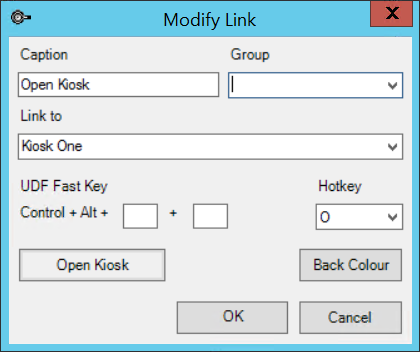
 on the Form Designer toolbar. The Modify Link screen will appear.
 - Enter a Caption for the link button and Link to the Kiosk you created in Create Kiosk UDF.
- Click OK to insert the Kiosk link. Click Close to close the Patient Details UDF.

Set a device to Kiosk mode
- Log in to the tablet or device that will be used as a Kiosk and handed to patients.
- Select Setup > Workstation Preferences.
- Tick the Kiosk checkbox. If this option does not appear, your practice has not obtained a Kiosk licence for your Bp VIP.net installation.
- Click Ok.
Any user logged in to this workstation will not be able to search for another patient to load in to the Information Bar, and will have access only to the Kiosk UDF forms.
Start a Kiosk session
- Log in to Bp VIP.net on the Kiosk device you enabled in the steps above.
- In Bp VIP.net on the user workstation, search for or create the patient who will fill out the Kiosk.
- Press F3 to open the Patient Details screen.
- Select the Kiosk device from the Kiosk dropdown and click Start. The Patient Details screen will close.
- Select Setup > Kiosk from the menu.
- Give the Kiosk device to the patient to complete the Kiosk forms and return to reception.

Exit Kiosk mode
To close kiosk mode on a device, press the escape (ESC) key and enter your Bp VIP.net password.

Related topics
Last modified: 23 July 2024