UDFs are created in the Bp VIP.net Form Designer screen. Bp VIP.net is installed with several system UDFs that are used in the Medical Desktop, Personal, and Provider Details screens. You can create new UDFs from a blank canvas, or modify an existing UDF and save the form under a different name.
Creating a UDF normally involves the following steps:
- Insert fields and field labels onto a blank canvas.
- Assign fields and labels into groups.
- Apply rules and shapes to visually section a UDF into functional areas or workflows.
- Create rules and calculations to allow the UDF to intelligently respond to user input.
- Set the tab order so that a user can tab through the form in a natural order.
- Determine under which circumstances and providers the UDF is visible.
Create a UDF
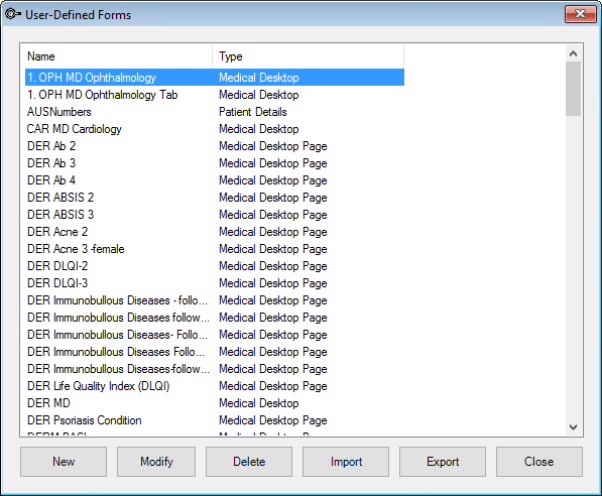
- Select Setup > User-Defined Forms. The User-Defined Forms list screen will appear.
- Click New to open the Form Designer, which is a blank canvas with a toolbar along the top.
- Click the
 icon to open the Properties screen.
 - Enter a Name for the UDF. Each UDF must have a unique name.
- Select the UDF Type. See UDF Types for more information on the types of UDF available.
- Assign a Fast Key to the UDF if you want operators to be able to quickly access the screen from anywhere in Bp VIP.net.
- Set the starting Width and Height for the UDF.
- Use the first half of the toolbar to insert the required fields, such as pick lists, free text boxes, and labels. See Form Designer Toolbar for more information on the fields you can insert.
- Click and drag to select multiple fields, and use the Alignment icons on the toolbar to align fields to the left, right, top, or bottom. Ctrl+A will also snap the selected fields to grid.
- You can also select a field and use the arrow keys to finely adjust the position of a field.
- Right-click a field and select Send to Back or Bring to Front, or press Shift+Tab or Tab to move fields into the foreground or background. This option is useful when you insert Shapes to section a UDF into related groups of fields.
- Hover the mouse over the right or bottom border of a field and drag to adjust the length or height. You can also use Shift+arrow key.
- Click
 to save and close the Form Designer when you are ready to test the UDF.

Best Practice Software recommend starting with a large canvas, such as 1000 x 800, so you have plenty of space to arrange fields for the initial construction. After you have finished adding and formatting fields, you can shrink the canvas to just the size required. If you expand the canvas because you run out of space, you may have to realign many of your fields.
TIP If a field is pushed off-canvas, use click and drag to select the object and use the arrow keys to move the field back on to the canvas.
To test a UDF, insert a link to the UDF from an existing UDF of type 'Medical Desktop' or 'Details'. Click the link to open your UDF and test the layout, data entry, and rules.
What is a field level?
Except for preset fields, when you insert a new field into a UDF, Bp VIP.net prompts for the Field Level of the new field:

The field level indicates the context, or how the data should be stored and updated in the database. If a field is set to the Practice level, the entered value will be stored once for the whole practice. If the field is updated, the value for the whole practice changes, regardless of which operator is logged in. You would set a field to level 'Practice', for example, if the field was in a UDF of type 'Practice Details', used to record practice demographic details.
If a field is set to level Medical visit, a value is stored for each visit by a patient. Each time a patient visits for a consultation, a new value can be recorded. This level is used for fields that appear in Medical Desktop UDFs, for example, which capture patient information from visit to visit. Because fields of this type change value over time, you could create a graph from fields of level 'Medical Visit'.
Fields of level Patient and Provider are used to store information about a patient or provider that changes little over time. For example, fields to record DOB or Blood Type would be of level 'Patient', because this kind of information is recorded once over a patient's lifetime and will not change. Similarly, a field to record a provider's vehicle registration number would be set to level 'Provider', because this information would not change very often.
Form Designer Toolbar
The toolbar along the top of the Form Designer allows you to insert fields of different types and align the components of a UDF.

NOTE Every field in a UDF must have a unique name.
Most fields have a Copy Forward option in the settings. This option auto-populates the field from past data entry:
- None — Do not auto-populate.
- Previous Visit — Use the value from the most recent visit, even if that visit is the default value and was not changed by an operator.
- Previous Entry — Use the value from the most recent change of data. Ignore any previous visits in which the data was not changed.
|
Icon |
Action |
|---|---|
|
|
Inserts a preset or 'lookup' field into the UDF to record data. See Using the preset fields for more information. |
|
|
Inserts a pick list of custom options to select from. You can supply over-ride values depending on the provider logged in. TIP Always start the list of pick list items with a comma, so that the first entry is blank. |
|
|
Inserts a set of related radio buttons. A user can only select one button. Align the buttons horizontally or vertically (default). |
|
|
Inserts a single-line text box to record free text. You can set the type of data expected by the text box (numbers only, or currency, or date and time, for example). The following options apply to text boxes:
|
|
|
Inserts a single checkbox. The Text when... fields indicate the text to pass on to autotexts, templates, and UDF rules if the checkbox is checked or unchecked. |
|
|
Inserts a multi-line free text box. |
|
|
Inserts a user-defined dropdown list that selects from a preset UDF pick list. You can specify a pick list that has been defined for any UDF, not just the current UDF. Users can also use the list as a 'maintain list'. That is, the user can right-click in a blank entry and add additional options to choose from. |
|
|
Inserts a text label used to label fields and sections of a UDF canvas. |
|
|
Inserts a rectangle to highlight or divide a UDF canvas into sections. You can use the grouping feature and shapes to highlight a desired workflow through a form, for example, or hide or dim a UDF section until relevant. |
|
|
Inserts a slider object into the UDF. A slider is a line with end points and defined intervals, for example, from 1 to 10 in intervals of 1.0. You can pair a slider with a read-only text box calculated from the slider value to create an adjustable 'dial' on a UDF. |
|
|
Inserts a horizontal or vertical rule. |
|
|
Inserts a graph. See Create a graph from visit data for more information. |
|
|
Inserts a Visual Acuity field specific for eye specialists. VA fields are automatically colour-coded red and green and paired to reflect left and right eye measurements. See Record visual acuity for more information. The preset field Ophthalmology > VA Format can be inserted to determine the default units used for all VA fields on a UDF. See Using the preset fields for more information. |
|
|
Inserts a template image designed to be used as a sketchpad. For example, a graphic of the front and back of the human body might be used to mark the location of an injury, or a graphic of an eye to indicate a condition. Bp VIP.net operator Windows accounts must have Windows permissions to access the template image file and the containing folder to be able to use the image on a UDF. |
|
|
Inserts a hyperlink to a URL, email address, or file on the network. URLs and email addresses will open in your default browser or email client. You can also link to an autotext or report builder report that generates one of the above. |
|
|
Opens another UDF or Bp VIP.net screen. For example, you could open the Immunisations screen from Medical Desktop. See Vaccinations for more information. |
|
|
Inserts an option to print the UDF to a template or report. The fields from the UDF will populate the report or template fields. For example, you could print to a medical certificate template. The following options apply to UDF printing:
|
|
|
Align the selected fields to the left. |
|
|
Align the selected fields to the right. |
|
|
Align the selected fields to the top. |
|
|
Align the selected fields to bottom. |
|
|
Sets the tab order for the UDF. See Set the tab order for more information. |
|
|
Inserts a rule into the UDF. See Apply a rule for more information. |
|
|
Inserts a Notes Summary button into the UDF that prints a summary of selected fields automatically to patient notes in Medical Desktop with a timestamp. Summary notes are represented by a series of bracketed values: {Blood Pressure: [BPSys] / [BPDias]}
{Resting Heart Rate: [RHR]}
...
The text between the curly brackets is printed to notes. The UDF field between the square brackets is substituted with its recorded value. For example, the above summary notes might be printed as: Blood Pressure: 120 / 80
Resting Heart Rate: 72
When recording information in a live UDF, a field with red text indicates that the field has been recorded into patient notes. |
|
|
Opens the UDF Properties screen. This screen sets the UDF type, fast access key combination, and size. |
|
|
Saves and closes the current UDF. |
|
|
Closes the current UDF without saving. Bp VIP.net will confirm the close if there are unsaved changes. |


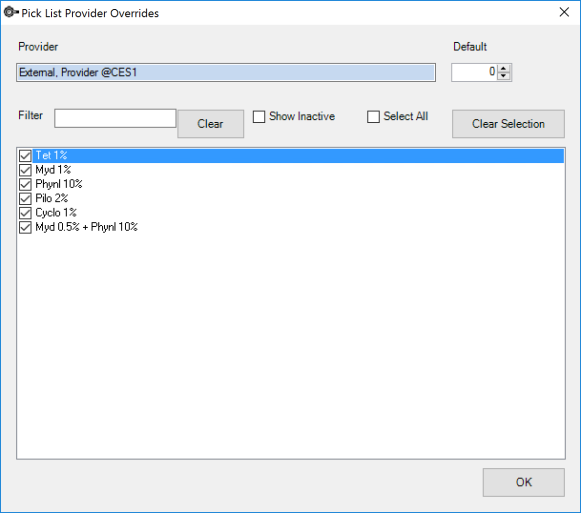
Pick lists Provider Overrides
The Provider Overrides function controls which users see which options.
- Go to Setup > User Defined Forms.
- Select a form with the Type 'Medical Desktop' or Medical Desktop Page.
- Click Modify. The Form Designer screen is displayed.
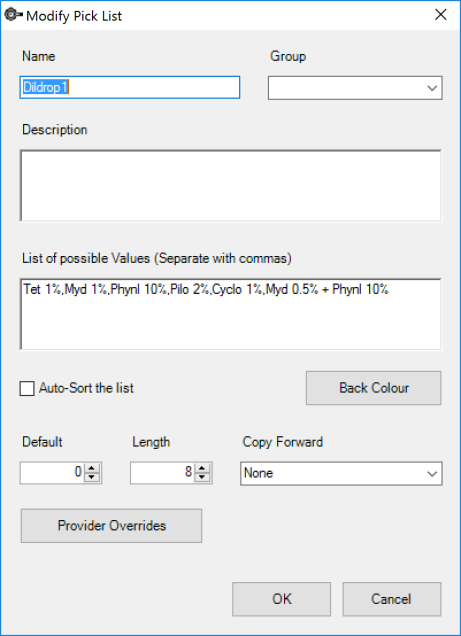
- Select a Pick list. For example, on the Ophthalmology Desktop, there will often be a picklist for Dilation drops.
- Click Provider Overrides.
- Select the provider and select which options to display in the pick list for that provider.
Double click on the Pick list.
Using the preset fields
Preset fields encourage you to use Bp VIP.net's existing field types for data that a specialist will commonly record, instead of creating new fields unnecessarily. It is good practice to scan the preset fields before you create a new UDF field, to check if what you want to record already exists.
For example, the preset fields under Glasses, Ophthalmology, and Ophthalmology Motility offer a large range of data that ophthalmologists might record in patient details. Endocrinologists can find relevant fields under Diabetes, and Cardiologists might use the Echo Cardiac Report fields.
The preset field Medical > Visit History List provides a selectable list of a patient's visit history. This is a very useful preset field to use in Medical Desktop UDFs.
When you insert a preset field, you must select the type:
- Medical — field data is stored per patient visit and associated with a visit record, for use in Medical Desktop UDFs. If a new visit occurs, all values are set to '0' until data is entered, if the field is not set to copy forward.
- Patient/Org — data for patient and organisation details. Used for demographic data, Patient/Org fields are static over time unless a new value is recorded.
- UDFs — references a field from another UDF. If a field already exists in another UDF, use this option to avoid data being defined twice in the Bp VIP.net database.
Grouping fields on a UDF
Fields on a UDF can be grouped, so that actions can be performed on multiple fields and labels at once. Groups can be combined with rules to perform actions on sections of the UDF based on entered data. For example, you could hide or dim fields to collect gynaecological data if the patient ticks an 'M' demographic checkbox. See Apply a rule for more information.
When you insert a field, you can select or enter a Group option.

Select a group to assign the field to that group. To create a new group, type the new group name into the Group field and click OK when you have completed the rest of the fields.
Apply a Calculation
A calculation is a value calculated from other field values in a UDF. A UDF field that has a calculation will be read-only. Only text boxes, edit boxes, and VA fields can be calculations.
Calculation example
For example, you could have fields for Height and Weight and use those values to calculate and display the patient's Body Mass Index.
- Insert numeric text box fields for Height and Weight into the UDF. Supply labels showing units of measurement.
- Click the
 icon to open the Modify Text Box screen. Call the text box 'BMI' and click Calculations. The Calculations/Summary Notes screen will appear.
 - Select the Weight UDF field you created in step 1 from the drop-down menu at the top. Click Add to insert the field into the workspace.
- Insert the Height UDF field from step 1 into the workspace.
- Construct the formula for BMI in the workspace:
- Click OK to return to the Modify Text Box screen. The Calculations button has turned red to indicate that a calculation exists. This field is now read-only.
- Add two decimal places to the field and click OK.
- Add a label 'BMI' to the UDF.
- Save and close the UDF, and link the new UDF from an existing medical desktop to test.
- When you enter values in the Height and Weight fields, the BMI field will display the calculated value.


TIP If you know the field name, you can type it directly in square brackets in the workspace.

The following operators can be used in calculations:
|
Character |
Operation |
|---|---|
|
+ |
Addition |
|
- |
Subtraction |
|
* |
Multiplication |
|
\ or / |
Division |
|
^ |
Exponent |
|
[^] |
Use after a field name in square brackets, such as [Height^]. The caret ^ returns the previous value held for this field, for example, the patient's weight recorded from the previous visit. You can use the caret operator to keep a running total of values. |
|
[$] |
Use after a checkbox field name in square brackets, such as [DrugTaken$]). The $ operator returns the Description field from the checkbox field properties. |
|
[!] |
Use after a VA field name in square brackets, such as [VAUnaidedRight!]. The ! operator converts any VA field value to Snelln 6m and returns the converted value. |
|
( ) |
Normal arithmetic brackets |
|
@ |
Copy forward a previous value entered or recorded. See Using the @ operator for more information. |
Using the @ operator
Some preset fields do not allow copy forward, which forces users to enter values or leave a blank every new record. You can use the @ operator when calculating values to replicate copy forward behaviour:
- @previous — Use the last value recorded for this field, even if the value was NULL (nothing was recorded).
- @previousvalue — Use the last value entered by a user for this field, ignoring subsequent NULL entries.
The following example shows the @previousvalue modifier applied to a UDF field 'VA - L'. When a new record is created, the VA - L field will show the last entered value for the field.

Apply a rule
When you define a rule, a field value is compared to a set value using comparison operators such as 'equals', 'less than', or 'contains'. If the result of the comparison is true, an action is performed on a field or group.
You do not need to define the complement to a rule. For example, if you have a rule defined as:

you do not need to create a second rule:

The opposite behaviour of an existing rule is assumed.
If a field has a default value, the default value is processed in any rules when the screen is loaded. Rules are executed in the order they appear in the list.
Rule example
The following example hides one group of fields and shows another based on the user's selection in a Sex field.
- Insert a pick list called 'Sex' into a UDF with ',Male,Female,Unspecified' in the List of Possible Values. Supply a label for the pick list.
- Insert the following text box fields of type 'Date' into the UDF:
- Last Pap Smear
- Last Mammary Screen
- Last Prostrate Check.
- Supply labels for the new date fields.
- Insert a shape with a width of '1' into the UDF that covers the pap smear and mammary screen fields. Assign the shape, the labels, and the two fields a Group called 'Group F'. Right-click on the inserted rectangle and select Send to Back or press Shift+Tab to place the rectangle in the background.
- Insert a shape with a width of '1' that covers the prostrate check field and label. Assign the shape, the label, and the field a Group called 'Group M'. Send the rectangle to the background.
- Click the
 icon to open the Rules screen. Click Add to add an empty row to the workspace.
 - Complete the fields along the bottom as shown:
- Click Add and add the following rules to the workspace:
- Click OK to close the Rules screen. Save and close the Form Designer.
- Link the new UDF from an existing medical desktop to test. The selection made from the Sex drop-down will toggle the visibility of the field groups.


TIP You may need to save, close, and reopen the UDF to see your groups appear in the last field.

The comparison operators are straightforward: equals/not equal to, greater than/less than, begins with/ends with, and contains/in. The 'contains' operator returns true if the compare value is a character subset of the field value. For example, 'cde' is contained in 'abcdef'.
The following actions can be used in rules:
|
Action |
Description |
|---|---|
|
Hide |
Hides the group or field from display. |
|
Show |
Shows the group or field. |
|
Enable |
Renders the group or field able to receive input. |
|
Disable |
Keeps the field or group visible, but greys out and renders the field or group unable to receive input. Labels are not greyed out. |
|
Compel |
Forces the focus back to a field or group so that the user cannot exit the screen until the field or group has a value. |
|
Uncompel |
Removes a compel from a field or group. |
|
Warn |
Displays a warning popup to the user, but allows the user to continue or exit the screen. The text for the warning popup is the Description from the rule field's properties. |
|
Disallow |
Displays a warning popup that the value entered is invalid. |
Set the tab order
The tab order on a user-defined form defines the sequence in which users can use the Tab key to move through the fields in a form. Experienced data entry operators often use the Tab key to quickly process a form without using the mouse to move the cursor.
The tab order also matches up labels with the correct field. If you use the Summary feature of UDFs, all labels associated with a field must appear directly before the corresponding field in the tab order.
How tab ordering works
The screen capture below shows an example of a UDF with tab order visibility switched on.

The example represents a possible form for capturing patient details from the Patient Demographics screen. The Employer field in the top left has two numbers appearing adjacent: the '0' is the tab number for the label 'Employer', and '1' is the tab number for the field in which the user types a value.
The Tab key will only move the focus from field to field, not from field to label. In the example, if the cursor were focused on the Employer field, pressing Tab would shift the focus to the Occupation field (the next highest field in the tab order at 3). If Tab were pressed again, focus would shift to the Ethnicity field (5), and then the first Home number field (23), the second Home number field (24), and so on.
Set the tab order
- Select Setup > User-Defined Forms from the menu. Select or create the UDF you want to adjust the tab order for.
- Click the Set Tab Order icon from the Form Designer toolbar. Tab order will be made visible on the UDF.
- Select a UDF component. The item will be highlighted with a red border.
- Use one of the following key combinations to change the tab order number:
- Save the UDF.

|
Key Combination |
Action |
|---|---|
|
Ctrl+Pg Up |
Increases number by 10. |
|
Ctrl+Pg Dn |
Decreases number by 10. |
|
Ctrl+Up arrow |
Increases number by 1. |
|
Ctrl+Down arrow |
Decreases number by 1. |
|
Ctrl+Home |
Sets the number to the last tab order stored in memory. |
|
Ctrl+End |
Sets the number to one greater than the last tab order stored in memory. |
|
Ctrl+3 (not keypad 3) |
Opens the Tab Index popup to enter a specific number. |
It is good practice to leave gaps of at least five between field tab order values. This allows you to insert fields in the tab order if you need to update the UDF later without needing to renumber the entire UDF.
IMPORTANT Field labels must always have tab order value one less than the associated field.
Activate a UDF
UDFs of the following type are automatically enabled and added to the standard Bp VIP.net screens:
- Medical Desktop — See Set a UDF as a provider's Medical Desktop for more information.
- Patient Details — appears as a panel in the Patient Details screen
- Patient Details More — each 'More' UDF appears as a tab on the Patient Details screen
- Practice Details — comprises the entire Practice Info screen
- Provider Details — appears as a More tab on the Provider Details screen.
The first UDF to appear alphabetically in the Setup > User-Defined Forms list is used in the standard screen. Rename existing screens to start with something like 'ZZ_' to push UDFs you do not want to the bottom of the list.
In the example below, the first 'Patient Details' UDF in the list (AUSNumbers) will be used in the Patient Details screen. If this UDF were renamed 'ZZ_AUSNumbers', the next 'Patient Details' UDF in the list (Ausnumber No Fund Data) will appear in the Patient Details screen.

To enable a UDF of type 'Medical Desktop Page', you need to link the UDF to an existing Medical Desktop or Medical Desktop Page. When the link button is clicked, your UDF will open. See the  icon in Form Designer Toolbar.
Set a UDF as a provider's Medical Desktop
The default Medical Desktop used for the practice is the first UDF of type 'Medical Desktop' that appears in the Setup > User-Defined Forms list, which lists UDFs alphabetically.
To change the default Medical Desktop, rename unwanted Medical Desktop UDFs to start with something like 'ZZ_' to push them to the bottom of the list.
You can also nominate a UDF to open on top of the default Medical Desktop when F11 is pressed.
To set an opening UDF for the practice, select Setup > Facility Preferences > General Preferences > Medical Desktop tab and select a UDF from the drop-down Select UDF to open over Medical Desktop when F11 is pressed.
To set an opening UDF for an operator, log in as that operator and select Setup > Facility Preferences > General Preferences > Medical Desktop tab. Untick Use Facility Preferences and select a UDF from the drop-down Select UDF to open over Medical Desktop when F11 is pressed.
Set workstation UDF Preferences
Two workstation preferences set the default size for UDF labels and Medical Desktop.
- Select Setup > Workstation Preferences. The Workstation Preferences screen will be displayed.
- Adjust the following settings:
- UDF Label Scale — Default zoom size of UDF labels
- Medical Desktop UDF Zoom Mode — Default zoom size of Medical Desktop UDFs.