Patients are normally added from the appointment book or Search screen, but Bp VIP.net also provides a Kiosk feature to enable patients to complete their own details while waiting.
Medicare and DVA setup
For Australian practices, several fields in the patient demographics are necessary for successful online validation and claiming.
In this article:
- Add a patient
- Record patient and account addresses
- Add a referral from Patient Details
- Deactivate a patient
- Add an associate for a patient
Add a patient
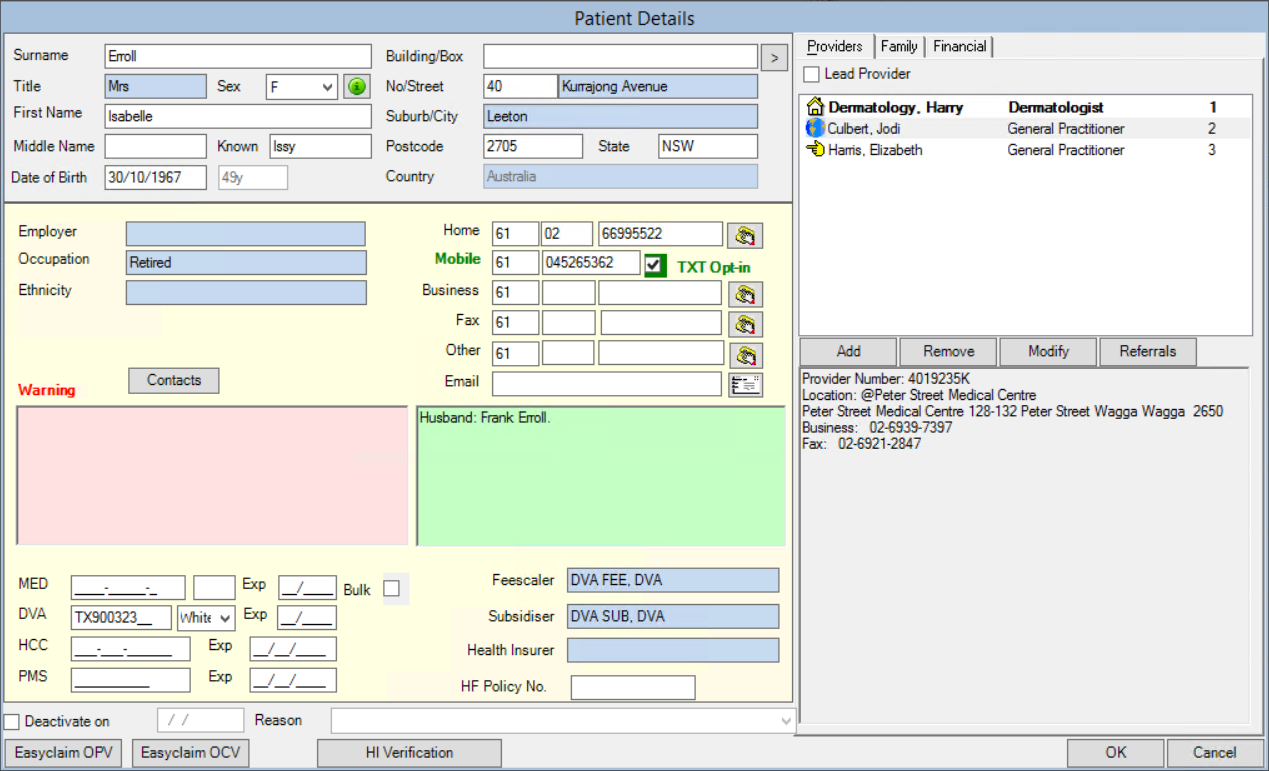
- Press F2 to open the Search screen. Enter the new patient's name in the Search field and click New Patient.
- The Patient Details screen is a mix of predefined and user-definable forms (UDFs). Depending on how your practice has set up Bp VIP.net, your Patient Details screen may have different fields, or have a different number of tabs on the right hand side.
- Complete the details in the non-tabbed sections of the form. Anything entered in the Warning text box will be displayed in the warning field on the Information Bar when this patient is selected. Use the text box with green background to record miscellaneous information about the patient.
- Select the Providers tab, which records all of the providers (internal, external, and referring) who are involved in the health care of the patient.
- Click Add to search for a provider to add to the list. If a provider is the usual provider for a patient, tick Lead Provider. Provider types are indicated by the icons to the left:
- The provider in bold type is the Lead Provider.
- A house icon indicates a provider at this clinic.
- A hand pointing leftwards indicates an external provider who has referred this patient to an internal provider.
- A hand pointing rightwards indicates an external provider who has been referred from an internal provider.
- The Referrals button opens MyComms (F4) at outgoing referrals, so you can create a referral from the Patient Details screen if necessary.
- Select the Family tab, which saves next of kin and redirection details.
- Click Join to add a patient or associate to the patient's family list. Select the Relation, the Ext. Role, or both for the added family member.
- The Redirect to field indicates that invoices for this patient should be redirected to the patient or organisation selected here. For example, a young patient may redirect to a parent's account, or an employee may refer billing to their employer organisation.
- The Account Holder field indicates that another patient or organisation is responsible for accounts associated with this patient.
- Click OK to save the patient record.
If you are in the appointment book and booking an appointment for a new patient, begin typing the patient's name as 'surname, first name' in an available slot and press Enter. Bp VIP.net will respond that no records have been found. Click Yes to create a new patient.

TIP You only need the Surname and First Name fields completed to be able to save a patient record. This allows administrative staff to book new patients quickly and collect details from the patient later.
Record patient and account addresses
When you are entering the address details for a patient, always tab out of a street or suburb field after you have made a selection. This will automatically populate the postcode, state and country fields. Check that these fields are not empty before you save the patient record: address details are important for billing and day surgery stays.
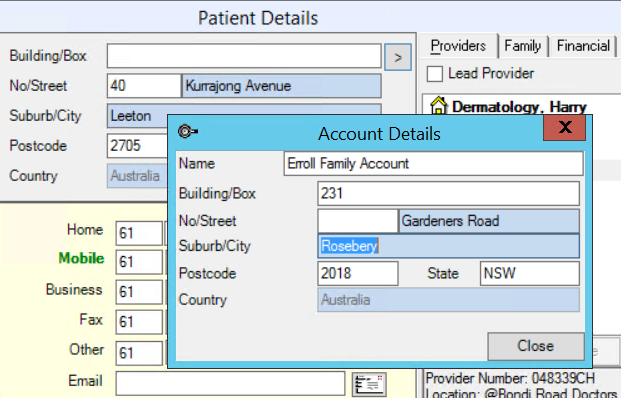
You can also record an account address that is different to the patient or organisation's normal mail or residential address. Click the chevron > next to the Building/Box field at the top of the screen. The Account Details screen will appear with address fields.

A patient's account address, if recorded, will be used in Medicare and ACC claims. You can also insert an account address using lookup fields in a template or autotext.
Add a referral from Patient Details
Sometimes you will want to create a referral or even a new referring external Doctor while adding a new patient, or while Patient Details is open.
Deactivate a patient
- Open the Patient Details screen for the patient.
- Tick Deactivate on at the bottom of the screen. Bp VIP.net will ask you to confirm that you want to deactivate the patient. Click Yes.
- Enter a date to deactivate the patient (press Ctrl+d for today's date).
- Select a Reason for the deactivation, for example, the patient has left the practice or has passed away. Click inside the Reason field and press Ctrl+L to add additional reasons.
You can reactivate a patient at any time. Deactivated patients do not appear in list screens and reports unless the 'Show Deactivated' option is ticked.
Add an associate for a patient
An associate is an account holder or redirector who is not a patient of the clinic.
NOTE Associates cannot be booked into the appointment book and are commonly used for billing purposes only.
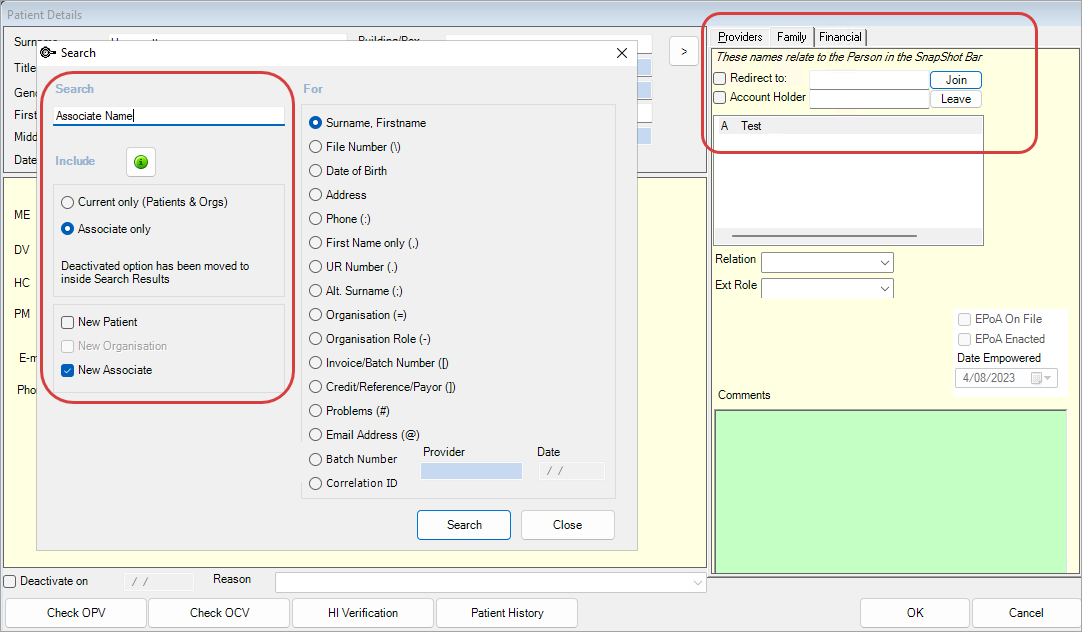
- Go to the Family tab from the Patient Details (F3) screen.
- Select Join.
- Enter a name into the Search field.
- Select the Associate only radio button.
- Select New Associate. This will create the new record.
- The new associate can now be seen in the Family tab and be selected as an account holder or redirector.

Related topics
Last modified: 4 August 2023