BP VIP.net Stepthrough
Day stay episodes and billing
This article describes how to use Bp VIP.net to record and bill Day Stay Episodes.
Day stay is a separately licensed module of Bp VIP.net. To check if this licence has been activated, go to Help > About > Licence Information. If your installation has been granted a Day Stay licence, the Access Level column for day stay will show 'Full'. See Set up Day Stay for more information.
The procedure items charged by the surgeons should be updated regularly using VIP Live Update - Health Fund Update to ensure you are billing with the most up-to-date information. Theatre bands will be updated as part of an MBS update and when importing items using Live Update.
The surgeons must have a provider record at the location where the operation is performed in Bp VIP.net)
The hospital billing fees are updated under the contracts for each health fund.
Resources
Check patient details
The patient must have their health fund (Insurer), health fund policy number, Medicare and / or DVA numbers, excess or co-payment balance, cover type and when their policy commenced recorded in their Patient Details > Financial tab.

- Ensure all details are completed before booking the operation and starting the Day Stay Episode in Bp VIP.net.
- Ensure the commenced date is prior to the day of the operation.
- Run the Online Eligibility Check to see if the patient is eligible for cover by the health fund. This can be done through the verification buttons on the bottom of the Patient Details screen.
Add the operation to the patient record
Prior to starting a Day Stay episode in Bp VIP.net, an operation must be assigned to the patient.
- When the patient is in the snapshot, select Medical > Operations (Ctrl+F9)
- Click the New button under the operations section.
- Check the Procedures radio button is selected.
- Search for the code either using the Description or the Code sort options.
- Select the code and the Location of the procedure.
- Click OK.
The Operations screen is displayed.

The Choose Procedure screen is displayed

IMPORTANT Do not select the ICD10 Procedures radio button to search for the procedure as selecting an ICD10 procedure code will impact the billing codes on the doctor's invoice. The ICD10 procedure code will be recorded on the Day Stay Episode.
The patient’s Operation screen is displayed with the procedure populated.

IMPORTANT The Add Procedure button is used to add additional procedure codes (these will populate through to the doctor's invoice and day stay episode invoice). For the day stay episode invoice to be generated correctly, all procedures and prosthesis must be added through the Operation screen.
- If more than one procedure is listed, ensure that Main Procedure tick box is selected for the main item.
- Select the Unit (location) and Surgeon.
- Select the Anaesthetist, Anaesthetic and any additional details.
- Add the prostheses required and specify the location (these will be included in the doctor's invoice if Include Prosthesis tick box is selected).
- Click OK to save the operation details.
- Book the operation into the appointment book.
TIP The default anaesthetic recorded in the Day Stay Preferences screen will automatically populate into the Anaesthetic field.
The Time Required will populate from the procedure’s Item Details screen in Setup > Charges.

Create the day stay episode
After the operation has been recorded and booked, the Day Stay Episode must be created in Bp VIP.net.
- Click Patient > Day Stay or Ctrl+F8
- Click New. The Choose/Create Operation screen is displayed.
- Select the operation and click the OK button. The Personal and Admission Details tab is displayed.
The Day Stay Episodes for screen is displayed where previous episodes may be listed.


Personal and admission details

The patient and operation details are populated from the Patient Details and Operation screen.
- Complete the required fields.
- Click the Charge Excess button to create the invoice for the patient excess and / or co-payment.
- Ensure the patient’s health fund is displayed in the Insurer field.
- The Fee field at the bottom of the invoice populates with the patient excess and / or co-payment balance recorded in the Patient Details screen.
- Click the Pay button to receipt and save payment or click OK to save and take the payment at another time.
- The screen switches back to the Day Stay Episode screen after closing the Consultation (F5) or Payment (F6) screen.
- Click the P1 button to print page one of the National Private Patient Hospital Claim Form where the patient can fill out and sign the Declaration Concerning Claim.
- Click Close.
NOTE Fields marked with a red asterisk are compulsory and must be completed for the Day Stay Episode to be validated for transmission. Fields may have a default entry displayed populated from the Day Stay Preferences.
IMPORTANT Medicare eligibility should be run when the Day Stay Episode is created.
The Consultation screen displays with the excess fee generated.
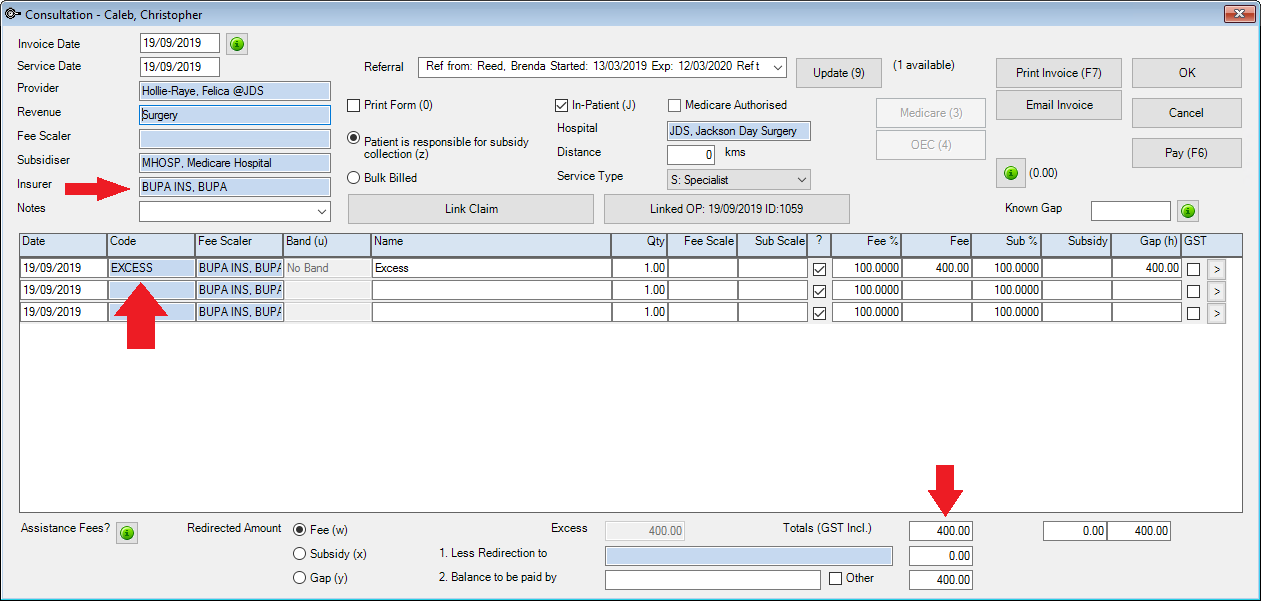
NOTE A second check will be run by Bp VIP.net when invoicing the Day Stay Episode, that the excess has been charged to the patient. If you try and charge the excess again the ‘Excess / Invoice already Created’ warning is displayed.
The diagnosis and procedures
- Add the diagnoses by clicking the Existing button for the list of patient’s existing diagnoses.
- Or click Add New to add a new ICD10 diagnosis from the Problems screen.
- Enter the Location of the procedure on the body if applicable and click OK to save the diagnosis.
- The Select Diagnosis onset Flag is displayed.
- Select the required option and click the OK button.
- Enter a date into the Symptom Awareness Date field.
- Click the Convert to ICD10 button to convert the MBS procedure to the ICD10 procedure if there are available ICD10 codes that map to the MBS procedure.
- If there are no available mapped ICD10 procedure codes, press the Add New button to manually search and choose the correct ICD10 procedure code
- Click OK to select the ICD10 procedure codes.
- Add the prostheses if not already been added on the Operation screen.

The MBS procedure/s and prostheses populate from the patient’s Operation screen. The MBS procedures and prostheses are required for creating the Day Stay Episode quote. Diagnoses and the ICD-10 procedure can also be completed while completing the discharge process.


IMPORTANT The Generate DRG button will only generate the code if the Mode of Separation field is completed on the Discharge Details tab. A default option can be defined in the Day Stay Preferences enabling the DRG code to be generated prior to completing the Discharge Details.

IMPORTANT If additional MBS procedure items need to be added to the episode, they must be added through the Operations screen (Ctrl D). This will also ensure the day stay invoice is populated with all items correctly.
Quote the doctor and the day stay episode costs
Prior to the booked operation, quotes can be generated from the Operation screen for both the doctor’s invoice and the day stay invoice.
TIP If you click the Quote Theatre button prior to creating the day stay episode, an episode will be generated automatically.
- Tick the Include Prostheses tick-box to if you require the fee for the prosthesis included in the doctors quote.
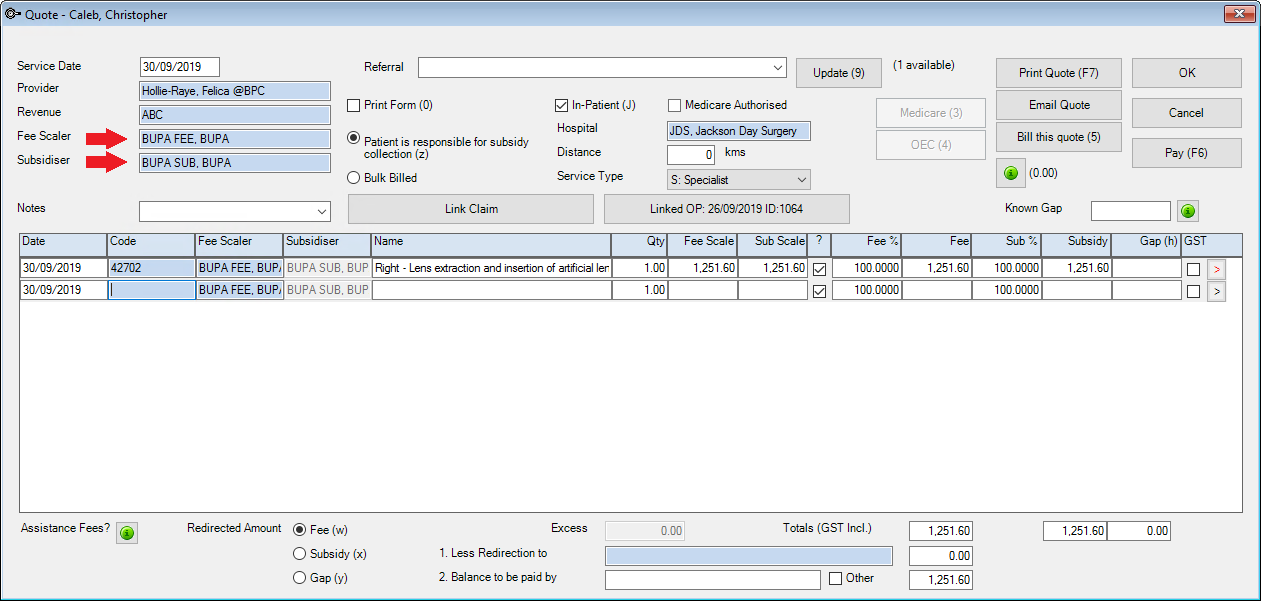
- Click the Quote Doctor button to create a quote for the doctor’s invoice.
- The Quote screen is displayed.
- Add the patient’s health fund to the Fee Scaler, and Subsidiser field or equivalent health fund umbrella group i.e. AHSA.
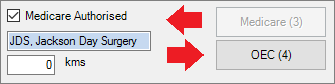
- Tick Medicare Authorised and click the OEC button to run the Online Eligibility Check.
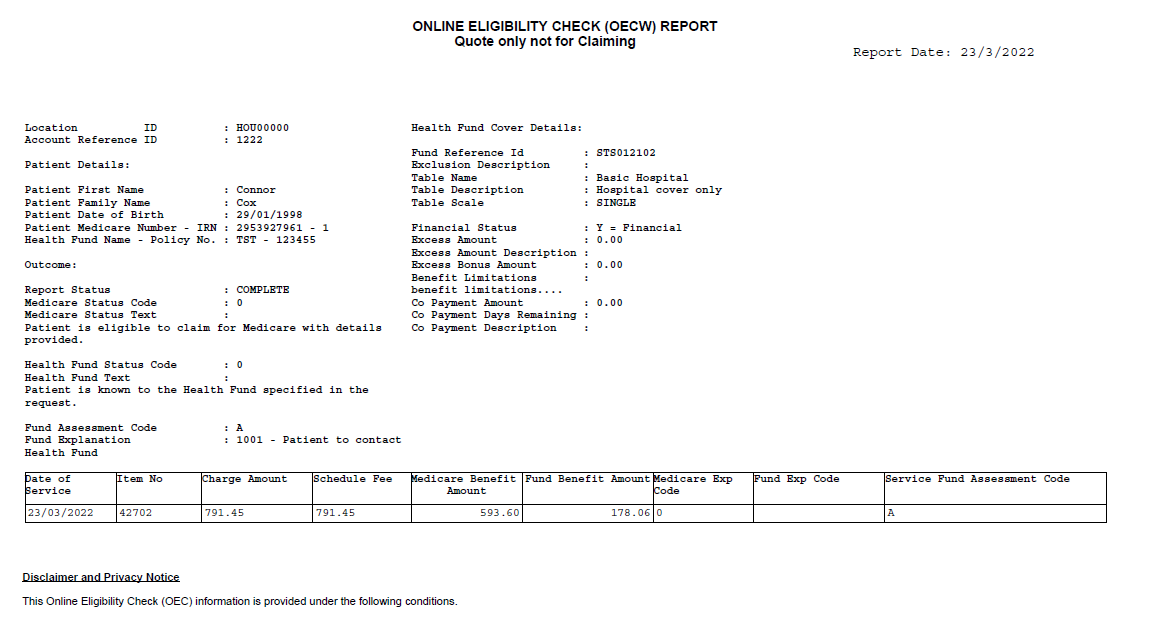
- The Online Eligibility Checking screen is displayed where additional information for the procedure can be recorded.
- Select the Presenting Illness Code at the bottom of the screen and click Online Eligibility Check button to run the check.
- The Eligibility Report is displayed.
- Close the report and exit from the Online Eligibility Check screen. You can access this report, and all OEC reports for patients, by selecting Medicare > 8. Online Eligibility Check Reporting.
- The Operation screen will be presented again. Click the Modify button to display the Operation Details screen again.
- Click the Day Hospital: Quote Theatre button
- The Service Date will populate with today’s date unless the operation has been booked in the appointment book and then the operation date will display in the service date field.
- The item code will populate from the Operation screen and the operation will automatically link to the quote.
- Insurer will be populated into the Insurer and Less Redirection to field. It is important to leave the health fund in both fields for the Online Eligibility Check.
- Tick the Medicare Authorised tick-box and click the OEC button.
- Complete the Presenting Illness Code field.
- Click the Online Eligibility Check button to run the check.
- Click the Exit button.
- Click the Medicare Online Claiming button at the top of the screen.
- Click the Online Eligibility Check button.
- Select the OEC claim you wish to check.
- Click the Get Process Report button.
- A report will display with the patient’s eligibility for cover by their health fund.
The surgeon’s fees are quoted separately to the Day Stay Episode. Follow the instructions below if you also use Bp VIP.net to quote and invoice the Doctor's fees.
NOTE The surgeon recorded on the Operation screen will be the billing provider on the invoice.
DOCTOR QUOTE
IMPORTANT Check the patient’s health fund is displayed in the Less Redirection to field so that when Online Eligibility Check (OEC button) is run from the quote the health fund can assess their portion of the quote.

TIP Running the OEC will save the quote. Print the quote from the patient's Transaction screen (F8).
The Quote is displayed with the provider populated from the Operation screen.
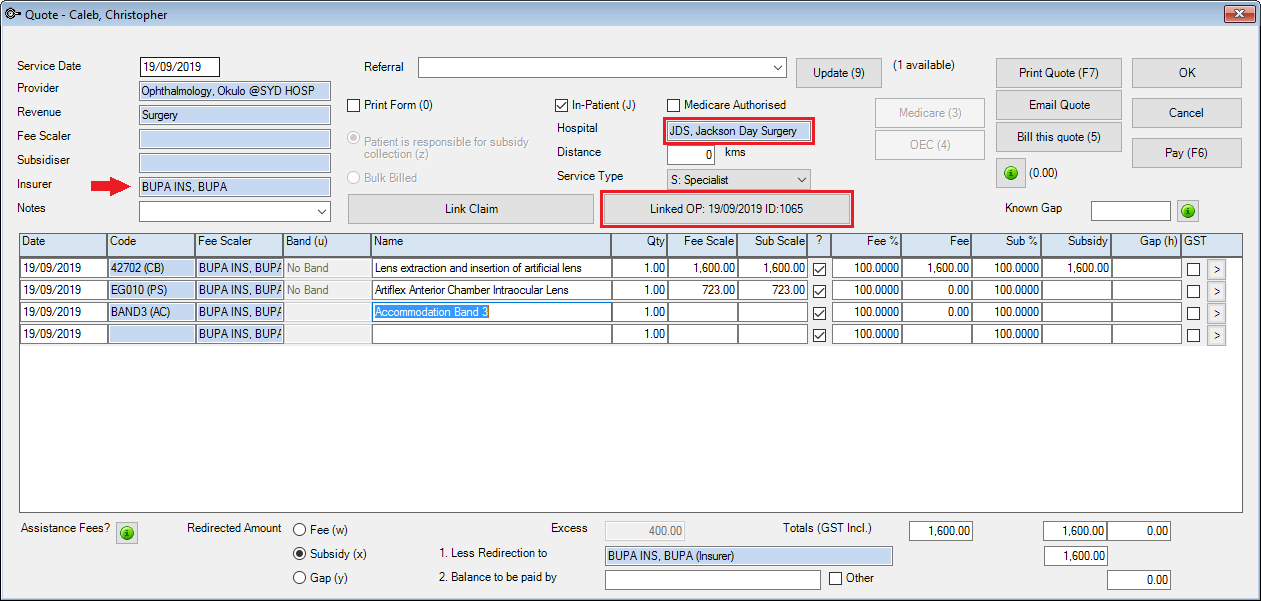
DAY STAY EPISODE / HEALTH FUND QUOTE
IMPORTANT OEC must also be run from the day surgery quote. The OEC report shows whether the patient is eligible for the procedure in the day surgery and what excess they must pay.
The Online Eligibility Checking screen is displayed populated with the patient’s information, the procedure Items, the claim type (dependant on the health fund’s contract with your surgery) and for the same day status.

Enter details after the day stay procedure
The Cancer Details (QLD only) and the Discharge Details will need to be checked and completed after the operation.
Cancer details (Queensland practices only)
- Click the Cancer Details tab if required.
- Click the Add New button to record the fields.

Discharge details
- Click on the Discharge Details tab.
- Check and amend the Admission Date/Time and Discharge Date/Time fields.
- Once the Mode of Separation has been selected, click back on the Diagnoses and Procedure tab to generate the DRG code.
- Click Generate DRG button.
- The DRG code will depend on the procedures and diagnoses selected. 960Z is always listed as ‘Ungroupable’ in the DRG version list.
- Click back on the Discharge Details tab and complete the details on the left-hand side of the screen ensuring that compulsory fields are completed.
- The Anaesthetic details will populate from the Operation screen.
- Complete the Theatre times and Anaesthetic Start Time.
- Ensure all required fields are completed on the Discharge Details tab.

TIP The Link to Existing Transaction button will enable you to link an invoice created externally to the Day Stay Episode such as when converting a quote to an invoice. The invoice will be validated on several conditions prior to enabling the linking: 1. the invoice cannot be bulk billed, 2. the invoice cannot be linked to another Day Stay Episode, 3. The invoice must have procedure codes.
IMPORTANT A default option can be defined in the Day Stay Preferences enabling the DRG code to be generated prior to completing the Discharge Details tab.
IMPORTANT Fields marked with a red asterisk are compulsory and must be completed for the Day Stay Episode to be validated for transmission. Fields may have a default entry displayed from the Day Stay Preferences.
The Theatre times and Anaesthetic Start Time will be used to generate and populate the Accommodation Band.
Invoice the day stay episode
Billing from the Day Stay Episode must be completed prior to completing the episode. When a Day Stay Episode is completed the Invoice and the Link to Existing Transaction buttons are locked and unavailable.
IMPORTANT Do not add additional items to the day stay invoice in the Consultation screen. Additional items must be added through the Operation screen.
1. Click the Invoice button on the top right hand of the Discharge Details screen.
The Consultation screen will be displayed.
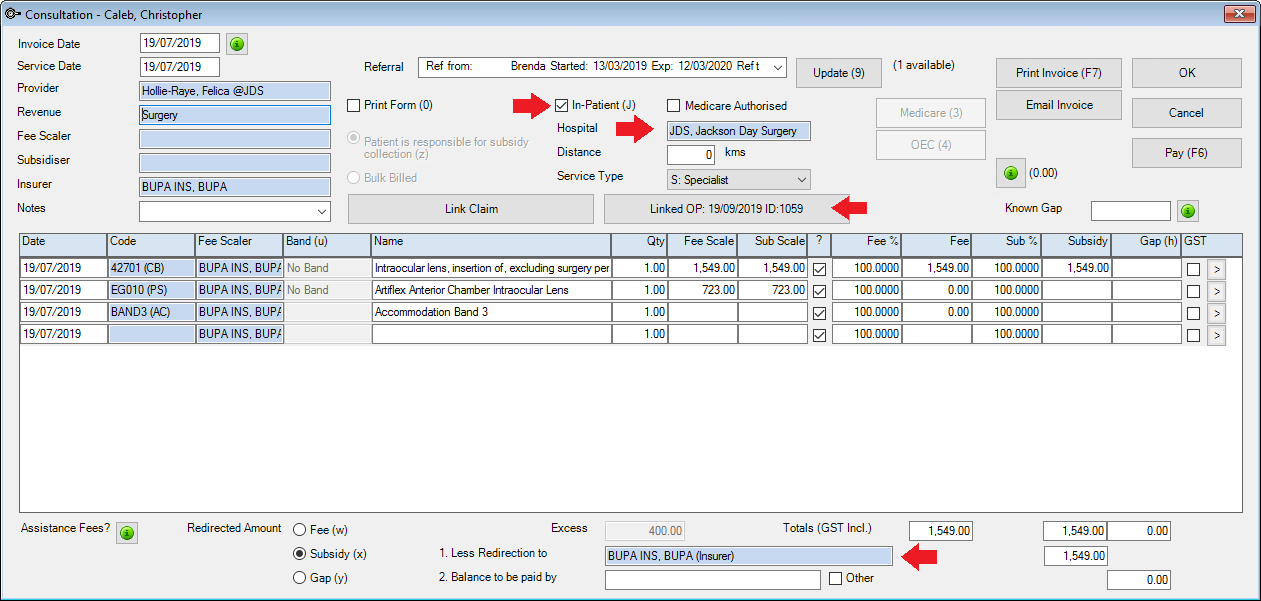
The invoice will not display if the Day Stay Episode does not meet Bp VIP.net validation, a floating notification Unable to Complete will display enabling the user to amend the episode before trying to invoice again.

- The Invoice and Service date will populate from the appointment book date.
- Change the Invoice Date if you are generating the invoice after the date of the operation (Service Date). Ctrl+D in the Invoice Date field will populate “today’s” date.
- The Insurer field will populate the patient’s health fund from the Patient Details.
- The Linked OP button will show the date of the operation.
- The In-Patient tick-box and Hospital will populate from the Day Stay Episode and Operation screens.
- The item Codes will have generated from the procedures recorded on the patient’s Operation screen, the Diagnoses and Procedures tab and the Accommodation Band on the Discharge Details tab.
- The patient’s health fund will populate in the Less Redirection to field.
- Select the Medicare Authorised tick box and click the Medicare button to send the claim.
- Check the data that has populated from the Day Stay Episode.
- Click the Charges tab, check the details and click the Send Claim button to send the claim.
- After the invoice has been generated, wait a few days and you should be able to receipt the claim. Click on the Medicare – Online Claiming button and select IHC Claim Reporting.
IMPORTANT When the invoice is saved, the Invoice date becomes locked. Ensure you are modifying the Invoice Date when you first generate the invoice.
The In Hospital Claims screen is displayed.

NOTE Almost all of the fields on this screen are read-only and for confirmation purposes. If a value needs updating, you must exit from this screen, edit the Day Stay episode details or Patient Details, and resubmit from the consultation.

The HIC Claim Sent Successfully pop-up will display if transmission is successful.

Troubleshoot the day stay invoice
If the day stay invoice included items with the incorrect fee, ensure that the Operations screen has all the items listed.
IMPORTANT Do NOT add additional items to the day stay invoice after the invoice has been generated from the Day Stay Episode.
What happens to the patient excess?
- After the day stay invoice has been generated, click the F8 button to display the patient’s Transactions screen.
- The Excess invoice should display first.
- The day stay invoice will display with the redirection of the credit and the final line will display the excess offsetting the day stay invoice balance.
![]()
Invoice the surgeon’s fees
The surgeon’s fees are charged separately to the Day Stay Episode. Follow the instructions below if you also use Bp VIP.net to invoice the Doctor's fees.
- Select the operation from the Appointment Book and press the F5 button on the keyboard.
- Remove the prosthesis which is included in the Day Stay Episode invoice by deleting the item code from the invoice.
- Add the patient’s health fund (or corresponding umbrella organisation i.e. AHSA) into the Fee Scaler and Subsidiser fields.
- Check that the patient’s health fund is also displayed in the Less Redirection to field.
- If sending the invoice through Medicare Web Services, tick the Medicare Authorised tick-box and click the Medicare button.
- Verify details on the In-Patient Medical Claims form and click the Send Claim button to transmit.
- Click Medicare in the toolbar > IMC Claim Reporting to manage the IMC claims
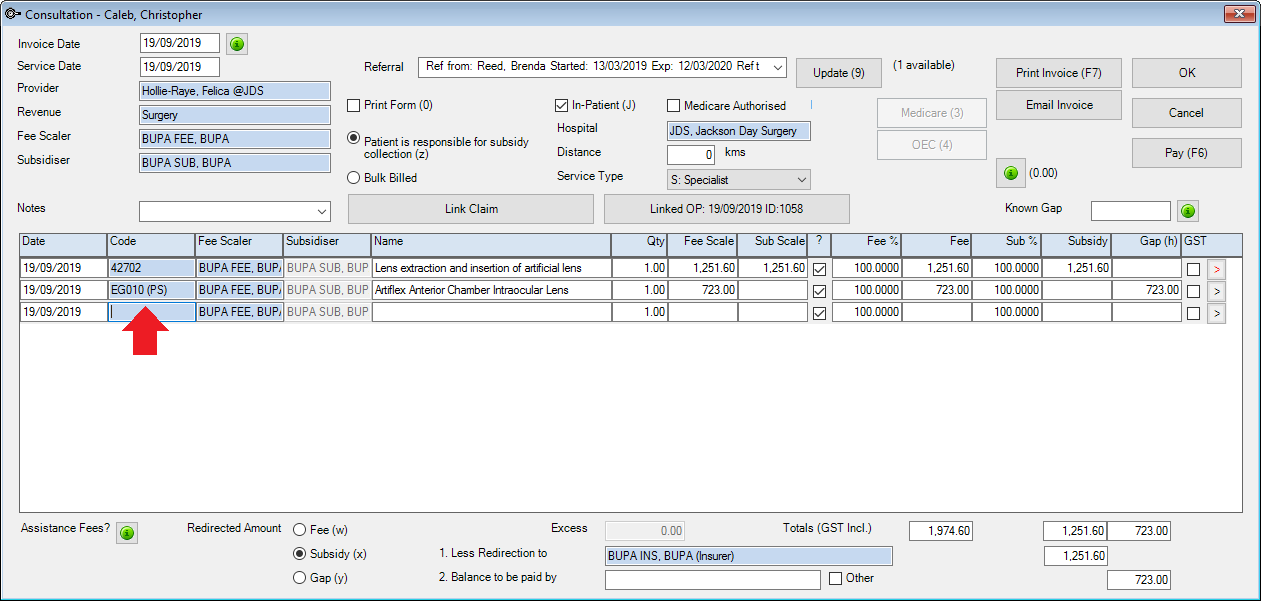
TIP If the claim is not being sent through Medicare Web Services, click the OK or Print button to save the invoice.

Print the claim forms
At the bottom of the Discharge Details screen are the print buttons for the National Private Hospital Claim Form including the DVA Discharge Advice and Hospital Claim Form and the Day Only Procedures and Overnight Stay Certificate.

- Print P1 Although the National Private Patient Hospital Claim Form can be printed prior to invoicing the Day Stay Episode from the Personal and Admission Details for the patient to check and sign, it can also be printed from the Discharge Details.
- Print P2 Displays page 2 and 3 of the Hospital Accommodation Details and can only be printed from the Discharge Details. Page 2-3 should only be printed after invoicing.
- Print P1 & P2 Displays the entire National Private Patient Hospital Claim Form populated with information completed on the Day Stay Episode. The entire form should only be printed after invoicing.
- DVA Form For DVA patients only. Displays the DVA Discharge Advice and Hospital Claim form populated with information completed on the Day Stay Episode and can only be printed from the Discharge Details after the invoice has been generated.
- Print Certificate Displays the Day Only Procedures and Overnight Stay Certificate which can be printed at any time. This is a manual form and is not populated with information from the Day Stay Episode.
TIP Page 1 and Page 2 are displayed on separate halves of the page so that they can be printed together by placing the completed page 1 into your printer’s tray in such away the page 2 gets printed alongside it.
8. Click the required form button to display the form.
9. Either select the Print button or the Email button to email the form.
IMPORTANT The print buttons will become locked once the Day Stay Episode has been ‘COMPLETED’. Ensure you print the forms prior to completing the Day Stay Episode.
Complete the day stay episode
When all required fields have been completed in the Day Stay Episode, the day stay invoice has been generated and the forms printed, the episode can be completed.

- Click the Complete tick-box at the bottom of the Discharge Details screen.
Bp VIP.net will check and validate that all compulsory fields have been completed and that times have completed correctly.
IMPORTANT If the Day Stay Episode does not meet Bp VIP.net validation, a floating notification Unable to Complete will display enabling the user to amend the episode for completion.
When the episode has been successfully completed, the tick will remain in the Complete tick-box and all details of the episode are locked.
The episode will display in the Browse tab as Complete and Queued.

The Operation screen will also display in read-only with the notification that the details are Unable to be edited as this operation is linked to a completed Day Stay episode.
Batch the day stay episodes
When the Day Stay Episode has been completed, the episodes must be batched and sent to the State Health Department per health fund.
- Click File > Communications > Transmit Day Stay Episodes.
- Click the New button to create a new batch.
- Select the appropriate radio button for sending either New or Corrected records.
- Select your Hospital (if not already displayed).
- Select the required option from the Generate files(s) for field.
- Select the health fund - if HCP, Private health funds was selected in the previous field.
- Select Month to Transmit (note you cannot select the current month until the month is completed).
- Click the OK button.
- Click OK on the Day Stay Episodes to be Transmitted screen.
- Select either Send Data via Email (an email screen will be displayed with dated episode txt file attached) or Send Data via Disk to save the dated episode txt file locally on the computer.
- Review displays the Day Stay Episode
- Delete deletes the day stay batch if it has not been transmitted previously.
- Re-Transmit displays the episode txt file for you to send off to the health fund.
- Filter displays by hospital and or who the file has been generated for.

The Create New Transmit File for Day Stay Episodes window is displayed.
![]()
IMPORTANT A batch needs to be generated for each of the different departments displayed in the drop-down list in the Generate file(s) for field.
![]()
A Transmission error will show if there are any issues
IMPORTANT A notification will also display if there are episodes that have not been sent to the health fund in a previous reporting period. Ensure these are batched separately within the correct reporting period.
![]()
The Select Method to Transmit Day Stay Episodes window is displayed.
When an episode has been transmitted, the patient episode will show as Complete and Transmitted in the patient’s Day Stay Episodes screen.
Produce the Bp VIP.net Day Stay Report
An inbuilt report on Day Stay Episodes will display the main patient information per episode. This report will assist your clinic in reporting a break down of your Day Stay Episodes to your State Department.
- Click Reports > Day Stay Summary
- Use the filters at the top of the report to filter the results.
- Use the Validate Episodes button at the bottom of the report to ensure all Day Stay Episodes are validated prior to transmission.
The report is displayed.

Related topics
Last modified: 30 March 2022
|
Training at Bp Software | What's new in Bp VIP.net| Bp VIP.net System Requirements |
|
|
|
|
|
This material is classified as commercial-in-confidence. Unauthorised distribution of this information may constitute a breach of our Code of Conduct, and may infringe our intellectual property rights. This information is collected and managed in accordance with our Privacy Policy, available on our website. © Copyright 2026 |
|