This article describes how to set up Bp VIP.net to record and bill day stay surgeries.
Day stay is a separately licensed module of Bp VIP.net. To check if this licence has been activated, go to Help > About > Licence Information. If your installation has been granted a day stay licence, the Access Level column for Day Stay will show 'Full'.
To process day stay operations in Bp VIP.net, you need to set the following configuration items:
- Purchase and install DRGrouper software
- Set the excess item charge for the practice
- Set day stay preferences and private fee accommodation charges
- Add insurers as Bp VIP.net organisations and configure the insurer's charging details
- Record health fund details for the day stay patient.
- Doctor's have a Provider record created at the location of the day stay hospital.
The procedure item charged by the providers should be updated regularly using VIP LIVE Update - Health Fund Update to ensure you are billing with the most up-to-date information. Theatre bands will be updated as part of an MBS update. See VIP Live Update for more information.
The hospital billing items are updated under the contracts for each health fund. See Understanding Day Stay episode charging for more information.
Set up day stay
Install DRGrouper
Even if your practice does not use the DRG charging method to bill patients, your practice must install DRG grouping software for reporting on day stay statistics to government bodies and insurers.
Bp VIP.net uses DRGrouper software from IQVIA. Contact Best Practice Software Specialist Products Support on 1300 40 1111(AU) or 0800 40 1111 (NZ) for instructions on how to purchase and install this software.
Install 3M DRG Code Grouper
Best Practice Software has partnered with 3M to offer Day Surgery practices future compatibility for AR-DRG grouping solutions, and to ensure state reporting requirements are met.
Users will need to obtain a 3M Certificate Serial Number from Best Practice Software to enable 3M Grouper in Bp VIP.net. Certificates can be purchased from the Best Practice Software sales team. Contact sales@bpsoftware.net for further details.
See Install a 3M Certificate for Daystay for instructions on how to install and configure a 3M certificate.
Set the excess chargeable item
The 'Excess' item is charged to customers when they pay their insurance excess and \ or co-payment before the day stay surgery.
- Select Setup > Charges to open the Setup Charges screen.
- Make sure Default is selected from the row of page-owners along the bottom.
- Scroll down the list to see if there is already an item with the code 'Excess'. If yes, select the Excess item and click Modify. Otherwise, click New. The Maintain Item Details screen will appear.
- Set the following fields:
- Set User Code to 'EXCESS'
- Set the Base Fee to '0.00'
- Add the Pre-Defined Rule 'Patient Excess'
- Select This item is usually GST Exempt
- Click Ok.

MBS items import
Import the MBS surgical Item numbers from the VIP Live Update.
The Import will import item numbers, item description, MBS Fees, theatre band and whether the Item is a procedure code.
- Click File > Utilities > Live Update.
- Select Import / Charges / MBS and Bp FTP.
- Click the Next button and the MBS Date notification is displayed.
- Click Yes.
- Use the Sort by radio button to display and sort the MBS items by their code.
- Enter the first required item number in the Find field and click the Enter button on the keyboard.
- If multiple numbers are required, use the scroll button to find other item codes and hold the CTRL button to select multiple codes.
- Click OK when all codes are selected in activate the import.
- Log out and back into Bp VIP.netand click Setup > Charges to ensure all the required MBS items are displayed in the Charges screen and theatre bands are showing for procedure items.
- You may also wish to modify the ‘name’ field so that invoices’ item descriptions are as you prefer, otherwise it will remain as the MBS item description which may take up extra room on the printed invoice.
The VIP Live Update screen is displayed.

The Import MBS Items screen is displayed.

The Item will be highlighted.
Set day stay preferences
- Select Setup > Facility Preferences > Day Stay Preferences. The Daystay Preferences screen will appear. If this is the first time you have set up day stay, Bp VIP.net will prompt for your practice's state health department.
- Choose Health Dept to Report — The State Health Department that your practice transmits day stay records to.
- Hospital Name — The Bp VIP.net facility used for day stay surgeries.
- The Hospital Provider Number and Hospital Facility Code are populated from the main Hospital Facility’s organisation details.
- Daystay Billing Provider — This provider may be the Day Hospital or your principal surgeon.
- Select the Revenue account to use when billing
- Day Stay Billing Provider’s Revenue: Uses revenue from the Day Stay Billing Provider field
- Use Day Stay Surgeon’s Revenue: Uses revenue of the Surgeon recorded in the Operation screen
- Leave Revenue blank when charging: Requires Revenue account to be recorded on each invoice

The settings in the Daystay Preferences populate the Daystay Episodes screen (Ctrl+F8) with default values when a new day stay episode is created.
In the Settings tab, select:
- Click the Admission Defaults option and record default values default values that are populated through to each patient day stay episode. These settings will differ between practices.
- Click The DRG Settings option and browse to the location of the DRG Engine's .bin files, and select the DRG Version of the installed DRGrouper software from IQVIA you installed previously in Install DRGrouper.
- In the Diagnoses and Procedures tab, the Condition Onset Flag is normally set to 'Condition not noted as arising during the episode of admitted patient care', but this will depend on your practice .
- The Discharge Defaults tab supplies default values for a patient when discharged. These settings will differ between practices.
- The Private Health Fund Defaults tab specifies the accommodation band charges for patients with basic health cover. These charges are set by the Department of Health.
- Click the Edit button to complete the values as provided by the Department of Health. These values will be used for patients with base cover.
- Click OK to save day stay preferences.
NOTE Accommodation Band Type C is where a procedure that is normally performed in a doctor’s rooms, requires an inpatient stay due to complexities. Type C accommodation band claim requires a certificate for claiming.
Set up health fund contracts
All health insurers (health funds) must be created as an organisation in Bp VIP.net with a role of 'Insurer'.
If you will be also billing the surgeon’s fee and if an insurer is not part of an umbrella organisation, you must set up the insurer as a 'Fee Scaler', 'Subsidiser', and Insurer in Bp VIP.net.
- Create an organisation with the role of 'Fee Scaler' – for Provider billing.
- Create an organisation with the role of 'Subsidiser' - for Provider billing.
- Create an organisation with the role of 'Insurer' – for Day Stay billing.
Set up an individual health fund contract
- Press F2 or select Patient > Select from the menu to open the Search screen.
- Type in a descriptive name for the health fund in the Search text field. Tick New Organisation.
- Select a Role of 'Insurer'. The Health Fund Contracts tab will be enabled .
- Tick Allow debts to be redirected.
- Complete the contract information in the Details tab.
The Organisation Details screen will open at the Details tab with the name you just typed in the Name field, ready to be completed.

Obtain the health fund’s brand ID
For online claiming, the health fund must have the correct brand ID.
- Click on the Medicare button in the toolbar and click the 1. Get Healthfund Information button.
- Click the 1. Get the Health Fund Participants button and all the health fund details will populate from Medicare.
- Click the 2. Get Insurers List and all the health fund details will populate from the health funds records created in Bp VIP.net.
- Select the health fund on the top half of the screen and match it with the corresponding record on the bottom half of the screen and click Update these values.
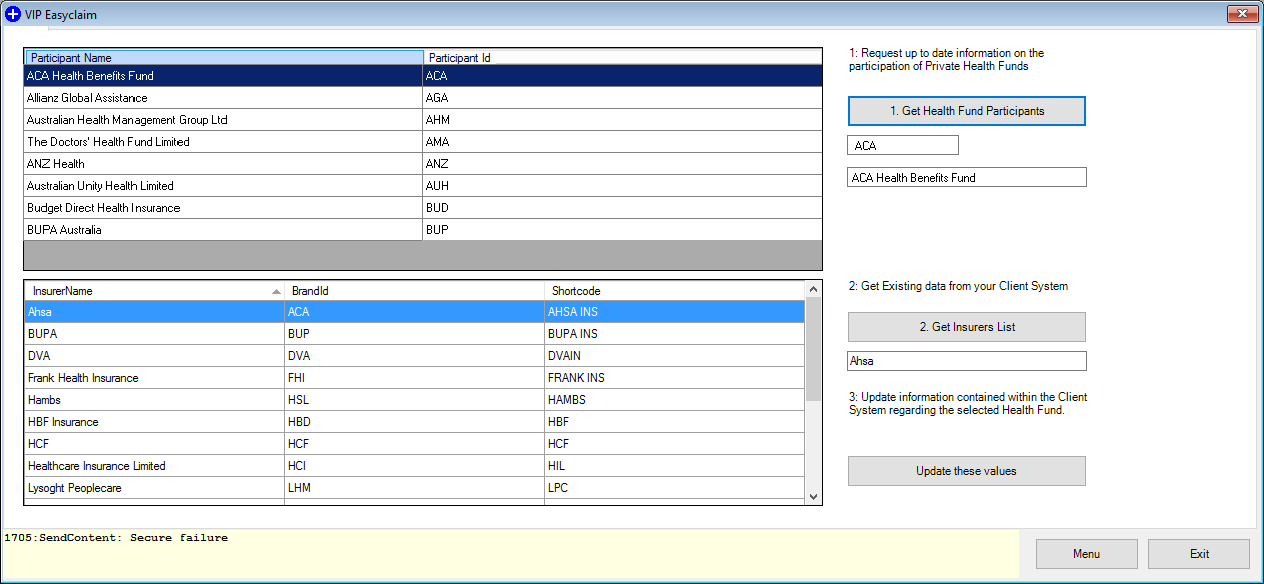
The BrandID will display on the health fund record in Bp VIP.net.

For health fund provider billing only:
- Select the Charging Details tab and set the following fields:
- Untick Generate a single batch.
- Under Redirection Settings, set the Percentage to '100%' and rounding to 'Up to Nearest 1c'.
- Set Base calculations on to 'Subsidy'.
- Invoicing is normally set to 'Print the patient invoice only', because health fund payments are usually processed electronically, but this will depend on your practice.

For day stay billing:
- Select the Health Fund Contracts tab.
- Set the DRG Version to the latest version.
- The Fund ID is usually set to 'Insured with agreement with hospital' but verify with your contract.
- Click Edit. You will be prompted to confirm the Charges Effective Date. Click Yes to continue.
- The charging band columns will be enabled for the addition of charge codes.
- Follow at least one of the sets of instructions below, according to the contract with the insurer.

Set up DRG charging
DRG charges are not always used as a hospital must have a contract to provide the DRG item.
- Click Add under the DRG Charges column. A row will be added. Enter the DRG Code and the associated Fee in the cells.
- If the DRG code includes a prosthesis, click Prosthesis and move the desired prostheses codes that are included in the contract over to the Selected column in the Prosthesis screen. Click Ok.
- Repeat steps a–b for all chargeable DRG codes applicable to the contract. Go to Set up accommodation charges (all types).
Set up case based charging
- Click Add under the CaseBase Charges column. A row will be added. Enter the item code and the associated case base fee and procedure fee.
- If the case base item includes a prosthesis, click Prosthesis and add the desired prostheses codes that are included in the contract over to the Selected column in the Prosthesis screen. Click Ok.
- Click the Edit button on each case base item to verify GST settings.
- Repeat steps a–c for all chargeable case base fees applicable to the contract.
- Set the Multiple Case Base Item Contract Type to the type specified by the contract: '1. Casebased fee for main item and remaining items use the procedure fee. No Accommodation fee', or '2. Use procedure fee for all items. Add Accommodation fee'. Go to Set up accommodation charges (all types).

Set up per diem Charges
- Click in a Top Cover column for a theatre band and start typing to enter your fee for that band.
- Repeat for all theatre bands applicable to the contract.
Set up accommodation charges (all types)
- The Base Cover values default from the DayStay Preferences screen and cannot be changed here. Click in a Top Cover column for a band and start typing to enter a fee for that accommodation band.
- Set the Procedure Percentages covered by the health fund contract for multiple procedures. If your contract only allows one item per episode, then enter 100.00 in Procedure 1 and leave the rest at 0.00.
- Leave the Rounding Options set to 'To Nearest 1c'.
- Click OK to save the charging details for the health fund contract.
Set up a health fund that is part of a larger umbrella organisation
If a health fund is part of a larger umbrella organisation, such as AHSA or BUPA, use the following instructions to create the health fund.
The parent company must be created three times:
- First record with the role of 'Fee scaler'
- Second record with the role of 'Subsidiser'
- Third record with the role of ‘Insurer’.
NOTE The Main Office tick box on the right hand side must be selected for the parent umbrella organisation for the contract information to be copied to the child organisations .

- Tick the Main Office tick box.
- From this organisation record click the Join button and the Search screen is displayed.
- Leave the organisation name in the Search screen
- Tick the New Organisation tick box.
- Click No to ‘Copy the Address Details’.
- Click Yes to ‘Copy the New role to associated Organisations’.
- Click OK on the ‘To Update the Health Fund Contracts’ notification.
- Edit the Name of the child health fund and enter a Code.
- After obtaining the BrandID, Obtain the health fund’s brand ID, click on the Health Fund Contracts tab and click the Copy from Parent Org button.
- Click Yes on the Copy Redirection Details pop up.
- Ensure the Contract Charges Effective Date is complete.
- Enter required DRG Version and Fund ID (these will not populate from the parent fund)
- Click OK to save the child health fund record.
The New Associated Organisation warning is displayed.
NOTE A BrandID is required on the organisation for all IMC and IHC claims through Bp VIP.net. A child health fund will still require their unique BrandID.


The health fund contracts information will copy over to the new joined associated organisation.

Health Fund Update
After you have created all the health funds as organisations with the types of 'Fee Scaler', 'Insurer' and 'Subsidisor', the Heatlh Fund Update should be run to ensure you are billing the latest updated fees.
IMPORTANT Ensure all health funds have a BrandID.
- Click File > Utilities > Live Update.
- Select Update / Charges / Health Fund and Bp FTP.
- Click the Next button.
- Select the required health fund fee scaler.
- Tick the Update tick-box.
- Select the health fund to update the fees in the Update With column.
- Repeat the last three steps for each health fund.
- Click Next when completed.
The VIP Live Update screen is displayed.


A notification of Health Fund Charges are Updated will display when the update is completed. The Last Updated column will display with the new updated date.
IMPORTANT The Effective Date must not be before or on the Last Updated date. If unsure, enter Effective Date as 1 day after the Last Updated date.
Check compulsory patient and health fund information
You need to record a patient's health fund details in their Patient Details (F3) to create and bill day stay episodes. Firstly, ensure you have the necessary fields on the Patient Details screen and Financial tab.
Patient Details screen: Indigenous Status (DS only) and Language (DS only)
Financial Tab: Health Insurer, Policy Number, Commenced, Excess, Co Payment, Cover
Create patient's preferred language and indigenous status fields
You can add fields to the UDF assigned to the Patient Details screen to capture the patient's indigenous status and language spoken at home. If a day stay episode is created for the patient, the preferred language and indigenous status will default through to the Language Usually Spoken at Home and the Indigenous Status field in the Day Stay Episodes screen. If this field is not populated, it will save as empty and will prevent completion of the day stay episode.
- From the main Bp VIP.netscreen, select Setup > User Defined Forms > AUSNumbers. Click Modify.
- Click the Pre-set Fieldbutton (first from the left) to open the Insert Pre-set Field screen.
- Select Patient/Org on the right-hand side. Open the Patient category, scroll down, and select the Language (DS Only) field. Click Insert.
- Click the Pre-set Fieldbutton again.
- Select the Indigenous Status (DS Only) field. Click Insert and position both fields on the AUSNumbers UDF.
- Double-click the new field label to open the Modify Label screen. Change the name of the label to something more descriptive, such as 'Language at home' or Language'. Click OK.
- Save the UDF.
- Press F3 to open the Patient Details for a patient. The new fields should be available.
NOTE If your practice uses a different UDF in Patient Details, select that UDF instead.


EXAMPLE The example above, shows the edited titles of both fields. This can be done for better placement on the screen.
Download a financials UDF from VIP Live Update
If your Bp VIP.net database does not show the following fields in the Financial tab: Health Insurer, Policy Number, Excess, and Co-payment, you will need to download a 'Financials' UDF for the Patient Details screens from VIP Live Update.
- Select File > Utilities > Live Update. The VIP Live Update screen will appear.
- Make the following selections:
- Section 1 — Select Import
- Section 2 — Select Bp Library
- Section 3 — Select UDFs
- Section 4 — Select Bp FTP
- Click Next.
- Tick /Patients 500 and click OK.
- Tick the 'Financial' options appropriate for your region and click OK. Bp VIP.net will download the latest financial UDF, which appear as the Financials tab on the Patient Details screen.
Add compulsory demographic and health fund information to a patient
You need to record a patient's health fund details in Patient Details to bill day stay episodes.
- Load the patient into the information bar and press F3 to open the Patient Details screen.
- Complete the Language and Indigenous fields.
- Select the Financial tab on the right.
- Click OK to save the patient's details.

TIP Often the patient will not know their insurance commenced date. The Commenced date must always be before the date of the day stay operation, or Bp VIP.netwill not process the day stay episode.
Set up theatre appointment books
- Theatres can be created as an individual appointment book to enable multiple providers per appointment page.
- Click Setup > Appointment Book > Page-Owners.
- Click the New button.
- Select Custom for the type of Page-Owner.
- Click OK to save.
- The Details tab is displayed. Enter any required autotext into the Additional Column 2 e.g. patient’s health fund details.
- Select a Background Colour.
- Click the Rosters tab.
- Click the New button.
- Complete the Roster Settings screen and click OK.
- The Roster of.. screen is displayed.
- Select the day of the week and the group of times required for one surgeon and click the Custom button.
- Select the Appointment Type of Operations and complete the Located At, Surgeon and Anaesthetist field (Anaesthetist field may be left blank if unknown at this stage.
- Click OK and continue creating the roster for the theatre. Save the roster when it is completed.


TIP The Location, Surgeon and Anaesthetist will default through to the Operation screen when the operation is booked from the Appointment screen.

Create the hospital as a provider for billing day stay
As the day stay component of the patient’s bill is generally claimed by the day stay hospital, the hospital can be set up as a provider for invoicing and display on the invoice.
- Click Setup > Providers > This Clinic.
- Click the New button on the Providers screen.
- Log out and back into Bp VIP.net.
- Click Setup > General Preferences > Day Stay Preferences.
- Select the Hospital provider record in the Day Stay Billing Provider field and select Day Stay Billing Provider’s Revenue to ensure the hospitals revenue account is populated into all day stay invoices.
- Click OK to save the settings.
IMPORTANT The minimum requirements for creating a provider record are shown by red arrows in the image below.

To add the newly created Hospital Provider record as the billing provider for the Day Stay invoice:

Day Stay setup is complete.
What do I do next?
Last modified: July 2020