ACC setup assumes that your practice has registered with ACC as a vendor and installed the HealthSecure digital certificate. For more information on ACC registration, contact ACC.
On this page:
To process ACC claims through the ACC API from Bp VIP.net, you need to:
- set up ACC item codes to charge against
- set ACC claim numbering ranges for your practice (if your practice lodges new ACC claims)
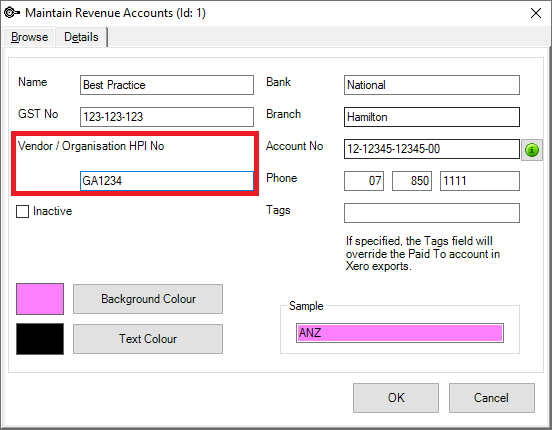
- record the Vendor ID on the Revenue Account.
- set up batching for the ACC organisation
- record contract details for all providers. The Provider’s HPI and ACC Contract number are sent to ACC with the ACC Invoice.
Point 1 and 2 will likely have been performed during your initial deployment of Bp VIP.net. You still may need to add ACC codes or modify existing codes.
Perform the following instructions on the machine that will be used to send and receive files from the ACC API.
Set up ACC item codes
You must create all of the items at your practice that are chargeable to ACC.
- Select Setup > Charges. The Setup Charges screen will appear.
- Click New, or select an existing item and click Copy if the new item will be similar. The Maintain Item Details screen will appear.
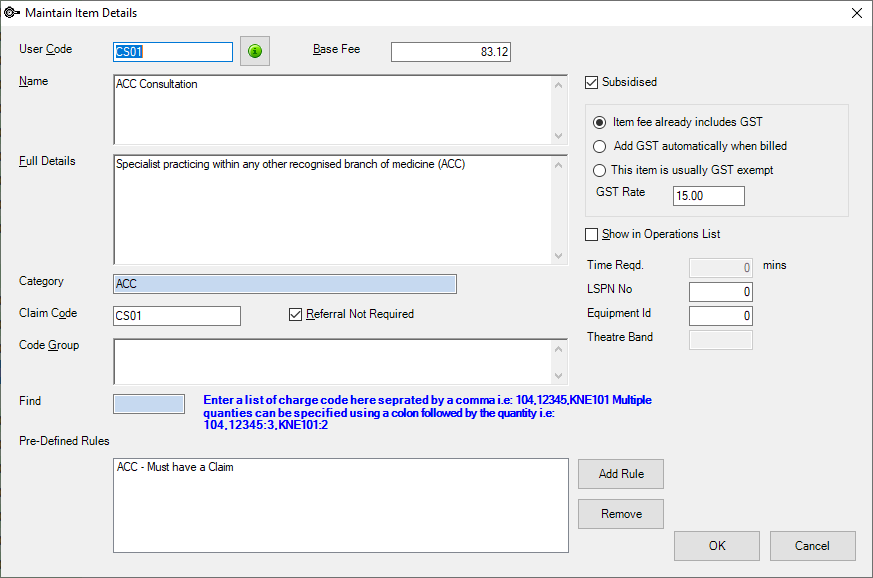
- Enter the ACC Claim Code for the charge in the User Code field.
- Enter the Base Fee (inclusive of GST) and tick Subsidised.
- Select Item fee already includes GST.
- Enter the Name of the ACC item and a full description in the Full Details field.
- You can create a Category to differentiate between ACC and non-ACC item codes for clarity in reporting.
- Enter the ACC claim code from step 3 in the Claim Code field.
- If a referral is not required to charge this item, tick Referral Not Required.
- Leave the Code Group field empty and click Add Rule. The Select Business Rules screen will appear.
- Select the rule ‘ACC – Must have a Claim’ from the list and click OK.
TIP The row of page-owner buttons along the bottom allow you to set fees for individual page-owners. In this example, fees are being set for the practice, so make sure the Default button is selected.
The base fee is the fee set by ACC for this injury, and subsidised 100% by ACC.
Start typing in the Category field. The Select Category screen will appear. Click New, enter a name for the category, and click OK twice to return to the Maintain Item Details screen.
TIP Categories are optional but grouping item codes by category can make reporting easier.
TIP This rule ensures that Bp VIP.net will populate the Select Claim screen to enable the selection of the linked claim for claiming the invoice.
Additional ACC item codes rules
Some ACC items now require a Unit Cost or Hourly rate to be calculated when creating the invoice.
Obtain the PMS Code list to see whether the Unit Cost or Hourly rates apply to any of the ACC charge items your clinic uses.
The new available rules to be applied in Bp VIP.net where a time or unit cost is required are:
- ACC – TIME Days Charge by Days (whole days only)
- ACC – TIME Hour Charge by Hour (including points of hours were .5 = half an hour)
- ACC – Time Minutes Charge by minute (whole minutes only)
- ACC – Unit charge Item is charged by unites
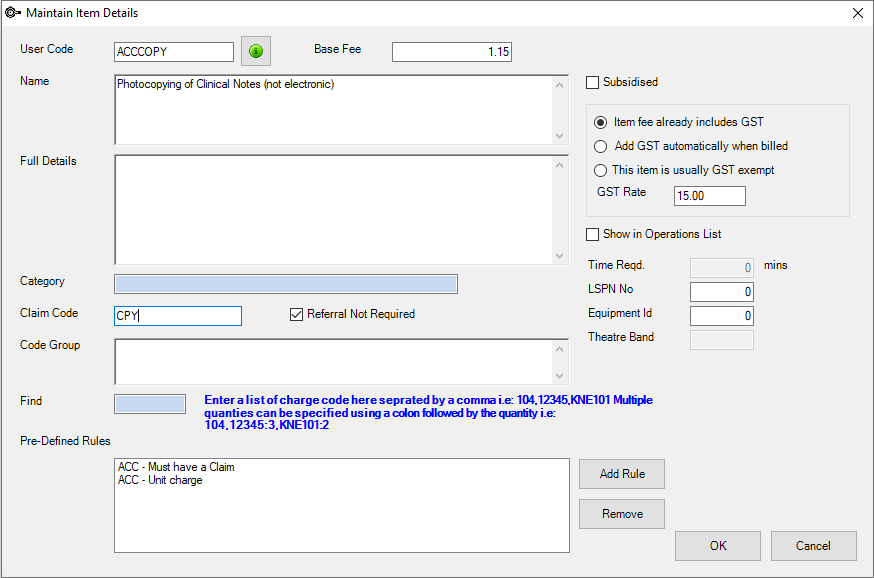
- Set up the Item and select the required additional rule from the Predefined Rules.
- Click OK to save the ACC-chargeable item and return to the Setup Charges screen.
- Repeat steps 2—13 for each ACC chargeable item. You can use the Copy bottom at the bottom of the Setup Charges screen to copy and modify the item you just created.
Log out of Bp VIP.net and back in for the new charges to become available.
Creating surgical and other ACC chargeable items
To create an item for surgical procedures, tick the Procedure Code check box and complete the fields below and include Show in Operations List.
It is advisable to set up a separate private fee if you charge a surcharge on the ACC item.
IMPORTANT The Charges screen will display the charge amounts for each item in both the ACC subsidiser column and the Base Fee column. It is not necessary to set up a Feescaler option for ACC when the base fee equals the same as the ACC charge.
Set ACC claim number range
If ACC has provided your practice with a range of ACC claim numbers to use, record the range in your facility preferences to auto-generate a claim number when a new claim is created.
- Select Setup > Facility Preferences > General Preferences. The Facility Preferences screen will appear.
- Select the Patients tab.
- In the ACC Claim Numbering section, record the First Number and Last Number allocated to your practice. Enter any letters as capital letters.
- Click OK to save the record.
![]()
Bp VIP.net will default new claims to use the ACC number range and validate each new number to ensure that you do not create a duplicate claim.
You can also set ACC number ranges for individual providers, if only some providers will provide ACC consultations at your practice. See Add a new provider for more information.
Set up batching
If your practice batches and sends claims to ACC electronically, you need to set the batching options for the organisation 'ACC'.
The 'ACC' subsidiser should have been created during the initial installation of Bp VIP.net NZ. If not, you must create the organisation.
- Press F2 to open the Search screen. Type '=ACC' in the Search field and click Search.
- Select the Subsidiser organisation with a Name of 'ACC' and click OK.
- Press F3 to open the Organisation Details screen for the ACC subsidiser. Select the Charging Details tab.
- In the Batching Method section, select the Method 'ACC Invoicing'.
- Tick Send batches via ACC Claim.
- In Batch Settings, enter '99' as the Maximum items allowed per batch and tick Automatically generate batch numbers.
- Click OK to save changes.

IMPORTANT In Batch Grouping, do not tick Generate a single batch for all providers/revenue accounts.This setting enforces a separate batch created and sent per provider.
Add provider contract details
You must add medical and ACC identifiers to a provider's details, if you haven't already when the provider was created.
- Select Setup > Providers > This Clinic. The Providers screen will appear.
- Click New if you are setting up a new provider, or select an existing provider and click Modify. The Providers (ID) screen will appear.
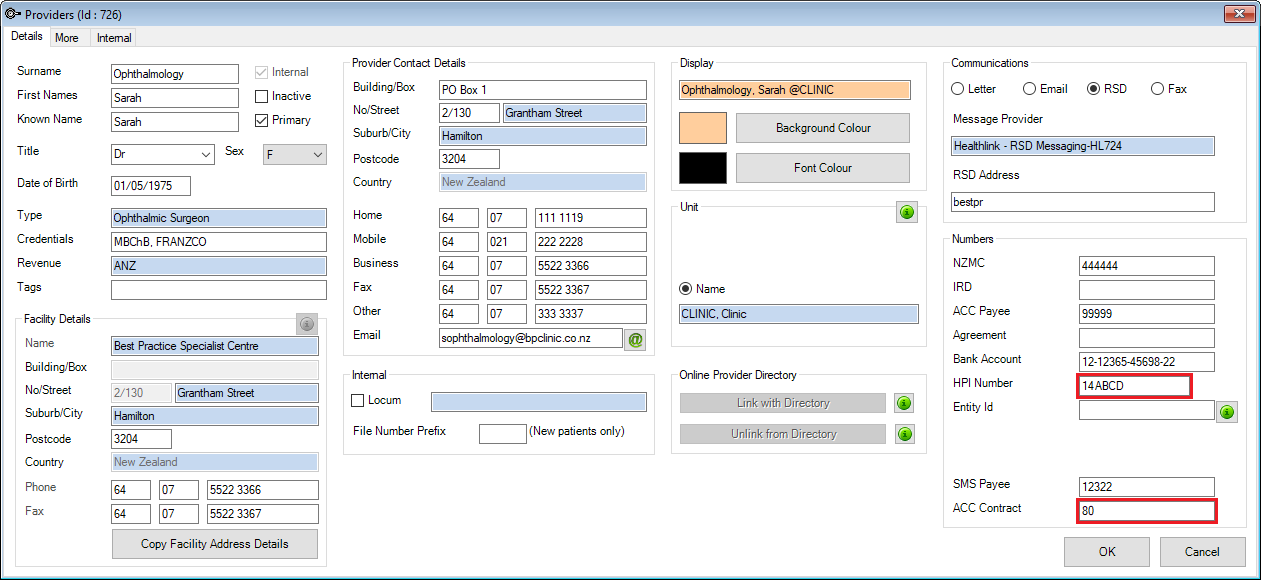
- In the Numbers section on the right, enter the provider's:
- NZMC
- ACC Payee number (if applicable)
- ACC Contract number
- HPI Number. Bp VIP.net will validate any entered HPI numbers. If a HPI number refuses to validate, contact Best Practice Software Specialist Product Support for assistance.
- Click OK to save the changes.
ACC setup for Bp VIP.net is complete.
What do I do next?
- Create an ACC45 claim
- Bill an ACC consult
- Batch and transmit ACC claims
- Record ACC payments and declines against a batch
- Resubmit a claim to ACC
Last modified: 21 August 2023