You can create one-off or recurring Appointments in Bp Allied. Some appointments will require a referral attached.
In this article:
- Create an Appointment
- Add referral to an appointment
- Set a referral as Current
- Create a casual appointment
- Appointment Right-Click Menu
- Set an Appointment Status
- Create a Recurring Appointment
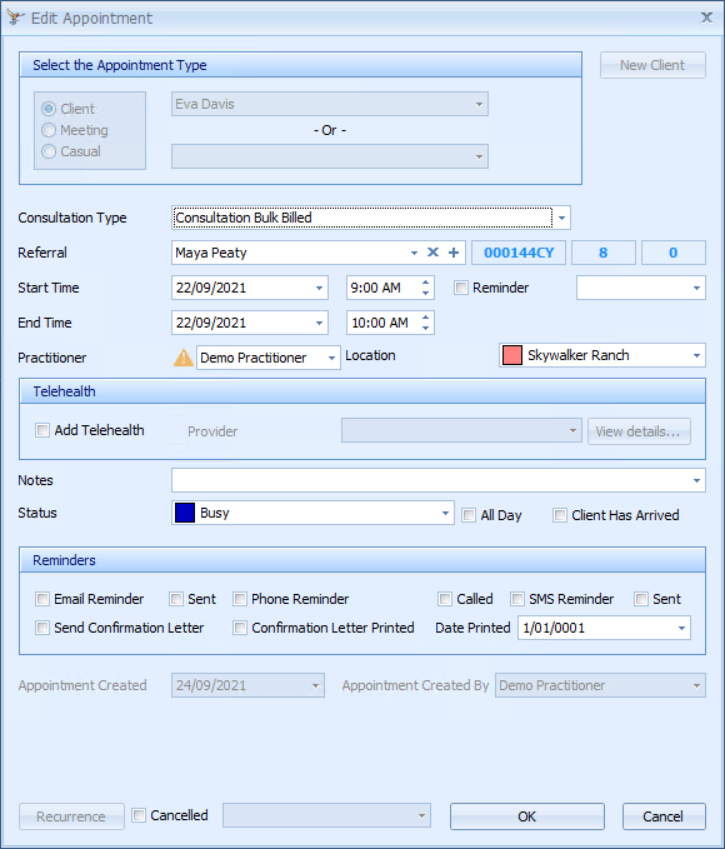
Create an Appointment
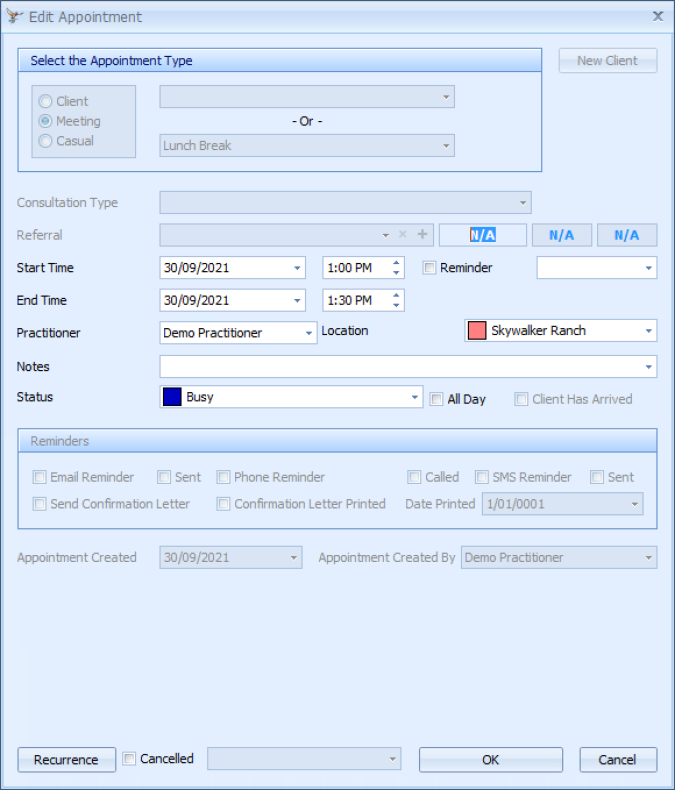
The Edit Appointment screen holds the details for an appointment or meeting booking, including attached referrals and reminders to send.
- With the Appointment Book open, click the New Appointment button, or double-click in the desired Appointment Book slot.
- Select an appointment type of Client, Meeting or Casual using the radio buttons.
- If Client Appointment is selected, choose a Client from the list, or select New Client.
- If Meeting appointment is selected, the Select a Meeting Type field becomes enabled. Choose a Meeting Type from the list.
- Choose the Consultation Type.
- Select a Referral.
- The referral details are displayed in the Referral field followed by the Referrers Provider Number, number of Appointments this Year, and Appointments Remaining. Referrals are sorted by Current Referral, then by Date. If multiple current referrals are shown, the referral with the most recent date is selected.
- If there is no referral selected, the Appointments Remaining field is set to N/A.
-
If a Client has a referral nominated as a Current Referral and the Practice does not have Allow Multiple Current Referrals enabled, the referral will be attached to each new appointment created after the creation of the referral.
- Enter the Start Time and End Time.
- If a Duration has been set for a Consultation Type, the default End Time will display based on the Start Time selected.
- Appointments can be moved around the calendar by dragging and dropping.
- Check the Reminder tick box for a pop-up notification at the time of the appointment.
- Select the Practitioner.
- Select the Location. This is set by default to the location specified in Practitioner Availability for the time of the Appointment.
- Add any Notes relating to the appointment if desired.
- Select the appointment Status.
- Check All Day if the appointment is scheduled for the whole day or use the New All Day Event shortcut option.
- Select a Reminder type.
- If the client has this information set in their Client Details it will automatically display in the appointment when the client's name is selected from the drop-down menu. Once the reminder is sent a tick will be shown in the Sent box.

The Edit Appointment form will display.
NOTE If the Client has a Red Flag note or an Outstanding Balance these items are flagged by the appropriate icon when their name is added to the appointment. Hovering over the icon will display the Red Flag note or the Outstanding amount.
TIP Consultations types can be grouped into Categories for ease of reference. New Consultation Types or Categories can be added under Maintenance > Products and Services.

NOTE A warning will display if the Practitioner chosen is not the Primary Practitioner selected in the Client Details.
Additional Fields
|
Field |
Description |
|---|---|
|
Client has Arrived |
This box can be ticked to indicate that the Client has arrived. It changes the icons displayed in the appointment book. |
|
Appointment Created |
Appointment Created shows the date in which the appointment was first created. This may not be changed. Appointment Created By shows who first created the appointment. This may not be changed. |
|
Recurrence button |
Recurring appointments can only be used for meetings, lunch breaks etc. These appointment types do not have the same functionality as a normal Client Appointment as Consultation Notes can not be attached. Use the Copy Appointment option to make multiple appointments for a client. |
|
Cancelled Appointment |
Tick the Cancelled box if the appointment/meeting has been cancelled. The Cancellation Reason drop-down list will be displayed. Select the appropriate Cancellation Reason. |
Add referral to an appointment
To add a new Referral to the Appointment, select the plus + icon at the right of the Referral field.
![]()
See Add a Referral when adding a New Client
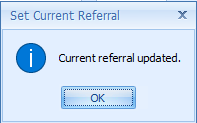
Set a referral as Current
A referral can be updated or viewed from Client Details > Referrals and can be set as the Current Referral when selecting from the Edit Appointment screen.
-
Select the desired record from the Referral drop-down field.
-
Right-click on the selected Referral.
-
Select Set as Current Referral.
-
The message Current referral updated will display.

Create a casual appointment
A Casual appointment can be used for a walk-in client or to block out a time space in the calendar for any other reason. If used for a walk-in Client, please note that the Client can not be invoiced from the appointment nor can any of the other usual appointment functions be carried out.
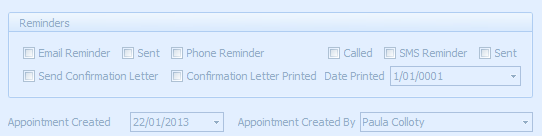
The following fields are not available for use within a casual appointment:
- Consultation Type
- Referral
- Notes
- Reminders
- Appointment Creation details
- Recurrence

![]()
![]()
Appointment Right-Click Menu
The Right-Click Appointment menu is displayed when selecting the Client Appointment. Options will display in the menu according to what has been selected in the Appointment Edit screen. If an SMS Reminder is not required in the Appointment details this option will not show in this menu.

|
Field |
Description |
|---|---|
|
Open |
Opens an appointment to enable it to be edited. |
|
Set Status as... |
Enables the Status of an appointment to be changed without opening the appointment. |
|
Location |
Enable the Location of an appointment to be changed without opening the appointment. This is only applicable where a practice has more than one location setup in Bp Allied. |
|
Delete |
Deletes the selected appointment. Once an appointment is deleted it can not be retrieved. |
|
Show All Client Appts |
This option displays all Appointments that a client has had or has booked in the future. |
|
Client Details... |
Opens the Client Details form for viewing or editing without opening the appointment. |
|
Send SMS... |
Used to send an adhoc SMS to the selected Client. |
|
Send Confirmation SMS |
Click to send a confirmation SMS at the time of booking an appointment. This is independent of an SMS reminder. Set up the SMS Confirmation Template in Data Maintenance > Reminder Templates. |
|
Send SMS Reminder... |
Used to send an appointment Reminder via SMS using the templates already set up. Once a reminder has been sent then the option in the menu is disabled. |
|
Send Email Reminder... |
Used to send an appointment Reminder via Email using the templates already set up. Once a reminder has been sent then the option in the menu is disabled. |
|
Phone Call Reminder... |
Click to acknowledge the phone call reminder has been made. |
|
Print Confirmation Letter... |
Click to create a Confirmation Letter. This will open the Letter Editor with the Client's information and appointment date selected and ready for merging. Once a Confirmation Letter has been printed and the menu option clicked then the option greys out. |
|
Create Invoice... or Go to Invoice... |
Enables the creation of an Invoice for this appointment without opening the appointment. If the Invoice has been created the menu option changes, clicking this opens the relevant invoice. |
|
Create Quote... or Go to Quote... |
Enables the creation of a quote attached to the current Invoice. If the quote has already been attached to the appointment, the menu option changes and clicking this opens the relevant quote. |
|
Tasks |
Tasks are used to send reminders to Practitioners and other users of Bp Allied of things that need to be done for a specific Client. |
|
Client has arrived |
Used to annotate the Appointment displayed within the Appointment Book with an icon denoting that the client has arrived. |
|
Copy Appointment |
This menu option copies the selected appointment. |
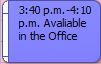
Set an Appointment Status
-
Right click on the Appointment and click Set Status As.
-
Alternatively, open the Appointment and select the Status from within the Appointment.
-
This changes the appointment highlight displayed on the left side of the appointment.
-
The default status is set from Options > Appointment Book. By default it is set to Busy.
![]()

![]()
![]()
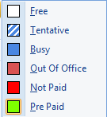
The Appointment Statuses available in Bp Allied are:
|
|
Create a Recurring Appointment
Recurring appointments can only be used for an appointment type of Meeting. They can be used for scheduling meetings and lunch breaks into a Practitioner's diary.
- The Recurrence button is disabled for a Client Appointment. This appointment type does not have the same functionality as a normal Client Appointment. Consultation Notes can not be attached to these appointments.
- Meetings are not updated to Google calendar.
- Open the Edit Appointment screen.
- Click Recurrence to open the Appointment Recurrence form.
- Start, End and Duration will default in from the Start Time and End Time. Otherwise, set these as required.
- Select how often the meeting is to recur.
- Start will default in from the Start Date if already selected. Otherwise, set this as required.
- Select how many occurrences of the meeting are to be created or the date of the last occurrence.
- Click OK to save the Recurrence options.
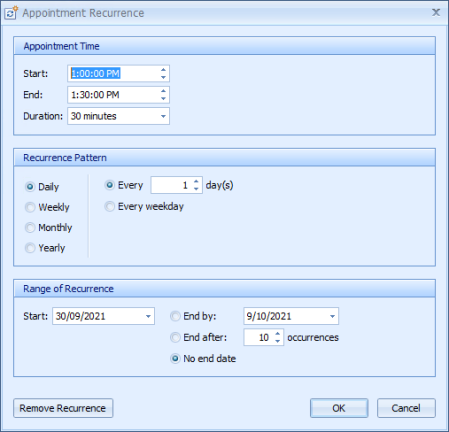
What values need to be selected depend on whether a Daily, Weekly, Monthly or Yearly option are chosen.
Click Cancel to cancel any changes made
Remove Recurrence will remove all instances of this meeting from the Appointment Book.


 AU
AU 