Current medications are managed from the Current Rx section of the left hand tree in the patient record.
Add a current Rx
- Open the patient record you want to add a new prescription to.
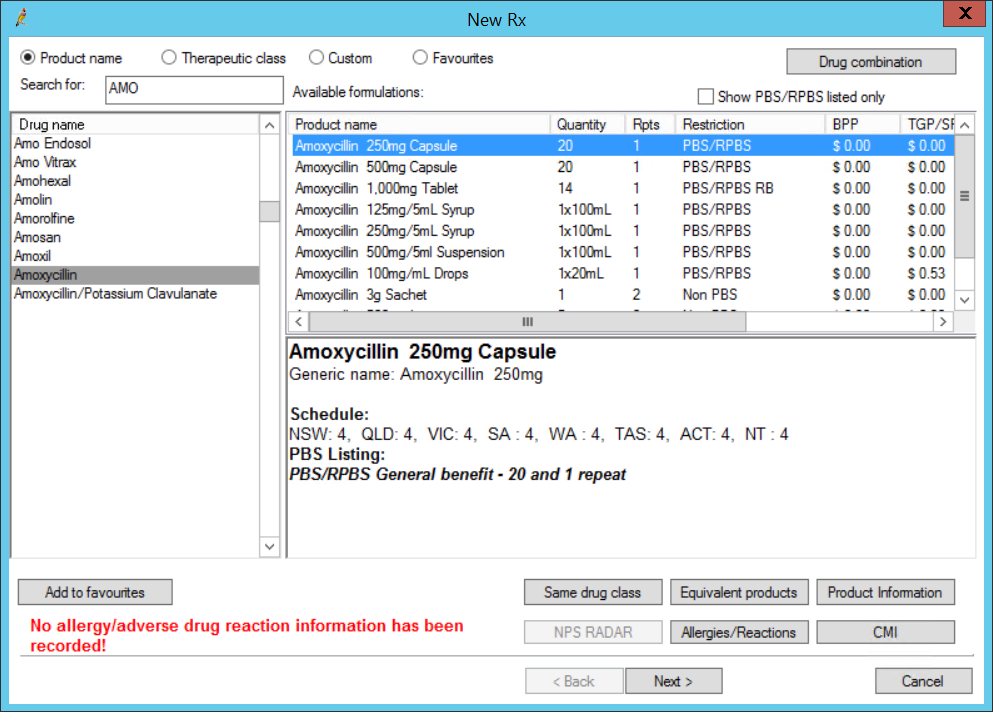
- Select Current Rx from the tree on the left hand side. Click Add above the list to the right. The New Rx screen will appear.
- Select to search by Product Name or Therapeutic class, search for Custom preparations, or search Favourites that have been recorded for this provider.
- Enter the first few letters of the search term in the Search for field. Matching drugs or preparations will be listed below.
- Select the medication you want to prescribe from the list. Select the formulation to prescribe from the Available formulations list to the right. Tick Show PBS/RPBS listed only to only show listed formulations.
- If you are likely to prescribe the same medication in the future, you can click Add to favourites to add the drug to your Favourites list.
- If the patient requires a combination of drugs, and your practice has configured the drug combination in Bp Premier, click Drug combination to prescribe the combination.
- The buttons at the bottom of the screen have the following actions:
- After you have selected the formulation you want to prescribe, click Next. The New Rx screen will continue.
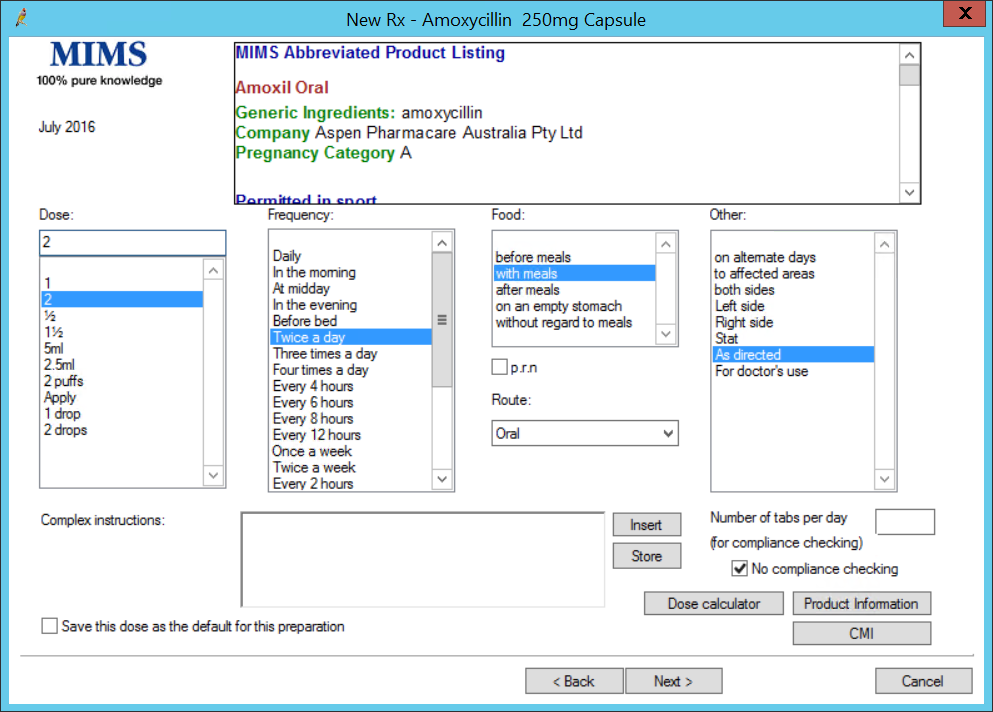
- Select the Dose, Frequency of administration, whether to take with Food, and any Other instructions. To assist in calculating the correct dose for a patient, click Dose calculator to open the dose calculator tool.
- Tick p.r.n if the medication is to be taken 'as needed'.
- Change the Route of administration if necessary.
- Enter any Complex instructions to be printed on the script, if any. Click Store to store complex instructions for later reuse.
- If the patients requires compliance checking for medication, enter the Number of tabs per day to check for. Otherwise, tick No compliance checking.
- If the selections made in this screen are likely to apply to further prescriptions of the drug, tick Save this dose as the default for this preparation.
- Click Next. The New Rx screen continues.
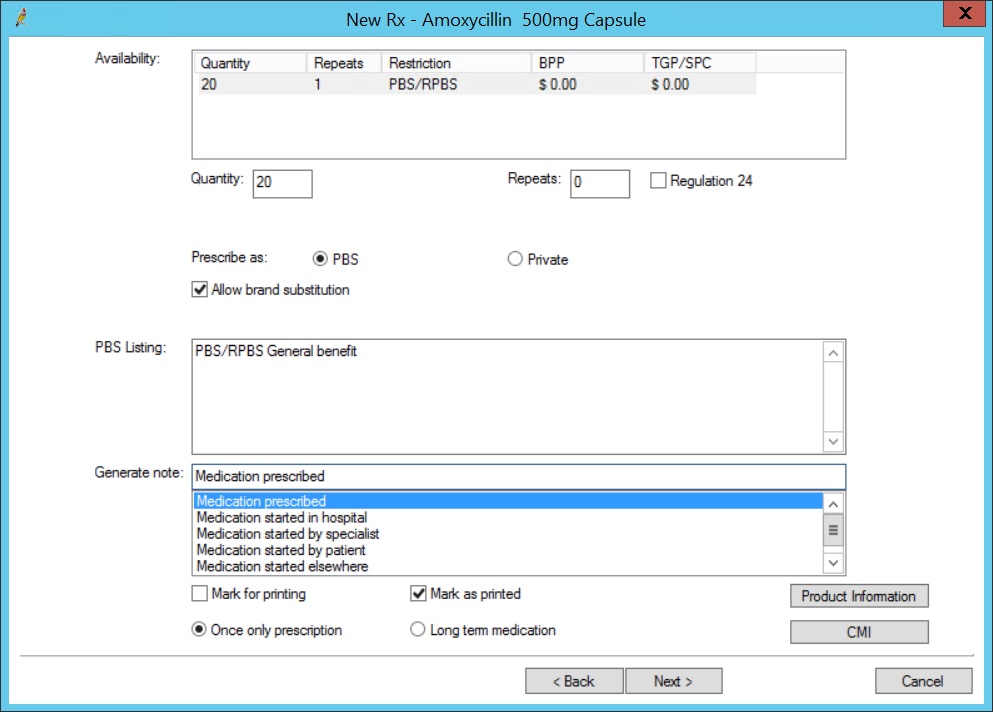
- You can manually edit the Quantity and number of Repeats for private scripts.
- If you increase the Quantity for an Authority prescription, Bp Premier will prompt you to confirm . If you select yes, an additional authority approval screen will appear before the Rx is finalised.
- Tick Regulation 24 to endorse Regulation 24 on the Rx. For more information, refer to the Pharmaceutical Benefits Scheme website.
- You should not need to change the Prescribe as selection.
- Tick Allow brand substitution to allow the dispenser to suggest a brand alternative.
- Select the Rx origin from the Generate note dropdown.
- Tick Mark as printed if the Rx has already been printed for the patient. Otherwise, tick Mark for printing.
- Select Once only prescription if no repeats are intended, or Long term medication if repeats are being prescribed.
- Click Next. If you selected an Authority prescription in step 17, the New Rx authority screen will appear. If the script is not an authority, go to step 25.
- Complete the fields in this screen and click Next. The final New Rx screen will appear.
- Select the condition treated by the medication from the patient's existing conditions, or select New condition to enter a new condition.
- Click Finish to return to the Current Rx list, or Another to add another Rx.
- Tick the checkboxes of the medications in the Current Rx list you want to print, and click Print to print the scripts.
TIP Depending on the type of drug searched for, a hyperlink at the bottom of the New Rx screen may appear that links to PBS guidelines for prescription of that drug.
Button | Action |
|---|---|
Same drug class | Select a drug from the Available formulations and click this button to view formulations in the same therapeutic class for comparison. |
Equivalent products | Select a drug from the Available formulations and click this button to view alternate similar products. |
Product Information | Opens the MIMS product information viewer for providers. |
CMI | Open the Consumer Medicines Information viewer for providers to show or print for patients to take home, providing information about the drug. |
Allergies/Reactions | Opens the Allergies/Adverse reactions screen to view or add allergies for the patient. |
NPS RADAR | Opens NPS RADAR if there are any alerts or patient information leaflets relevant to the selected formulation. |
NOTE If you tick the p.r.n. checkbox , Bp Premier does not consider the medication 'regular medication' for the patient. This affects the ability to insert the prescription into template fields. See Add or cease Rx for more information.
Bp Premier will default the Prescribe as value based on the patient's DVA status and the medication. If the patient has a DVA Gold card recorded in their demographics and the medication is listed on the RPBS, RPBS will be selected in this window. Patients with white or orange DVA cards will not default to RPBS. If the medication is for a condition listed under the patient's white card, you must manually select the RPBS option.
IMPORTANT Make sure you only select Long term medication if the patient will require repeats. See Once only and long term medication for more information.
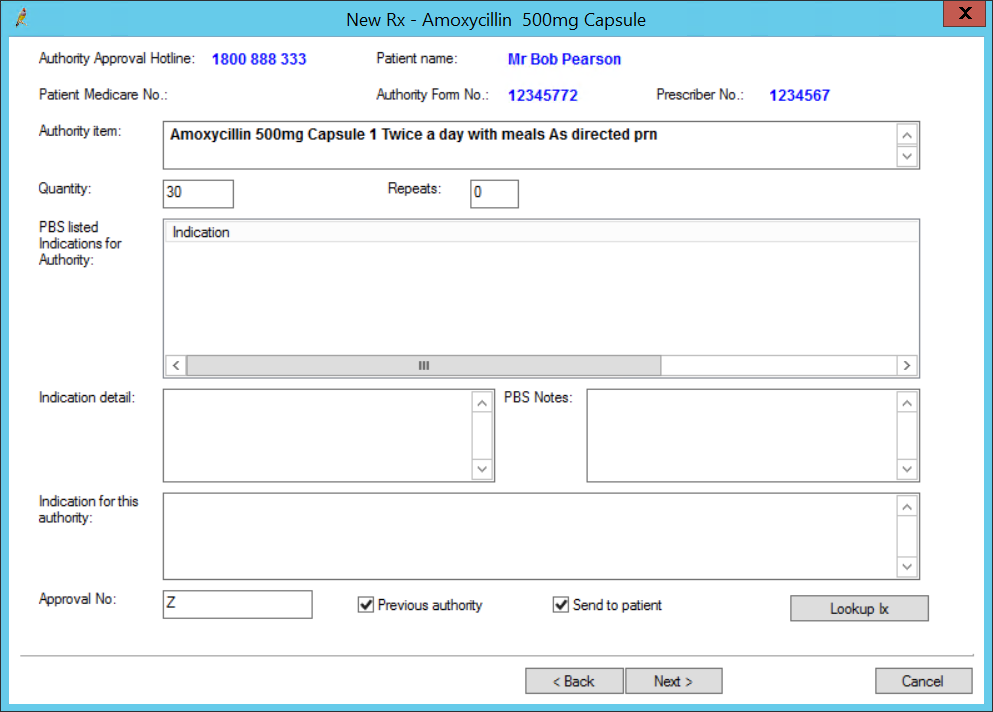
NOTE Authority details are printed on the script. For more information on authority prescriptions, refer to the Pharmaceutical Benefits Scheme website.
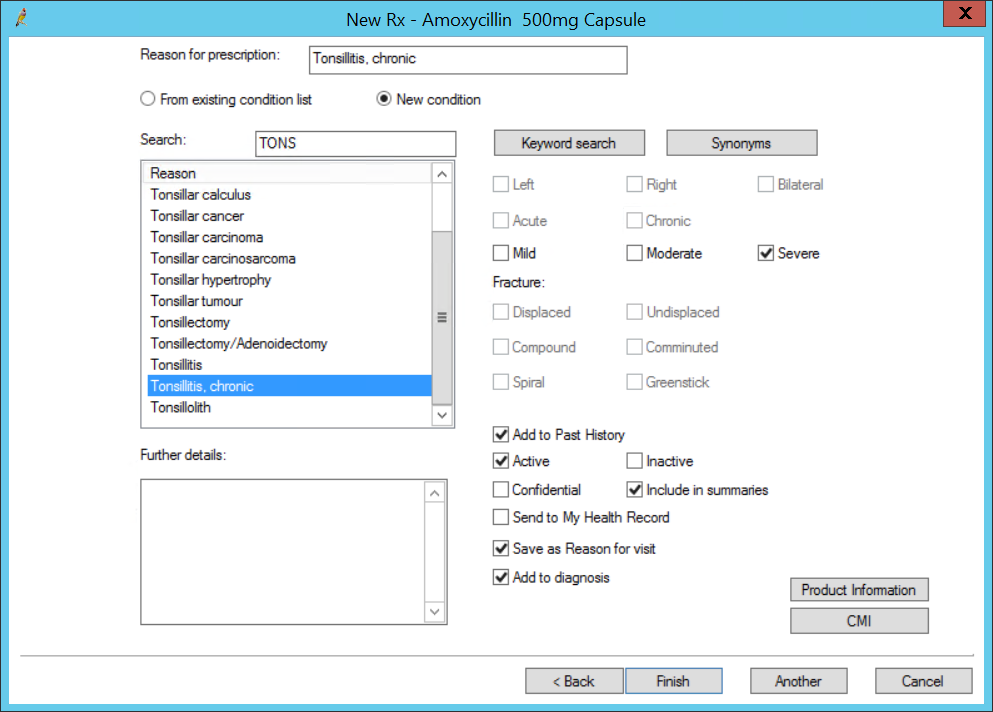
Depending on whether a new condition has been selected, and the type of condition, some or all of the fields on the right hand side will be enabled. The fields in this screen are the same as when entering a condition from the Diagnosis screen from Today's notes.
If you are not ready to print the scripts, when you close the patient record, Bp Premier will ask what to do with unprinted Rx. Select Store them for printing later and click Ok. You can print stored Rx later from the patient record or the Stored Prescriptions screen.
Edit a current Rx
- Open the patient record you want to cease medication for.
- Select Current Rx from the tree on the left hand side.
- Right-click the Rx you want to edit. A number of editing options are listed in the right-click menu. Select the item you want to change for the Rx.
- Some editing options, such as No substitution, update the Rx record in the list. Other options will open the Edit Rx screen so the record can be updated.
- Make the changes in the screen and click Save.
Cease a current Rx
- Open the patient record you want to cease medication for.
- Select Current Rx from the tree on the left hand side.
- Right-click the Rx you want to cease and select Cease Rx. The Cease Rx screen will appear.
- Change the Date ceased from the current day if necessary.
- Enter or select a Reason for cessation. Reasons entered as free text will be available for selection the next time the screen appears.
- Tick Add to allergies/adverse reactions to add the medication to the patient's Allergies list.
- Click Delete.
