

This article describes how to set up and use the Bulk Document Import (BDI) utility to import clinical images and documents.
The Bulk Document Import utility (BDI) tool can:
- Import document files in all popular formats: photos, images, PDF, MS Word documents (.doc and .docx), RTF, .txt, HTML files
- Import scanned documents using a local or network scanner
- Import photos directly from a digital camera.
The BDI tool does not require interaction through the Bp Premier user interface. BDI is a separate utility with the following advantages:
- Users do not require access to the patient clinical record
- Documents and images can be stored in any provider's Inbox or directly into the patient record
- Documents and images can be stored in the BDI utility until staff are ready to allocate them.
NOTE BDI storage of images is a practice-wide holding area, not user-specific. All documents scanned to the general Inbox will be visible to all users until processed.
BDI File Size Options
Minimise the size of files you are importing to reduce database growth.
Using the BDI tool
Using the BDI tool is a three-step process:
- Import the documents from file, scanner, or camera.
- Edit the image. This step is optional, but allows you to optimise imported documents for your practice.
- Send the documents to a provider's Inbox, or send to a patient record.
Access the BDI tool
To access the BDI tool:
- Click on the Windows flag icon in the bottom left corner of your screen, and look for Best Practice Software under 'B'.
- Select the down arrow to view apps, and click on Bulk Document Import.
- Enter your Bp Premier username and password into the login prompt. The Bulk Document Import screen will appear.

Set up the BDI tool
Before using the utility for the first time, users should configure the import options to suit your practice's workflow and scanning device. BDI settings are specific to the logged-in user, not system-wide.
- Select File > Options. The Bulk document import options screen will be displayed.
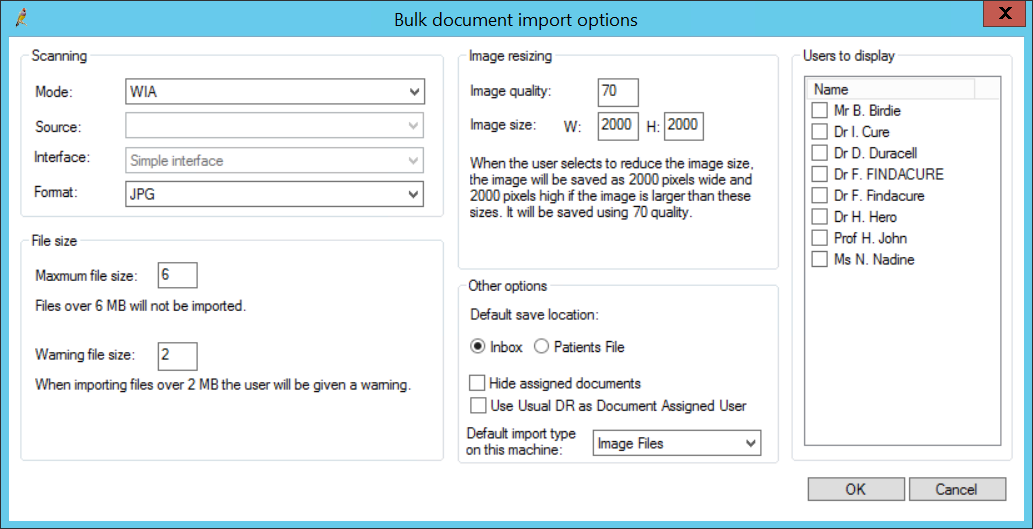
The following settings can be configured:
Field | Description |
|---|---|
Mode | Depends on the type of scanner: 'Twain' or 'WIA'. Consult your scanner documentation if you are unsure of which type is your scanner. |
Source | Scanner to use as the source for scanned images. The scanner can be connected to the computer you are running BDI from, or any scanner connected to the same network. |
Interface | The 'Simple interface' option uses Bp Premier' interface for scanning documents. The 'Manufacturer's interface' option uses the manufacturer's scanning software, which may feature more options. |
Format | The file format in which to save scanned documents. |
File size | You can set the maximum size scanned image file that Bp Premier will accept, and a warning file size. If the file size is within the maximum file size limit but exceeds the warning file size, a Reduce size button appears. The user can reduce the file size using the Image resizing settings. Scanned files over the maximum file size can not be saved. Default settings are 6MB for a maximum file size and 2MB for a warning file size. |
Image resizing | These settings are used in conjunction with the File size settings. The higher the Image quality value, the larger the file size. If the document can be reduced in width and height without sacrificing image quality, use the Image size dimensions in pixels to rescale the image. |
Default Save Location | Indicates whether documents are saved to the provider's Inbox or the patient file by default. |
Hide assigned Documents | Specifies whether already allocated documents are omitted from the Imported document list (for inbox) in the BDI utility. Ticking this option can make managing documents easier during an import, because the Imported document list will only show documents you haven't allocated yet. |
Default import type on this machine | Specifies the default file type to look for when browsing for files to import into the BDI utility. |
Users to display | Specifies which users are available in the User drop down list when allocating an imported or scanned document. |
Zoom size preference
To set the default zoom size preference in the document viewer, view a document and set the zoom % to a setting that suits your screen size. Right-click in the main part of the document viewer screen and select Set current view as default.
Import from file
Use Import from file when you have documents that are saved or scanned externally to Bp Premier that you wish to import. The supported image types are JPG, TIF, TIFF, BMP, PNG, EXIF, RAW, JFIF, GIF, PMP, PDF, RTF, DOC, DOCX, TXT, and HTML file.
- Click the Import document button
 or select File > Import from File. The Open screen will be displayed.
 - Browse to the file or files you want to import. The Default Import Type configuration setting determines the default Files of type shown. Change the files of type shown if you need to.
- Select the files you want to import. Use CTRL+ and SHIFT+ click to select multiple files. Click Open. The Import new files screen screen will appear.
- You can now view and edit the imported image.
Importing secured PDF files
If you attempt to import a PDF file that has been secured with a password, Bp Premier will warn that you must open the file in an external viewer, print, and scan the file to import. You could also remove the password protection from the secure PDF, if the password is known.
To open a file externally from BDI, click the down arrow at the end of the toolbar and click the Open file externally icon:

Import from scanner
Ensure that the scanner is installed and is working within the Windows environment. This procedures assumes that you have selected 'Simple Interface' for the Interface configuration setting.
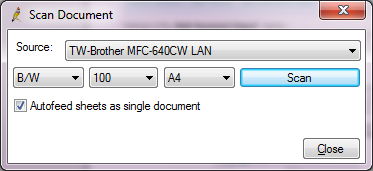
- Click the Scan document button to display the Scan Document screen.
- Select your scanner as the Source.
- Select the colour depth from the B/W drop-down list.
- Select the resolution. The default is 100 dots per inch.
- Select the paper size.
- If you are scanning using a document feeder and want the pages to be merged to a single document, tick the Autofeed sheets as single document checkbox.
- Click Scan. The document will be scanned, ready to be allocated to a patient or Bp Premier user. The Import new files screen will appear.
- You can now view and edit the imported image.
Import from camera
Ensure the camera is connected to the PC and can be accessed within the Windows environment (the camera device should be available in Windows file explorer).
- Select File > Import from Camera, or click the camera icon in the toolbar to display the Get picture from screen. All images that are stored on the camera will be displayed.
- To show an image in a larger view, click the Detail icon.
- Select an image and click Get picture to import the image. The Import new files screen will appear.
- You can now view and edit the imported image.
View and edit the image
The screen capture below shows the Import new files screen with an imported image.

The toolbar across the top manipulates the image in the following ways:
- zoom in and out, or zoom to a specific percentage
- marquee zoom in on a selected part of the image
- grip and move the image
- fit the image to actual size, screen width, screen height, or the visible part of the image
- rotate the image 90 degrees to the left or right.
If an imported document has multiple pages, the options at the right end of the toolbar allow you to:
- view as a single page or single column
- move back and forth between pages
- open a document outside of Bp Premier (you will be prompted for the external application to use)
- delete the current page
- change the page order.
The top right of the Import new files screen shows the selected file of the total number of files imported. Untick this checkbox to exclude the selected file from import.
After editing the image to your specification, you are ready to store the image in the Inbox or Patients file.
Store to the Inbox
- From the Import new files screen, set Store in to 'Inbox'.
- Click Search next to the Patient field to show the Open Patient screen.
- Search for and select the patient associated with the image, if any, and click Open. The selected patient will appear in the Patient field.
- The Date of the document defaults to today’s date, but can be changed to reflect the date the document was written or received.
- The Subject field supplies a brief description of the document contents. This field is optional.
- Click Search next to the Contact field to show the Select contact screen.
- Search for and select the contact who is the sender of the document. If the sender does not exist in the database, click New contact to open the Contact Details screen to create a new contact.
- Select the section of the patient record to store in:
- Investigations
- Correspondence In
- Clinical Images
- Select the User to store the document in their Inbox. If you are importing multiple documents for the same provider, tick the Default checkbox.
- If you need to import other images or documents into the current open document, click Scan or Import to scan or import from file. The file will be inserted at the end of the open document.
- Click Copy to all files to copy your settings to all the files in the import list.
- Tick Delete file after importing to delete the source file after the file has been successfully imported. Click Delete all files to apply this setting to all files in the current import list.
- See Merge and reorder pages for more information on the page and merge images options. These options will only appear if you have multiple images in the import list.
- Click Next to set the options for the next file, or OK to begin storing to the user's Inbox. Bp Premier will report the number of successfully stored documents.
- Make sure the counts for each import type are correct. You may need to reimport or scan the document again.
NOTE The Patient field can be left blank and allocated later. However, documents do not appear in the Inbox until they are allocated to a patient, if your practice has ticked Configuration > Results import > Don’t allow unallocated reports into Inbox.
NOTE When storing to Inbox, you do not need to allocate all imported documents to a patient or a user before importing. If unallocated, documents will remain in the Imported document list (for inbox) waiting to be allocated. This list is useful if you are going to scan a large amount of information and don’t want to allocate each document on the run. See Manage the imported document list (for inbox) for more information.
Store to a patient file
- From the Import new files screen, set Store in to 'Patients file'.
- Click Search next to the Patient field to show the Open Patient screen.
- Search for and select the patient whose record you want to import the image into, and click Open. The selected patient will appear in the Patient field.
- The Date of the document defaults to today’s date, but can be changed to reflect the date the document was written or received.
- The Subject field supplies a brief description of the document contents. This field is optional.
- Click Search next to the Contact field to show the Select contact screen.
- Search for and select the contact who is the sender of the document. If the sender does not exist in the database, click New contact to open the Contact Details screen to create a new contact.
- Select the section of the patient record to store in:
- Correspondence In
- Correspondence Out
- Clinical Images
- If you selected to store in 'Correspondence In', select a Category that best describes this document.
- Enter a detailed description for the document in the Detail field.
- Enter a User Reference in the User Ref field, if your practice uses references. This field is optional, and does not apply to Correspondence out documents.
- Tick Confidential if the document is confidential. The document will only be visible for the provider marked as Usual provider in the patient's record.
- If you need to import other images or documents into the current open document, click Scan or Import to scan or import from file. The file will be inserted at the end of the open document.
- Click Copy to all files to copy your settings to all the files in the import list.
- Tick Delete file after importing to delete the source file after the file has been successfully imported. Click Delete all files to apply this setting to all files in the current import list.
- See Merge and reorder pages for more information on the new page and merge images options. These options will only appear if you have multiple images in the import list.
- Click Next to set the options for the next file, or OK to begin storing to the patient's file. Bp Premier will prompt you with the number of successfully stored documents:
- Make sure the counts for each import type are correct. You may need to reimport or scan the document again.
Merge and reorder pages
If you have a file open in the Import new files screen, you can insert a scanned or imported from file image into the current image as a new page instead of a new document. Use the following options to merge and delete images:

- Add to selected image as a new page — adds the currently displayed page to a document that is currently listed in the 'Imported document list' (for inbox). You will need to highlight the relevant document in the 'Imported document list' (for inbox) before you open the Import new file screen.
- Merge — Some files of the same type (for example, .tiff, .jpg, and some PDFs) can be merged together. This function merges open files into one single document.
NOTE The merge options will only appear for images, or a combination of merged and scanned PDFs. You cannot merge only imported PDFs or PDF and image files.
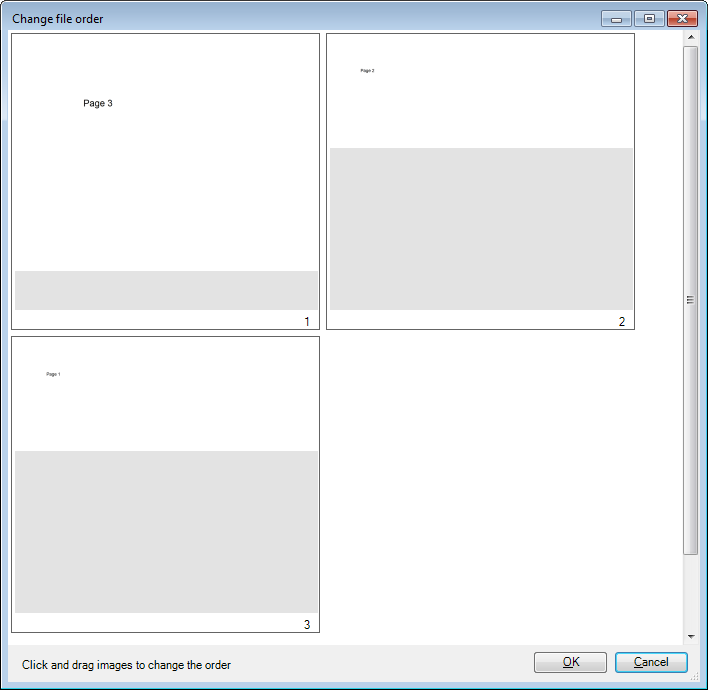
To reorder pages in a merged file:
- Click on the down arrow at the right of the image toolbar.
- Click on the file to move and drag it into the position required.
- When you have reordered the pages, click OK.
![]()
This will open the Change file order screen.
Manage the imported document list (for inbox)
The Imported document list in the BDI main screen displays all imported or scanned documents that have been marked as Store to Inbox, and:
- have not been allocated to a user or patient record
- have been allocated to a user, but the user has not yet actioned the document from their Inbox.
NOTE Documents do not appear in a user's Inbox until they are allocated to a patient. This prevents bulk scans from being stored in the Inbox without patient allocation.
When you select a document in the list, the file details are displayed in the File allocation section above. You can edit the fields in this section; changes will be saved automatically.
To assign file allocation details to multiple files
- Hold down the Ctrl key and click on each document you want to update details for. The image preview will change to Multiple files selected.
- Make changes as required to the File Allocation fields. Changes will be applied to all selected documents.
To merge documents
- Hold down the Ctrl key and click on each document you want to merge into one.
- Select File > Merge Selected items. The Merge file screen will appear.
- Reorder pages or change file allocation details and click OK. See Merge and reorder pages for more information.
NOTE When two files have been merged, the icon on the Imported document list will change from a single page to a nested page.
To append to a document in the imported document list
You can attach a scanned or imported image to a document in the imported document list, if the selected document is an image file (for example, .jpg, .bmp).
- Click on the document in the Imported document list that you want to append to.
- Click either the scan or import button to import or scan the new document. The Import new files screen will appear.
- Tick the checkbox Add to selected image as a new page and click Ok. The imported image will be appended to the one selected in the Imported documents list.
What do I do next?

