

The My Health Record home screen allows you to view and manage documents that have been uploaded to a patient's shared My Health Record. From here you can also download documents to the patient's record in Bp Premier. The patient must be registered with My Health Record.
NOTE GPs can only upload Shared Health Summaries and Event Summaries to My Health Record. Pathology or radiology clinics and hospitals can upload other document types such as reports and discharge summaries.
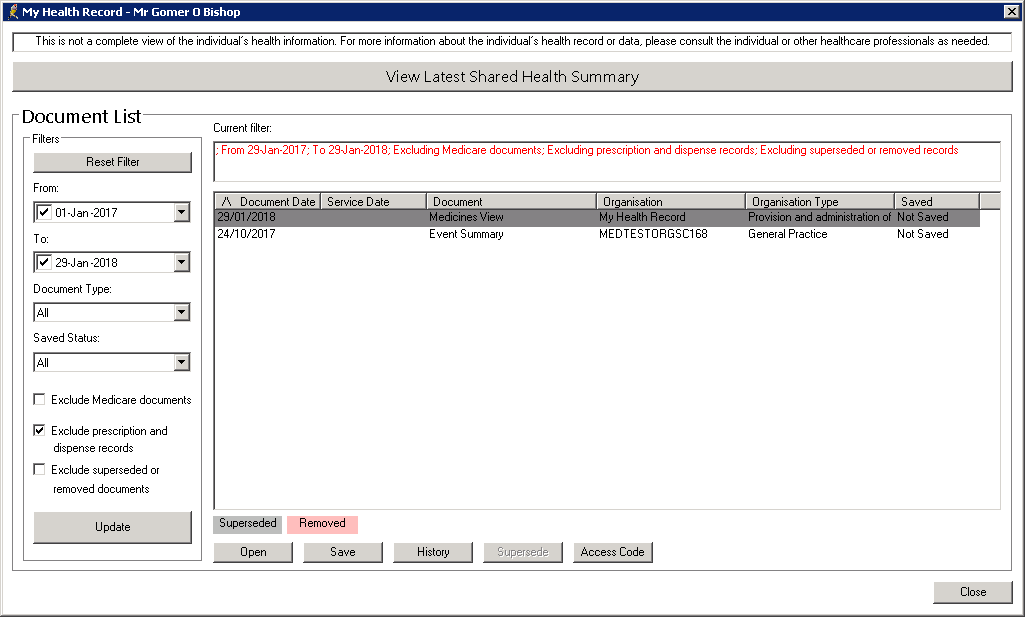
View and print My Health Record documents
- From inside the patient record, select My Health Record > Document List from the menu or press Ctrl+F9. The My Health Record screen will appear.
- Click View Latest Shared Health Summary to open the Shared Health Summary including the most recent changes. If this button is not enabled, the patient has no Shared Health Summary uploaded yet.
- Use the Filters on the left hand side to change the age and type of documents shown:
- Reset Filter — Resets filter values to default.
- From / To — Include documents uploaded during the date range.
- Document Type — Limit documents shown to the selected type.
- Saved Status — Show only saved, unsaved, or both.
- Exclude... — Don’t show documents of the selected type.
- Click Update to apply filter settings to the list of documents.
- Click on a column heading to sort the list by that column. ‘/\‘ or ‘\/’ in a column header indicates whether the list is sorted in ascending or descending order by that column.
The home screen shows all uploaded documents, such as donor registrations, discharge summaries, referrals, specialist correspondence, and prescriptions. This screen will only list up to 1000 My Health Record documents. If your search returns more than 1000 documents, Bp Premier will prompt you to use the filters to reduce the number of documents returned.
Print a document
From the My Health Record home screen, select a document and click Open or right-click on the document and select View. The document will open in a viewer. An example of a patient's health summary is shown below.

Documents are displayed in CDA format. At the top of the screen are two icons 
- The first indicates the format of the document (for example, HTML format )
- The second returns to a previous document, if you have multiple documents open.
To print a document, select the document and click Print, or right-click on the document and select Print.
Save a document to a patient record
- From the My Health Record home screen, select a document and click Save or right-click on the document and select Save. The My Health Record Document screen will appear.
- Most fields cannot be edited. Complete any Details you want to note about the document, and tick whether the document is confidential. See Understanding confidentiality and patient notes for more information.
- Record a User reference if applicable and press Save. The document will be saved to the Correspondence In section of the patient record, and the document Saved status will be updated to ‘Saved’.

Document Saved status
A status of ‘Saved’ in the Saved column of the My Health Record home screen indicates that a document has been downloaded and stored in a patient record. If the document is deleted from the patient record, the Saved status will be reset to ‘Not saved’ to indicate that the document no longer exists in a patient record.
Documents saved from My Health Record to a patient record cannot be moved to another patient record. However, you can move documents to Correspondence Out or Investigations in the same patient record.
Supersede a My Health Record document and review change history
Documents can be superseded over time by the document author, for example, if information was omitted in an initial upload of an Event Summary. Not all document types can be overwritten this way.
Supersede a document
- Select My Health Record > Document List from the patient record or press Ctrl+F9.
- From the My Health Record home screen, select the My Health Record document to update. Click Supersede or right-click the document and select Supersede.
- The creation screen for the document type will appear. For example, if you are updating an Event Summary, the Event Summary screen will appear, showing the information that was originally uploaded.
- Update the document with new information.
- Click Upload. The previewer will display the updated document. Click Upload again to upload changes to My Health Record.
View the change history
From the My Health Record home screen, select a document and click History, or right-click the document and select History. The My Health Record Document History screen will show the dates on which superseded versions were uploaded to My Health Record.
Manage uploaded documents
A copy of each document uploaded to My Health Record by the practice is stored in Bp Premier.
To view the list of uploaded documents:
- From the patient record, select My Health Record > Uploaded documents. The Uploaded My Health Record Documents screen will appear.
- Double-click on a document, or select the document and click Open to open the uploaded document.
To remove an uploaded document from My Health Record:
Only the document author can remove an uploaded document.
- From the patient record, select My Health Record > Uploaded documents. The Uploaded My Health Record Documents screen will appear.
- Select the document and click Remove to remove the uploaded document.
Tick the Include removed documents checkbox to include removed documents in the displayed list.

