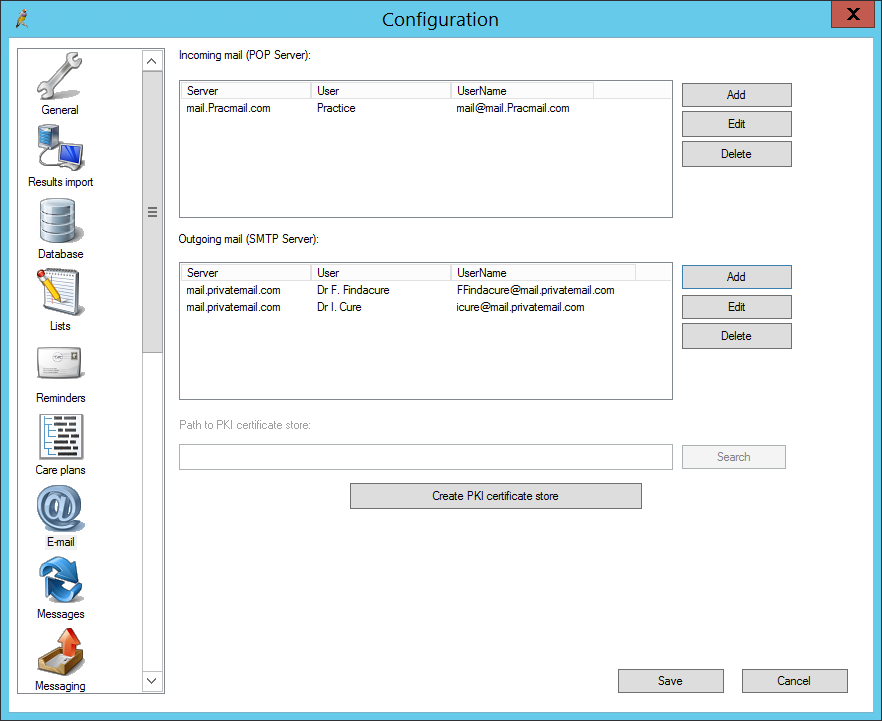
Bp Premier can receive and send emails. You will need to supply the Internet Service Provider's POP and SMTP settings for any email addresses you want to use from Bp Premier.
How can you email from Bp Premier?
You can use email in Bp Premier in three ways:
- The practice uses one email address only (for example, a general enquires or practice email address). Only one email address needs to be set up with your ISP. You can grant all users access to the practice email, or you can restrict access to one user who allocates emails to provider inboxes.
- All users have an individual email address. Each user must have an email address provided by his or her ISP. The email address is to be used specifically for clinical correspondence and not general use.
- Both methods: your practice has a general practice email, and users have individual email addresses. For example, incoming email could be sent to the practice address and outgoing email sent from user addresses.
Email provider compatibility and limitations
Bp Premier uses the standard ports for email:
- port 110 for POP
- port 25 for SMTP.
You cannot change these port settings in Bp Premier. Your email provider must use these ports to send and receive emails from the Bp Premier server.
The option Requires authentication for outgoing email only supports plain text authentication. Your email provider must support this type of authentication to use this option. Your ISP or IT support can assist you.
Before you begin
You will need the following items from your ISP or IT support:
- The POP mail server name for each email address that receives incoming mail.
- The username and password used to access the POP mail server.
- The SMTP mail server name for each email address that can send outgoing mail.
- The username and password used to access the SMTP mail server.
Follow all of the tasks below to set up email.
Set up email
- Log in to the Bp Premier server as a user with access to the Setup > Configuration screen.
- Select Setup > Configuration > Email from the main screen.
- Click Add next to the Incoming mail (Pop Server) list. The Setup incoming mail server screen appears.
- Complete the fields in this screen:
- User – Select the BP user who will receive emails, or select 'Practice' to set up the practice email.
- Server – Enter the incoming email POP server name.
- Username – Enter the username used to access the incoming mail server.
- Password – Enter the password associated with the username. The password is not displayed.
- Click Save to return to the Configuration screen.
- Repeat steps 3–4 for each user able to receive incoming email.
- Click Add next to the Outgoing mail (SMTP Server) list. The Setup outgoing mail server screen appears.
- Complete the fields in this screen:
- User – Select the BP user who will send emails, or select 'Practice' to set up the practice email.
- Server – Enter the outgoing email SMTP server name.
- Tick Requires authentication if the outgoing mail server requires authentication.
- Username – Enter the username used to access the outgoing mail server.
- Password – Enter the password associated with the username. The password is not displayed.
- Click Save to return to the Configuration screen.
- Repeat steps 7–9 for each user able to receive incoming email.
- Click Save on theConfiguration screen.

Set a user's email address
- From the main screen on Bp Premier, select Setup > Users. Select the user to configure for email and click Edit.
- Confirm that the user's E-mail address is the same as the email account configured for the user in the Configuration screen. If you edit the email address, click Save to save changes and exit.
- Click Set Permissions to open the Permissions screen.
- Set the permission Practice Email to 'Allow access' to allow access to the practice email.
- Click Save to save changes.
The user must log out and back in to Bp Premier for email settings to take effect.
To set the practice email address, select View > Practice details from the main menu.
Set the practice's email address
- From the main screen of Bp Premier, select Setup > Practice details.
- Select the location from the Practice locations list to configure for email and click Edit. The Location details screen will appear.
- Enter the practice location's E-mail address. Make sure the address is the same as the email account configured for the practice in the Configuration screen.
- Click Save to save changes and exit.
