
Get Started
Set up
Clinical
Patient Comms
Management
Tools & Utilities
Title
Overview
This article outlines the steps involved in setting up pathology and radiology results importing in Bp Premier.
Before you begin
Before you can set up results importing, you will need to:
- Install secure messaging software. See Set up a messaging provider for more information.
- Confirm the file paths that are needed by secure messaging or the laboratory to import files into. These paths will be created in panel 4: Add download paths.
Enable results import
Perform the following procedure on the server or workstation you will use to receive incoming results. This is usually but not necessarily the Bp Premier server.
- Select Setup > Configuration from the main Bp Premier screen and select the Results Import tab.
- The following fields enable results import:
- This option is always ticked on the server.
- This option is ticked for a client machine only if that client is used for importing results.
- Complete the rest of the fields in the Results Import tab:

Field | Description |
|---|---|
Import investigation reports on this computer | Tick this checkbox. This would usually be the Bp Premier server only. NOTE Don't set up two computers to import results. Results import may conflict between the two machines. |
Automatically import in the background when Bp Premier is open | Helps manage virtual memory resources when importing results by emulating Bp Service. Best Practice Software recommend that: |
Don't allow unallocated reports into Inbox | Tick if you do not want to forward results that have not been allocated to a patient to a provider's inbox. If ticked, someone in the practice should be allocated the task of checking for unallocated results on a daily basis from the View > Incoming reports screen. |
Field | Description |
|---|---|
Add header to incoming letters | Referrals and other letters received electronically usually have a patient's name and address and the top and don't need to show the header visible on results. Tick if you want to see the results header as well as the address shown on the letter. |
Keep HL7 and PIT files after import | Only tick this box if advised to do so by General Products Support to diagnose an issue with importing reports. |
Report file extensions | Most labs will use the standard extension for their results file. However, additional file extensions can be added here if required for a lab. |
Acknowledgements | Some labs require that an acknowledgement is sent back to the lab to confirm that the result has been received. See Set up results acknowledgement for more information. |
Number of months to display in Investigation reports list | Defaults to 1 month, but you can extend the default month range. |
Number of months to display in Inbox follow up list | Defaults to 12 months, but you can extend the default month range. |
Enable polling for insurance reports (UHG) | medEbridge is a UHG proprietary system that communicates between Bp Premier and UHG to electronically complete insurance reports. Tick this checkbox to enable UHG functionality and enter the login password. See medEbridge for more information. |
Include BDI documents in the Incoming reports list | Tick this checkbox to view documents that are scanned or imported via the Bulk Document Import utility (BDI ) in the Incoming reports screen. |
Set default storage locations
You will need to ensure imported results are sent to the correct location in Bp Premier. By default all imported results will be sent to Correspondence in. However, this can be changed to Investigations if required.
- From the Results import tab, click the Set storage locations button. The Report Location screen will be displayed.
- Select the report name and click Change to change the storage location.
- If you need to add a new report location for your practice (for example, a unique type of referral), click Add from the Report Location screen. Type the Report name and select a default store location from the Store in field. Click Save to return to the Report location screen.
- Click Close to return to the Configuration screen.

The Report name will be matched against the content of the report and identified accordingly. When processing reports from the provider Inbox, the Inbox indicates where the report will be saved in the patient’s file: Correspondence In or Investigations.
Add download paths
Results are imported to a folder on the Bp Premier server, or another machine in the network you nominate. Best Practice Software recommends that you set up a separate folder on the server for these files to be downloaded to (for example, 'c:\Results'). While not necessary, Best Practice Software also recommend that you have a separate subfolder for each pathology and radiology provider your practice receives results from. Separate folders can make it easier to diagnose download problems.
However, some messaging providers require specific paths. In these instances, the path must be exactly the same as what has been specified by the messaging provider. Best Practice Software recommend that you liaise with the messaging provider's support to assist you with the settings required.
- From the results import tab, click Add next to the Report file search paths. A file explorer will open.
- Browse to and select the folder to download the report. Click Ok.
- Repeat steps 7–8 for each path where results are being downloaded to.
- Click Save to save your results import configuration.
Folder permissions
You must adjust the security settings on the import folder to allow Bp Premier access to the files in the folder.
- Open a Windows file explorer and browse to the first import folder you created.
- Right-click the folder and select Properties and the Security tab. Click Edit to open the Permissions screen, and tick Allow > Full control for general users. Click OK and OK to save changes.
- Repeat the above steps for each import folder you created.

See the Troubleshooting panel for more information on setting access to result files, if files are not being imported into Bp Premier.
Set up results acknowledgement
Many secure messaging providers provide a tracking mechanism to confirm that a result, report, or document has been received by the intended recipient. This tracking mechanism uses an acknowledgement request.
- Select Setup > Configuration > Results import from the main Bp Premier screen.
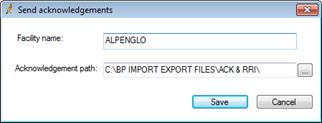
- Next to the Acknowledgements list, click Add. The Send acknowledgements screen will appear.
- Enter the Facility name. This needs to be exactly the name stored in the file by the sending facility.
- Enter the Acknowledgement path. This is the folder in which the acknowledgement files will be saved and from which the lab or sending facility can collect the acknowledgements.
- Click Save to update this setting in the system.
- Click Cancel to cancel any changes and return to the Results import screen.
After a HL7 result has been imported into Bp Premier, the system will check if the facility name in the file corresponds with the name listed on the Sent acknowledgements screen. If Bp Premier finds a match, an acknowledgement file will be created in the path indicated.
There are two types of acknowledgement files:
- acknowledgements related to results have the file extension ‘.ACK’
- acknowledgements related to reports and referrals have the file extension ‘.RRI’.
Test results import
After pathology and radiology results import has been set up, monitor the results to ensure the set up has been successful.
Import results
There are two ways of importing results into Bp Premier:
- Set up Bp Premier to automatically import results on the server. Bp Service will check every five minutes to see if there are any results and reports in any of the folders indicated in the Report file search paths, and if found will import them into Bp Premier. See Set up Bp Service for more information.
- Select View > Incoming Reports from the main Bp Premier screen. This will force an import of any results and reports found in any of the folders indicated in the Report file search paths. See Managing Pathology and Radiology Results for more information.
Once results are imported, the following behaviour is expected:
- If the system can match the result to a patient and a doctor, the results will appear automatically in the Doctor’s Inbox.
- If results cannot be matched to a patient and/or doctor, they will remain in the View > Incoming screen and will need to be matched manually.
What happens if import fails?
If Bp Premier fails to successfully import a result file three times, on the third attempt an internal message is sent to the practice manager stating the import filename, the machine on which the import failed, and the sending facility (if known). If there is no practice manager user recorded, Bp Premier will message active principal doctors.
Result files that fail to import are moved to C:\ProgramData\Best Practice\Unprocessed. ‘C:\ProgramData’ depends on the version of Windows.
Next steps
Once results import has been set up, to finalise pathology and radiology set up at your practice, complete the following tasks:
Troubleshooting
Bp Premier imports pathology and radiology results and electronic documents received through third-party messaging providers. If results are not being imported correctly, step through the possible solutions in this article to see if the issue can be resolved.
In this article:
- Are you connecting to the server by remote desktop?
- Are you importing results to the server?
- Are you using Bp Link or Bp Service to manage imports?
- Is Bp Service running?
- Check configuration
- Check permissions
- Check for active remote sessions
Are you connecting to the server by remote desktop?
If you are using a Remote Desktop session to connect to the Bp Premier server, you will not be able to configure results import or Bp Service. Import configuration requires a local login or a ‘console’ session. After you have set up results import in Setup > Configuration, you can remote log in and use Bp Premier.
However, active Remote Desktop sessions on the Bp Premier server computer can still interfere with importing results. If you have stepped through the resolutions in this article and the issue has not been resolved, follow the instructions in Check for active remote sessions to see if this resolves the issue.
Are you importing results to the server?
Best Practice Software recommend that you configure results to be imported to the Bp Premier server PC. This minimises network traffic and ensures that any clients that are offline will not affect importing results.
- On the server, go to Setup > Configuration > Results Import and tick Import investigation reports on this computer.
- Click Check Paths and ensure local paths are set and that all paths are in green and the Status column shows 'Found'.
- Click Close and Save to save changes.


NOTE The path C:\USERS\%username%\Documents\Best Practice\Import is a default path that you cannot change.
Are you using Bp Link or Bp Service to manage imports?
Bp Link is a Windows process that was used in Bp Premier versions Summit (642) and Lava (754). Best Practice Service (or Bp Service) is a Windows service that was introduced during Lava (SP1, 801). For practices running Lava SP1 and later, Best Practice Software strongly recommend that Bp Service should be used to manage automatic results import instead of Bp Link.
IMPORTANT A very small number of practices may still need to use Bp Link because of unique requirements, such as multiple imports of patient files. All other practices should use Bp Service instead.
However, Bp Link is not automatically retired when upgrading your version of Bp Premier. It is possible that both Bp Link and Bp Service are running at the same time, which can cause problems with importing results. Best Practice Software recommended that you remove Bp Link from startup and configure Bp Service to start automatically instead.
Stop Bp Link
Go to Setup > Configuration > Links and untick Load Bp Link on startup.

Check if the Bp Link icon is sitting in the Windows System Tray. The icon is a small bird.

Right-click the Bp Link icon and click Exit.

Use Bp Service
Go to Setup > Configuration > Bp Service and tick Use BP Service for importing results on this machine.
Is Bp Service running?
Type 'services' into Windows search and click the Services app to view all Windows services. If you cannot see the Services app, you may not have sufficient user permissions to view it.
Find the Best Practice Service and ensure the Status is 'Running'. If Best Practice Service isn’t running, right-click and select the Startup Type to 'Automatic'.

If Best Practice Service is running, right-click the service and select Restart. Confirm the service started successfully.
NOTE If Best Practice Service fails to start automatically, or continues to stop for no reason, you may need your IT services provider to investigate why.
If the service is running successfully but the issue with results importing still occurs, the service may require reinstallation due to an issue with Anti-Virus software. Before you reinstall this service, contact Best Practice Software Support to confirm the antivirus issue with a Lead Support Specialist.
If Support confirm the antivirus issue, you can run the file installservice.bat found under C:\Program Files\Best Practice Software\BPS\BPSupport\ to reinstall the service.
It can take up to 15 minutes for the service to pull reports again.
Check configuration
Note the Report file search paths that you have created in Setup > Configuration > Results import. Open one of the search path folders in Windows file explorer.
If the folder is empty but should have imported result files, check that the download utility provided by the secure messaging vendor has installed successfully. Is the software running as it should be and pointing to the same folder you've entered in Bp Premier?
If the folder has downloaded files in it, check that the file extensions for the downloaded files are listed in the Report File Extensions section in the Results Import tab. You may need to enable View > File name Extensions in Windows file explorer to see the file name extensions for the report files.

If the file extensions aren't in the list, click Add to enter them from the Results Import tab.

Check permissions
Check the security settings on the result file and folder in Windows file explorer.
Right-click the folder and select Properties and the Security tab. Click Edit to open the Permissions screen, and tick Allow > Full control for general users. Click OK and OK to save changes.
Repeat the above steps for the result file. If the file imports into Bp Premier successfully after updating the permissions, Best Practice Software recommend that you contact your Pathology provider or IT provider to investigate why the file is coming through with restricted permissions, which prevent the file being imported into Bp Premier.
Check for active remote sessions
- From the Windows desktop, press the Windows key + R to open the Run window. Type 'cmd' in the text field and click OK to open a command prompt.
- At the prompt, type 'query session' and press the Enter key.
- In the output, a right chevron '>' will be next to the current active session. In the following example, session 'rdp-tcp' is the current active session, and is remote (indicated by the 'rdp' prefix).
- If the active session is ‘rdp-tcp’, disconnect the session, log back in locally or via console, and reattempt results import.

In the next example, the active session is a console session and is fine.

Feedback


This material is classified as commercial-in-confidence. Unauthorised distribution of this information may constitute a breach of our Code of Conduct, and may infringe our intellectual property rights. This information is collected and managed in accordance with our Privacy Policy, available on our website. © Copyright 2020