Get Started
Set up
Clinical
Patient Comms
Management
Tools & Utilities
- What's New?
- COVID-19 and Bp Premier
- Program, drug, and database updates
- Install for the first time
- Set up for the first time
- Convert clinical data from elsewhere
- Link or convert billing data
- Medicare and DVA
- My Health Record
- Tyro
- Secure messaging
- Pathology and radiology
- Appointment Book
- Add a new ?
- Bp Comms and Best Health App
- Document templates and printing
- Prescribing
- Billing and Banking
- Clinical integrations
- Service Registration Assistant
- Whitecoat
- Reminders
- Users
- Other Bp tools
- COVID-19 and Bp Premier
- Today's notes
- Clinical tools
- Enhanced Primary Care
- Clinical Reminders
- Prescribing and Medication
- Pathology and Radiology
- eReferrals
- My Health Record
- Immunisations
- Best Health App
- Patient consent
- Contact notes
- Send Bp Comms to patients
- Use the word processor
- COVID-19 and Bp Premier
- Reporting
- Booking appointments
- Invoice and pay on the day
- Invoice and pay later
- Correct an account or payment
- Claim with Medicare and DVA
- Banking reconciliation
- WorkCover
- Back up and restore data
- Remote database
- Query data
- Database Integration
- Merge data
- Import and export data
- Maintain data
Title
Setting up a multiple-location practice
Setting up a multiple-location practice
Bp Premier supports practices with multiple locations that share a Bp Premier server and patient database. This article steps you through the configuration requirements for multiple locations, and explains how to set up templates and letterheads so that the correct details are inserted when a template is used for that location.
This article also explains how to create an appointment book layout that shows only providers rostered at a specific location, and the importance of front desk staff logging into the correct location for billing reasons.
In addition to the below steps, you must set up minor IDs for online claiming at each of your practices.
Add practice details for each location
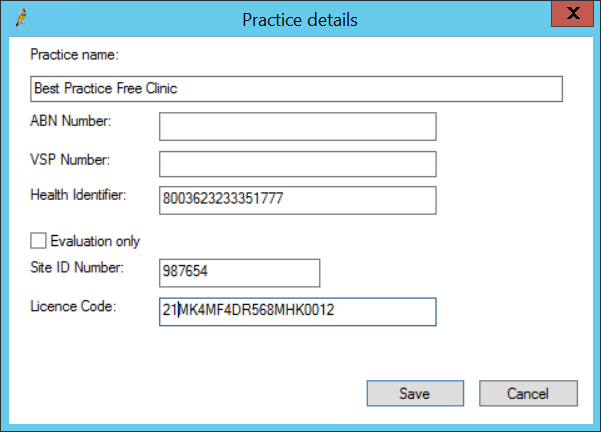
The Practice Details screen records details common across all practice locations, including the practice name, VSP, and site and licence details. From the Practice Details screen, you also record details specific to each practice location. You can record an ABN for all locations, and also an ABN for specific locations.
Location-specific details are printed on scripts, invoices, and reports automatically.
Add practice details
- Select Setup > Practice from the Bp Premier screen. The Practice details screen will appear, showing:
- practice name
- a summary of how many licenced users you have
- the licence expiry date
- each practice locations that are set up
- contact details for the first location on file.
- Click Change. The Practice details update screen will appear.
- Update any details and click Save.
Add a location
- Select Setup > Practice from the Bp Premier screen. The Practice details screen will appear.
- Click Add next to the Practice Locations list field. The Location details screen appears.
- Complete the details for this location and click Save.
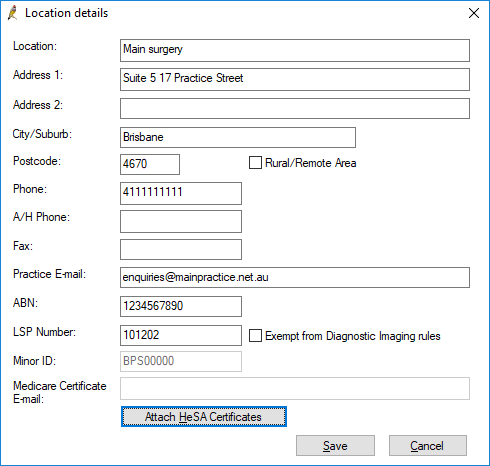
The Rural / Remote area checkbox controls which Medicare incentive is added to bulk-billed invoices for pensioners, health care card recipients, and children. If unticked, incentive '10990' is used; if ticked, '10991' is used.
LSP Number is the Location Specific Practice Number used when practices provide diagnostic imaging services or radiation oncology services.
ABN can be recorded for individual practice locations. A location's ABN is available for insertion in documents like invoices, receipts, Medicare forms, and general templates.
To delete a location:
- Select the location on the Practice details screen and click Delete. A prompt will appear if any users have provider numbers linked to that location.
- If the location is deleted, users with linked provider numbers will still be visible, but the provider number linked to that location will no longer be visible.
To restore a deleted location:
- Select the Show Deleted checkbox at the bottom of the screen to view deleted locations.
- Select the deleted location in the Practice locations list field and click Restore.
Templates, locations, and ABN
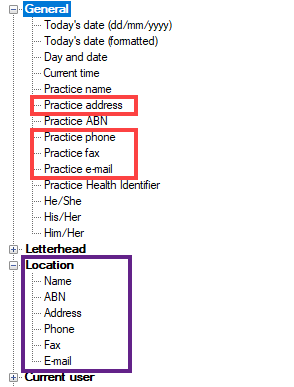
There are two ways to insert fields that are specific to a location into a template. One way uses your currently logged-in location and automatically adds the field when generating the document. The other method prompts you to select which location the document should use when inserting location fields.
Use the logged-in location
The fields outlined in red above use your currently logged in location and no prompt for location is made. Even though the fields say ‘Practice’, if you have multiple locations set up, these fields under the General section will populate with details recorded for the logged-in location.
NOTE The Practice name and Practice ABN fields are retrieved from the details entered in Setup > Practice details. These fields are not location-specific. Use the method below to insert a location-specific practice name and ABN.
Prompt to select a location
The fields outlined in purple prompt to select which location to use when inserting location fields:
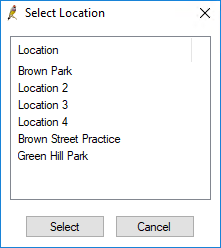
When you create a document from a template with fields from the Location section, the user will be prompted to selection a location to use.
See Create a word processor template for more information.
How does Bp Premier know which ABN to use?
The different ABN template fields will populate as follows:
- Doctor > Doctor's ABN <DrABN> will use the logged-in provider's ABN, then the Practice ABN if the provider does not have an ABN recorded.
- Location > ABN <LocationABN> will use the logged-in provider's ABN if recorded, then the Location ABN, then the Practice ABN.
- General > Practice ABN <PracticeABN> will only ever populate with the Practice ABN. If the practice has no ABN recorded, the field will be blank.
Letterheads and locations
Add a location letterhead
If a user letterhead does not exist for the logged-in user when a template is used, Bp Premier will substitute the practice letterhead. However, a location letterhead has no relationship to the user and practice letterheads, and will only ever be used if specifically selected for a template.
- From the word processor, select Templates > Edit letterhead. The Letterheads screen will appear.
- Click Add. The Select Location/User screen will appear.
- Select the location from the list and click Select.
- Create the letterhead as you would for a normal document.
- When creating a letterhead with multiple components, for example a logo with practice name, phone, and fax, you can use a table to format the elements neatly. Select Table > Insert > Table to insert a table.
- Do not use headers or footers in a letterhead. Headers and footers will not show when the letterhead is printed in a document.
- When you are finished creating your letterhead, click File > Save.
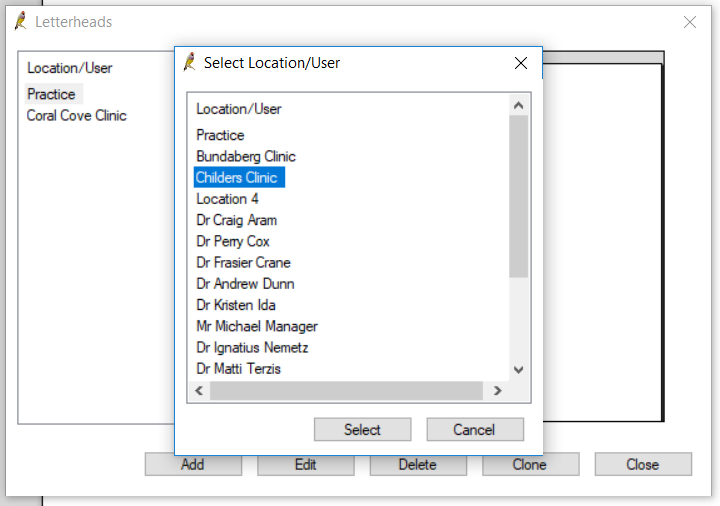
TIP Click Clone to create a letterhead based on an existing letterhead. This saves you having to create a letterhead from scratch every time.
Set appointment book layouts
Add users at locations to the layout
- To add users to the layout, select the layout in the top pane and click Add in the bottom pane.
- Select a Name and Location combination to only include a doctor's appointments at a specific location. In the example, only appointments for Location 1 will be shown for Dr Kimberlee Skaare in the appointment book if this layout is selected.
- Click Select to return to the Appointment Book layouts screen.
- Modify the order in which users are listed in the layout by selecting a user and clicking the Up or Down buttons.
- Click Save from the Appointment Book layouts screen. You can now assign the layout from the appointment book.
- Select a Name and Location combination to only include a doctor's appointments at a specific location. In the example, only appointments for Location 1 will be shown for Dr Kimberlee Skaare in the appointment book if this layout is selected.
A list of users who have Has appointments ticked in their User Details, and have sessions defined for at least one location, will be shown.
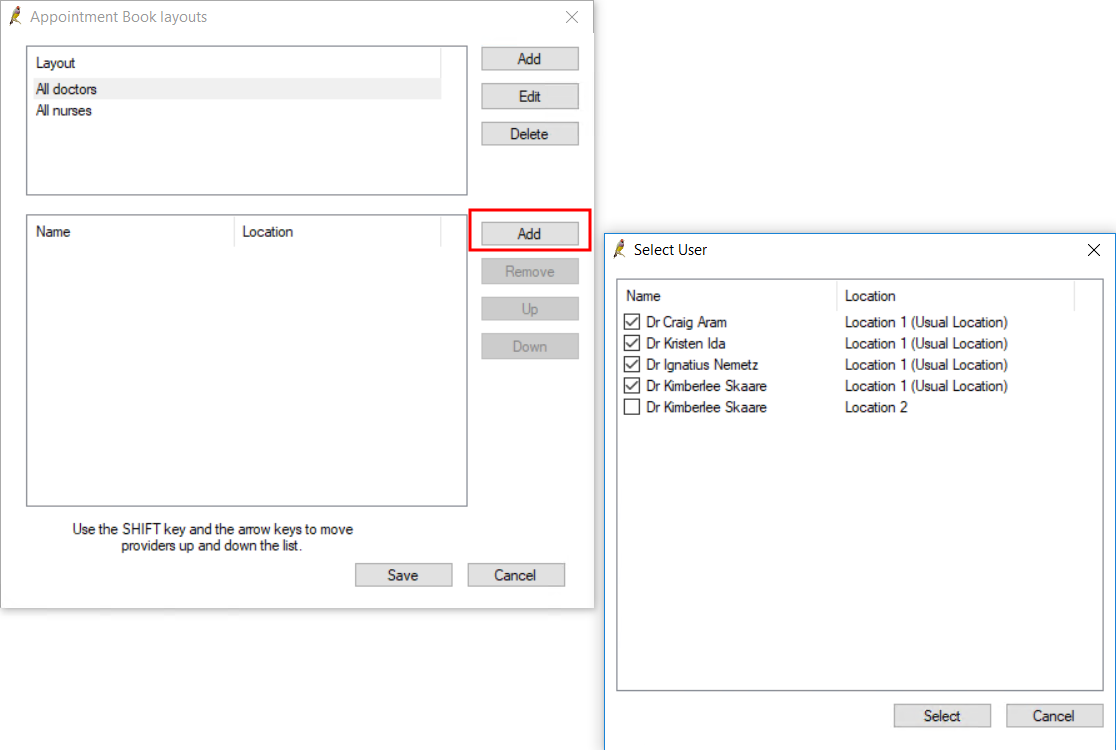
If a provider has sessions defined for more than one location, the provider will be listed more than once. In the example above, Dr Kimberlee Skaare has sessions defined for Location 1 and Location 2.
This method allows you to create a layout that shows only appointments at a specific location. This reduces confusion in the appointment book and prevents staff accidentally viewing or booking appointments for other locations.
NOTE While a doctor is working at a different location, their status in the appointment book will be set to dark grey, indicating that they are practicing elsewhere.
Log in to the correct location for billing
Practices that have more than one location, and who allow patients to pay for services at a location different to where the service was provided, must ensure that users log in to the correct Bp Premier location before they start taking payments.
How do I know which location I log in to?
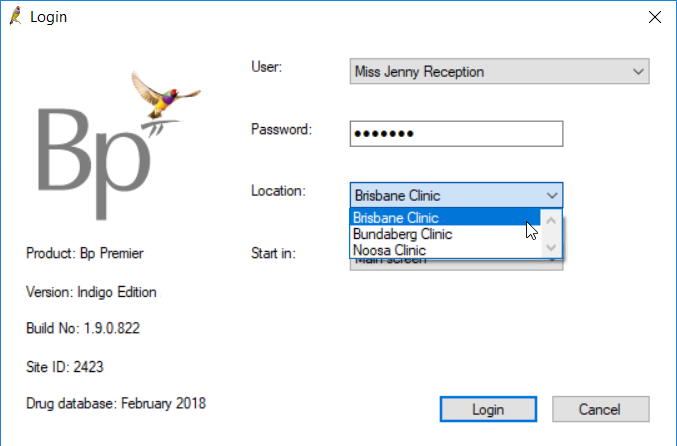
At the Login screen, the Location drop-down tells Bp Premier which location a user is at for that Bp Premier session. The user below is logging in to the Brisbane Clinic practice location.
How does the location of payment affect Bp Premier?
The Payment details and Bulk payments screen have a Location dropdown that defaults to the location selected when the user logged in to Bp Premier.


The payment location rarely needs to be changed. However, if a staff member has logged in to a workstation and selected a location that is not where they are currently working, any payments they take from patients will be recorded as taken at the wrong location.
For example, say a staff member works a shift at a new practice location (Noosa). However, this user mistakenly selects their usual location (Brisbane) when logging in. If this staff member processes payments, Banking reports will incorrectly show that payments were received at the Brisbane location, and the totals in the report will not match the total of receipts in the till.
To avoid this, make sure any staff who process payments select the Location at the Login screen where they are actually working when they start their shift.
Banking reports
The Banking reports show payments as taken at the Location selected when the payment was processed through the Payment details and Bulk payments screen
Payment reports
Payment reports always show payments as taken at the location where the service was performed. This means that if a patient pays for a service at a location other than where they received the service, a Payment report will show that payment was taken at the ‘wrong’ location.
However, because Medicare and DVA payments always go to the provider’s bank account associated with the service location, doctors will still be paid correctly even if patients pay at a different location. Depending on how your practice uses the Payment reports, your financials staff should be aware of potential discrepancies in the Payment reports where patients have paid at a different location, and whether these discrepancies need to be accounted for.
Online claiming check for payments
When a user clicks Check for payments from the Online Claiming screen, any Medicare or DVA payments to the practice that are created are set to the location of the service associated with the claim, not the location of the logged-in user.
Record locking and locations
In a busy practice, many users are accessing the Bp Premier database simultaneously. To ensure that the Bp Premier data is kept consistent, locks are placed on individual data records to allow only one user to change the data at a time. Areas that utilise locking include Visit Notes, Appointments, Invoices and checking for payments from Medicare.
In some situations, a lock may fail to release. The most common reason is when Bp Premier exits to the desktop without saving the record, due to a system error or a user ending the Bp Premier process via the Windows Task Manager.
Feedback
Walk me through...
Online Claiming: Direct Bill Home
Online Claiming: Patient Claims Home
SUPPORT
Telephone: 1300 40 1111
Email: support@bpsoftware.net
Training: https://www.bpsoftware.net/learning/
This material is classified as commercial-in-confidence. Unauthorised distribution of this information may constitute a breach of our Code of Conduct, and may infringe our intellectual property rights. This information is collected and managed in accordance with our Privacy Policy, available on our website. © Copyright 2020
