
Get Started
Set up
Clinical
Patient Comms
Management
Tools & Utilities
Title
Set up allocation and order requests
This article steps you through the pathology and radiology results management workflow, the actions available to staff from the Inbox and Follow up Inbox functions, and how to check for unallocated results and unreturned requests.
The following Bp Premier components need to be set up for automatic allocation of results from a laboratory:
Set up Pathology and Radiology Results Import
Add a pathology or imaging lab
You can order pathology or radiology using a printed form or electronically for participating labs. Cervical screening pathology requests involve additional fields:
Set up pathology request forms
Request pathology or radiology
Action results from the Provider Inbox
The Provider Inbox is used to check investigation results that have been imported from a pathology or radiology laboratory, action the result for followup, and save the result file to the patient record.
To access the Inbox, select View > Inbox from the main menu or press F3. The tree view on the left of the screen displays unactioned results by patient name.

TIP A provider can view unchecked reports for a single patient from their patient record. From inside the patient record, select Clinical > Unchecked reports. The Provider's Inbox will open, showing any unactioned results for that patient.
Action an investigation result
- Select View > Inbox from the main menu or press F3.
- Select the result you want to action from the list on the left.
- If the result is for an request that has not been marked as returned, tick the corresponding request in the Outstanding requests - tick if returned list.
- Enter a Comment and click Add to list to add any comments about a result. For example, a comment might contain relevant information for another provider tasked with following up the result.
- Action the request by selecting from the following radio button sections from the right:
- This result is — Clinical evaluation of result.
- Action to be taken — Followup action. All actions except for ‘No action’ will add the result to the Followup Inbox for later actioning by the practice.
- Click a button to perform additional actions for the selected result and patient:
- Store result in — Where in the patient’s record to store the result.
- Include header — Tick to store the report header with the result.
- Store for Location — Practice location to store result for.
- Click Finish to complete actioning the result and close the screen, or Next to move on to the next result. If you click Skip, the next inbox item will be displayed without saving changes.

Action the result
Store the result
Perform other clinical actions
The buttons in the bottom right perform other clinical actions, like graphing the result or adding to the patient's cervical screening record.
Button | Description |
|---|---|
Details | Supplies additional details about the result to save to the patient record. |
Send message | Sends an SMS message to the patient about actioned results. |
Add Reminder | Opens the Reminders screen to view or create reminders for the patient. |
Add Past History | Insert a past history item into the patient's record. |
Add INR | Opens the patient's INR Manager to record INR management details. |
Graph | View and graph atomised results. See Graph a result from the Inbox for more information. |
Add Action | Create an Action for the patient. |
Add CST Result | Record a cervical screen result t in the patient's record. See Cervical screening for more information. |
Complete the action
The result will be stored as indicated and moved to the Followup Inbox, unless 'No action' was selected.
What else can I do in the Inbox?
View another doctor's Inbox
Providers can view each other's Inbox screens for results that have not been marked confidential. For example, a provider who goes on leave may ask another provider to review their Inbox to ensure urgent issues are addressed.
- Select File > Change Inbox from the menu, or click the Change Inbox icon. The Select doctor screen will appear. This screen only lists providers who have results allocated to them.
- Select a provider and click Select.
- The Inbox will load the outstanding results for the new provider.
Book a recall appointment
A provider can also book a recall appointment directly from the Inbox.
- Select File > Patient appointments or click the Patient appointments icon. The Patient appointments screen will appear, showing future appointments for the patient.
- Tick Include past appointments to view historical appointments.
- Click New to create a Recall (or ‘review’) appointment for the patient.
Send a Bp Comms message to a patient
You can send a 'clinical communication' message by SMS or BHA to a patient about their results from the provider inbox. You must action a result before you can send a message about the result.
- From the Inbox, click Send Message from the bottom right, or click the envelope icon in the toolbar
 . The Send message window will appear.
 - Choose to either send via SMS or App.
- Change the clinical communication Template to use from the default if you need to.
- Edit the message text and click Send.

NOTE Sending a message from the Inbox does not mark the result as contacted.
Contact patients from the Follow up inbox
The Follow up Inbox manages patients who need to be contacted about returned results, and is used to book recall appointments for patients with clinically significant results.
- From the Bp Premier main screen, select Clinical > Follow up inbox.
- Use the filter options along the top to change the results that are displayed:
- (Reports checked from and to) — Show only results actioned in the date range.
- Filter by action — Show only results assigned the selected action.
- Provider (Checked by) — Show only results actioned by the selected provider.
- Filter by status — Show only results that have been marked as given or contacted.
- Sort the list by Date checked or Name. To view results separated by practice location, select Split by location.
- The leftmost column indicates the patient's preferred contact method. You can perform a Mail Merge to contact patients in bulk. See Send clinical communications for more information.
- Mark results individually using the buttons along the top and the right-click menu:
- To view a summary of the result, double-click the result in the list. The Details screen will appear according to the type of communication.
- Other actions from Follow up inbox include:

Display only the results you want to work with
By default, this screen displays results for the last 12 months where the patient has not been marked as contacted and where the result is marked as anything other than 'No action'.
For example, use the Filter by action field to show only results that the provider has marked for ‘Urgent appointment’. If a practice nurse is performing a daily followup check, you could set this field to show only 'Nurse to advise' results.
Follow up the result

TIP Your practice will have guidelines for recording contact attempts to ensure that clinically significant results have been demonstrably actioned. The Record note function is a quick way for staff to record a contact note immediately after a contact attempt for a result.
Action | Description |
|---|---|
Mark as contacted | Indicate that the patient has been contacted about the result. The result in the patient’s file will be updated to indicate a status of ‘Contacted’ and the date. |
Mark result as given | Indicate that the patient has been given the result. The result in the patient’s file will have be updated to indicate a status of ‘Given’ and the date. |
Record note | Record a contact note about a patient contact attempt concerning a result. |
Make appointment (right-click) | Book a recall appointment for the patient. |
View appointments (right-click) | View and book appointments for the patient. |
Change action (right-click) | Edit the clinical evaluation (for example, ‘Normal’ to ‘Abnormal’) , action to be taken, comments, or practice location. |
Action | Description |
|---|---|
| Opens the patient record for the selected result. |
| Opens the Report action list to print the list of results shown. When printing the report, you can indicate whether you want the results updated to indicate they have been ‘Contacted’ or ‘Given’. |
File > Mail Merge | Opens the Report action list to run a mail merge from the list of patients. You can filter the mail merge by provider, date, and action type, and mark the result as ‘patient contacted’ or ‘given to patient’ after the mail merge. |
File > Unmark result | If you accidentally mark a result as ‘Contacted’ or ‘Given’, this option resets the status. If the result no longer shows on the screen, change the Filter by action field to ‘All’. |
Utilities | You can open the Messages screen or To Do List for the logged-in user. |
Unmark a result
If you accidentally mark a result as 'Contacted' or 'Given' you can easily reset the status so that the item shows in your Follow up Inbox list again.
Manage unallocated results
Check for unallocated results
In most cases, the system will automatically allocate a result to the correct patient and provider. However, if the result has patient or provider names spelt or formatted differently to the way the names were entered in Bp Premier, the result will not appear in an Inbox. The Incoming reports screen is a 'global' screen for all returned results that can be used to check for unallocated results. Your practice might review this screen at a regular time to check for 'lost' results.
Select View > Incoming reports from the Bp Premier main screen. Opening the Incoming reports screen also forces an import of any results that are waiting to be imported.

You can tell if the system has not been able to match a result, because both the Allocated to patient or Allocated to user fields will be blank. Tick Show unallocated only at the top of the screen to show only those results that are not matched.
Allocate results manually
To allocate a result to a patient manually from the incoming reports screen:
- Right-click on a result in the list and select Allocate to patient. The Allocate patient screen will appear.
- Use the Search: field to search for the patient that you wish to allocate the result to.
- Once you have found the patient, double-click the patient's name in the Allocate to: list, or select the patient in the Allocate to: list and click Select to allocate the result to them.
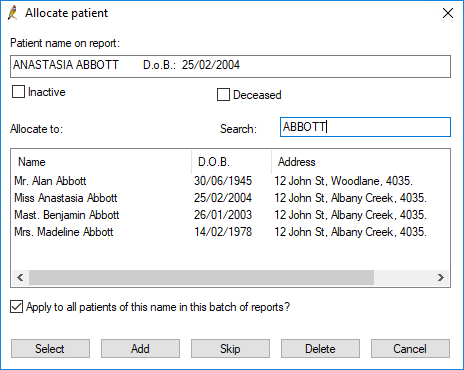
If searching for the patient name on the report does not produce any results, the patient name in the investigation result may not match the patient’s name in the database.
Try searching on variations on the patient name in the Search: field to find a patient that most closely matches the name on the result.
If you cannot find a patient name that matches, the result may be for a patient who does not yet have a record in Bp Premier. You can click Add to create a patient record with the name on the result and no other information. You can then allocate the result to that patient.
IMPORTANT Only use the Add function if you are certain that a new patient record needs to be created for this result. Otherwise, duplicate patient records may be created. A staff member will have to populate the new record with contact information and Medicare details later.
To allocate a result to a practitioner manually from the incoming reports screen:
- Right-click on a result in the list and select Allocate to user. The Allocate to user screen will appear.
- Select the practitioner you wish to allocate the result to from the Allocate to: Drop-down menu.
- Click Save.
TIP Results that cannot be matched to a patient will automatically be allocated to the provider's Inbox, unless the option in Setup > Configuration > Don't allow unallocated reports into inbox is selected.
You can also use the alias functionality in the incoming reports screen to redirect reports to an alternative provider. An example of when this could be useful is if a provider goes on leave, and someone else is temporarily responsible for their reports. See Redirect incoming reports to another provider for more information.
Move a result to another doctor
To move a result to a different doctor once the result has already been allocated:
- Select View > Inbox from the Bp Premier home screen. The Inbox screen will appear.
- Select Edit > Move report. The Select doctor screen will appear.
- Select the provider to move the report to and click Select. The result will be moved to the selected provider's Inbox.
Manually import and move results
Manually import a result into a patient record
If your practice has set up messaging and laboratories, investigation reports should proceed smoothly through the pathology workflow and be assigned to the patient record.
You can also add an investigation report manually to the patient record, for example, for investigations from a laboratory without secure messaging, or a lab in the same location as the practice.
- From the patient record, select Investigation reports from the patient tree.
- Click Add. The Investigation report screen appears.
- Complete the fields as if viewing the report from the provider Inbox.
- Cut and paste or type the report text into the text box provided.
- Click Save. The report will be added to the Investigation reports list in the patient tree and can be marked as given, moved to Correspondence in, and amended with followup notes.
- To assign graphable values to the investigation record, click Values at the top of the list. Enter data from the investigation manually into the fields, depending on the test type, and click Save.

Move an allocated investigation result
A report may be misfiled to the wrong section of the patient’s file, or the wrong patient.
In the Correspondence In section of the patient record, right-click and select the option to move an entry into Investigations or another patient.
In the Investigations section of the patient record, right-click and select the option to move an entry into Correspondence In.
See Import, scan, or move documents in a patient record for more information.
Graphing
Graph a result from the Inbox
Bp Premier can provide graphs of incoming results of atomised data. If the patient has existing atomised observation data recorded, the graph will include that data, and any other results data of that type also in the inbox.
This allows providers to view historical trends without needing to open the patient record, and provides more information to determine if a patient recall is required.
- From the Inbox, select the result you want to graph from the list of incoming reports on the left.
- Click Graph from the set of buttons at the bottom of the Inbox. This button will be enabled if Bp Premier can calculate atomisable data from the results.
- The Atomised result values screen will appear.
- Select View > Graph from the menu or click the Graph icon. The graph of results will appear.
- Select a property to view from the left hand side to view the graph for that property. Close the screen to exit the graph.


Check for unreturned requests
The Investigation requests screen is a ‘global’ screen that shows all requests made at a practice for a given time period. Staff can use this screen to periodically check for requests that have been ‘lost’ and have not had results returned by the lab, and may need following up.
Manage investigation requests
- Select View > Investigation requests from the main Bp Premier screen.
- Filter the requests displayed to a date range.
- Select from the By doctor drop-down list to only show requests from a specific provider. Tick the Include already returned checkbox to include investigation requests that have had results returned by a pathology lab.

Bp Premier cannot determine automatically that a request has been received in entirety, because this data is not provided in the result file from the laboratories. You can, however, determine if at least some of the request has been returned:
- Where the result is shown in green and has a Status of ‘Partial’, the request has been partially received. This status relies on the laboratory including the order number from your request in the returned result file.
- If the result has not been returned (even partially), or the laboratory has not used the order number, the request will show in pink with a status of ‘Outstanding’.
NOTE To view an investigation request for a single patient, select Request > List from the patient record. The Investigation requests screen will appear.
Audit the patient contact trail
If a mail merge was performed on bulk patients from the Follow up Inbox, a contact note will be automatically created for each patient in the mail merge about their result. If a staff member has recorded a contact note after a patient contact attempt from the Follow up Inbox, the initial and all subsequent contact attempts will be attached to that result.
Bp Comms allows you to review all of the contact notes associated with a patient if you need to follow up if a patient has been contacted about a result.
View a patient's contact history
- Press F10 to open the Patient list. Search for the patient by name, or click Advanced search to search by DOB, Medicare number, or HI number.
- Select the patient from the list of search results and click Contact notes in the bottom right corner, or press Alt+C. The Contact notes screen will appear.
- Use the Reason, Method, and Message status filters along the top to restrict the contact records shown. For example, select ‘Unsuccessful’ from the Status filter to view only unsuccessful contact attempts that need following up.
- Select a date range and a Location to restrict the records shown.
- Filter from where within Bp Premier the message was sent from by using the Origin list. The Origin list could contain the options All, Inbox, Follow up Inbox and Patient record. Options available in the Origin list depends upon from where within Bp Premier contact notes for this patient has been sent. Select All if you are searching for a Contact Note that was not sent from either the Inbox, Follow up Inbox or Patient Record.
- Tick Show deleted at the bottom to include deleted contact note records in the list.
- Click View to open a contact record, Print to print the selected contact note, or Patient details to open the patient demographics screen for the patient.

Feedback


This material is classified as commercial-in-confidence. Unauthorised distribution of this information may constitute a breach of our Code of Conduct, and may infringe our intellectual property rights. This information is collected and managed in accordance with our Privacy Policy, available on our website. © Copyright 2020