For more information about the subpoena tool and exporting patient records, see Export patient records and Frequently asked questions on importing and exporting records.
The Subpoena tool provides an export of a patient record in print, XML, or HTML format.
Export a record with the Subpoena tool
- Log in to Bp Premier as a user with the Subpoena Tool user permission.
- From the main screen, select Utilities > Subpoena Tool. The Open Patient screen will appear.
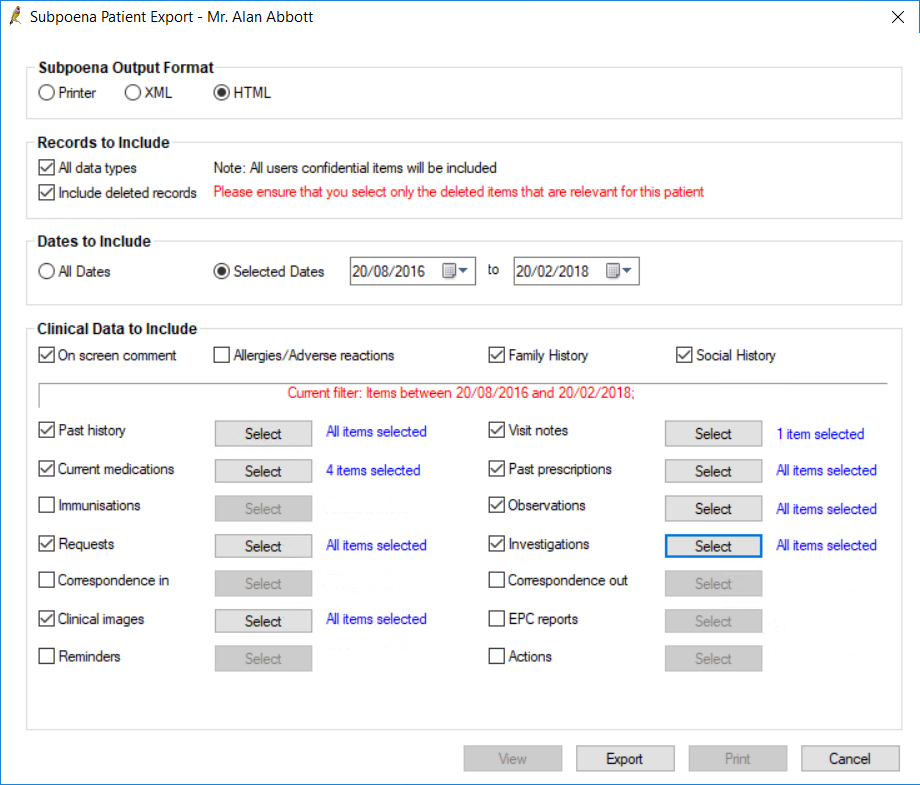
- Search for and select the patient you need to export. Click Open. The Subpoena Patient Export screen will appear.
- In the Subpoena Output Format section, select whether to export the record to a printer, XML, or HTML.
- In the Records to Include section, tick All data types to select all checkboxes in the Clinical Data to Include section. Ticking this checkbox clears any selections you have already made.
- Tick Include deleted records to include deleted records in the item lists when selecting which clinical data to include. If you do not tick this checkbox, you will not be able to select deleted records to export.
- Include All Dates, or select a date range to export from the Selected Dates calendar fields.
- In the Clinical Data to Include section, tick to include the following clinical data:
- On screen comment — Include the On screen comment field in social history.
- Allergies/Adverse reactions — Include patient allergies and reactions.
- Family History — Include patient family history data.
- Social History — Include patient social history data.
- Tick the data types that you want included in the export. By default, all items in the patient’s record are included. If you want to include only selected items, click Select.
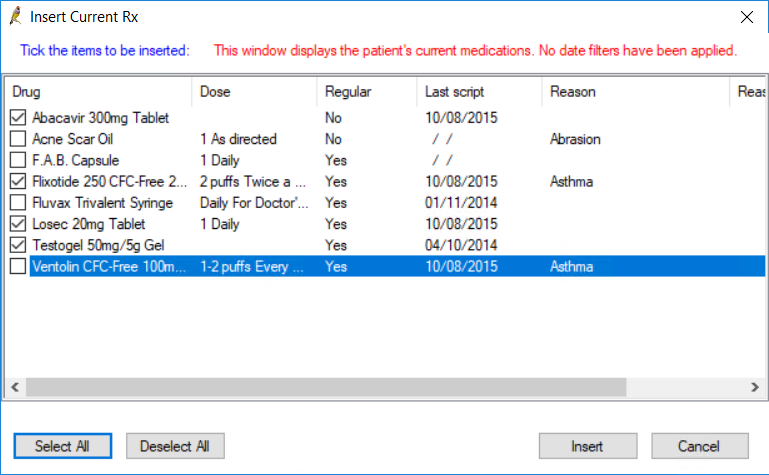
- All items are ticked by default. Untick the items that you do not want included in the export. In the example above, four items have been excluded from the export. Click Insert to return to the Subpoena Patient Export screen.
- If you are printing the export, click View. The assembled document will open in the Bp Premier word processor. You can save or print the document from the word processor, or return to the Subpoena Patient Export screen and click Print to print the export.
- If you are saving HTML or XML, click Export. Browse to a known location, enter a meaningful filename for the export file, and click Save.
- Click Cancel to exit the Subpoena screen if the record exported successfully.

Exporting to HTML produces a file that can be viewed in any Internet browser. Exported XML files are not very human-readable; you will need to import the file into Bp Premier to view the patient record. Printing uses an internal template similar to the Patient Health Summary. If printing to a file, for example, print to PDF, you will be prompted to save multiple files. Ensure that each file has a unique name so that previous files are not overwritten.
Deleted records are indicated as such in all export formats.
An item is included if the clinically significant date falls between the date range; the clinically significant date is the date of administering, not the date when the item is recorded by a Bp Premier user. Items without clinically significant dates are exported by default.
The following example shows the Insert Current Rx window that appears if you click Select next to Current medications.

The blue text next to the data item will update to show the number of items selected. In the example in step 3, 4 Current Rx items and 1 Visit note have been selected for export.
Export is now complete. An audit of the export is added to Today's notes for the patient that was exported. The audit includes the date exported; the parameters used when filtering and whether all or some items were exported.
