Get Started
Set up
Clinical
Patient Comms
Management
Tools & Utilities
- What's New?
- COVID-19 and Bp Premier
- Program, drug, and database updates
- Install for the first time
- Set up for the first time
- Convert clinical data from elsewhere
- Link or convert billing data
- Medicare and DVA
- My Health Record
- Tyro
- Secure messaging
- Pathology and radiology
- Appointment Book
- Add a new ?
- Bp Comms and Best Health App
- Document templates and printing
- Prescribing
- Billing and Banking
- Clinical integrations
- Service Registration Assistant
- Whitecoat
- Reminders
- Users
- Other Bp tools
- COVID-19 and Bp Premier
- Today's notes
- Clinical tools
- Enhanced Primary Care
- Clinical Reminders
- Prescribing and Medication
- Pathology and Radiology
- eReferrals
- My Health Record
- Immunisations
- Best Health App
- Patient consent
- Contact notes
- Send Bp Comms to patients
- Use the word processor
- COVID-19 and Bp Premier
- Reporting
- Booking appointments
- Invoice and pay on the day
- Invoice and pay later
- Correct an account or payment
- Claim with Medicare and DVA
- Banking reconciliation
- WorkCover
- Back up and restore data
- Remote database
- Query data
- Database Integration
- Merge data
- Import and export data
- Maintain data
Title
Set up the Clinical module
Set up the Clinical module
This article describes the clinical functions that most practices need to set up after installing Bp Premier for the first time.
After you have installed Bp Premier for the first time, or converted from an existing clinical software package, you must apply some basic configuration to start using Bp Premier. The following provides an overview on how to set up the components of the Clinical module.
Before you begin
- enter a valid Bp Premier licence key into the server. If you do not have a licence key, contact General Products Support on 1300 40 1111.
- log in to Bp Premier on the server and each workstation to confirm the connection to the Bp Premier server.
Complete each setup procedure in sequence.
Some procedures may ask you to view other topics in the knowledge base. To open a hyperlink in a new browser tab, right-click on the link and select Open in a new tab, or click with the middle mouse button.
Update the drug database
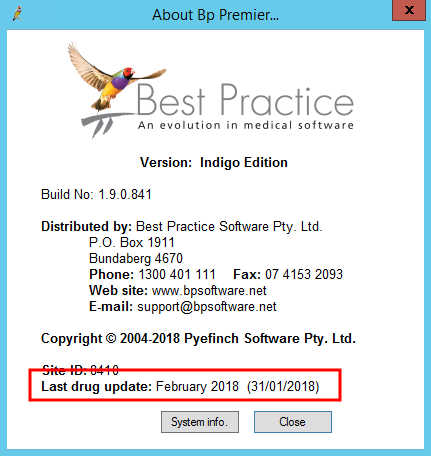
Check that you have the latest drug database version installed. Select Help > About. The About Bp Premier screen will appear.

The last drug database version is shown in the Last drug update field. Check this date against the data update section of our website www.bpsoftware.net. If any newer data updates are available, download them in chronological order and install to the server only. See Update the drug database for more information.
Select Help > About again to ensure that the updated version is now shown.
Enter practice details
If you have converted your data into Bp Premier from another package, the practice details will contain the same information as the old system.
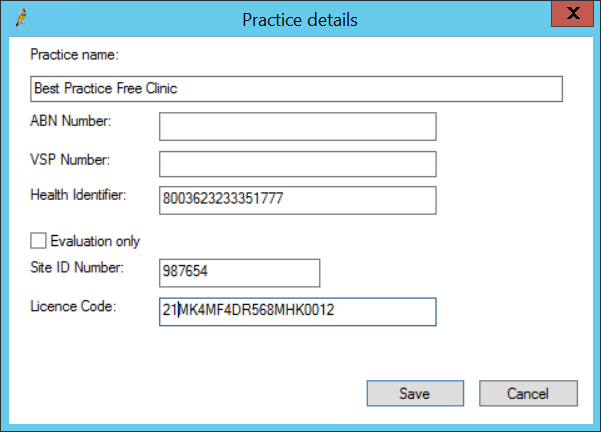
If you are starting from an empty database, you are prompted to enter the practice details when you first log in to Bp Premier.
NOTE Ensure your practice details are correct. Bp Premier uses the practice information entered when printing items like scripts, invoices, and receipts.
There is only ever one practice name in the software. However, you can create multiple practice locations to be printed on scripts, invoices, and reports. Users can select a location when logging in to the software.
To add practice details:
- Select Setup > Practice from the Bp Premier screen. The Practice details screen will appear, showing:
- practice name
- a summary of how many licenced users you have
- the licence expiry date
- each practice locations that are set up
- contact details for the first location on file.
- Click Change. The Practice details update screen will appear.
- Update any details and click Save.

There must be at least one location record. Most practices will have only the one practice location. However, you can create multiple practice locations. Location details are printed on scripts, invoices, and reports.
To add a location:
- Select Setup > Practice from the Bp Premier screen. The Practice details screen will appear.
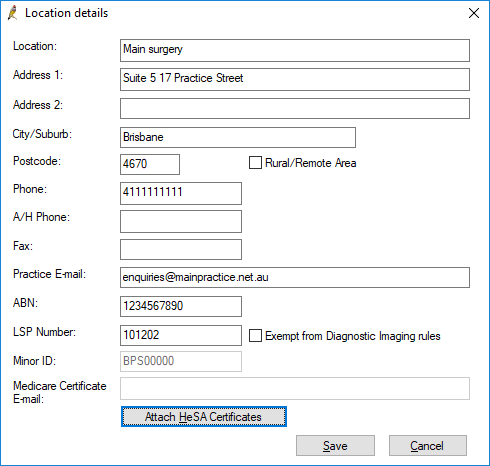
- Click Add next to the Practice Locations list field. The Location details screen appears.
- Complete the details for this location and click Save:
- The Rural / Remote area checkbox controls which Medicare incentive is added to bulk-billed invoices for pensioners, health care card recipients, and children. If unticked, incentive '10990' is used; if ticked, '10991' is used.
- LSP Number is the Location Specific Practice Number used when practices provide diagnostic imaging services or radiation oncology services.
- The Exempt from Diagnostic Imaging rules checkbox is used in remote areas where Diagnostic Imaging Services are provided and the practice is exempt from the claiming rules.
- ABN can be recorded for individual practice locations. A location's ABN is available for insertion in documents like invoices, receipts, and Medicare forms. Each ABN field will populate slightly differently if an ABN is not recorded:
- Doctor > Doctor's ABN <DrABN> will use the logged-in provider's ABN, then the Practice ABN if the provider does not have an ABN recorded.
- Location > ABN <LocationABN> will use the logged-in provider's ABN if recorded, then the Location ABN, then the Practice ABN.
- General > Practice ABN <PracticeABN> will only ever populate with the Practice ABN. If the practice has no ABN recorded, the field will be blank.

To delete a location:
- Select the location on the Practice details screen and click Delete. A prompt will appear if any users have provider numbers linked to that location.
- If the location is deleted, users with linked provider numbers will still be visible, but the provider number linked to that location will no longer be visible.
To restore a deleted location:
- Select the Show Deleted checkbox at the bottom of the screen to view deleted locations.
- Select the deleted location in the Practice locations list field and click Restore.
Set up results and secure messaging import
- Set up Results Import options for importing pathology and radiology results as described in Title.
- Configure Pathology and Radiology forms as described in Set up radiology forms and Set up pathology request forms.
- Set up Messaging Providers for secure messaging and electronic referrals (if required at your practice). See Set up a messaging provider for more information.
- Start the Windows Service Bp Service.
Bp Service checks periodically for results and patient demographic changes waiting to be processed, and also runs any configured scheduled backups. See Set up Bp Service for more information.
NOTE Terminal Server sessions will not run BP service. You must start Bp Service from the Bp Premier server to enable automatic linking to billing, pathology import, and Bp Premier scheduled backups to occur.
Review user settings
- Check user permissions for all users to ensure they have appropriate access. See Title for more information.
- Give one trusted user full permissions and store the password for this user in a fireproof safe for emergency access.
- Log each user into their workstation to:
- Configure their preferences — Setup > Preferences
- Configure their printers — Setup > Configuration > Printers
- Update their password — Setup > Users.
Update standard lists
Bp Premier provides a a number of standard lists that can be modified to suit your practice.
- Go to Setup > Configuration > Lists.
- Add and modify list items for the following lists:
- Reason for ceasing medication
- Contact category
- Document type
- Appointment type
- Reason for cancelled appointment
- If you have duplicate items in your list (common items with slightly different spelling, for example) use the Clean up button to merge duplicate items.
- From the Configuration screen, select the Reminders tab.
- Best Practice Software recommends that the checkbox Allow free text reminders be unticked. Disallowing this option forces providers to select a reminder reason from the preconfigured list.
- Add any reminder reasons applicable to your practice.
- Select the Care Plans tab. Add any Care plan goals and Care plan tasks applicable to your practice.
- Click Save to save your configuration changes.
Configure Bp Premier Messages
If the practice intend to use the inbuilt message functionality, add message groups and message users by selecting Setup > Configuration > Messages.
Bp Premier messages allow internal messages to be sent and received between Bp Premier users. Messages are unrelated to the secure messaging services used for electronic referrals.
Enter patient demographics
If the practice did not convert from another clinical package, you will need to input your patient demographic information by selecting File > Open Patient > Add new. You can also import patient records from another Bp Premier database.
Add Contacts
Contacts are individuals, companies, or institutions of relevance to the practice. Contact details are stored in the database.
If the practice converted from another clinical package, the contact list will be populated with the data from the other system. If the practice did not convert from another package, you will need to add third party contacts by selecting View > Contacts > Add New.
Configure Bulk Document Import
Bp Premier provides a Bulk Document Import utility for bulk scanning or importing documents. Configure this utility for each user who will be importing documents. The BDI tool is external to Bp Premier. To open the tool, click on the Windows flag icon in the bottom right, select the down arrow to view apps, and click on Bulk Document Import under Best Practice Software. See Import bulk clinical documents for more information.
Related topics
Feedback
Walk me through...
Online Claiming: Direct Bill Home
Online Claiming: Patient Claims Home
SUPPORT
Telephone: 1300 40 1111
Email: support@bpsoftware.net
Training: https://www.bpsoftware.net/learning/
This material is classified as commercial-in-confidence. Unauthorised distribution of this information may constitute a breach of our Code of Conduct, and may infringe our intellectual property rights. This information is collected and managed in accordance with our Privacy Policy, available on our website. © Copyright 2020
