NOTE Upgrading to Bp Premier version Saffron and looking for setting up online claiming for that version? Go to the Saffron Online Claiming setup page.
You must set up online claiming to process Medicare patient claims. The following instructions describe how to set up online claiming if your practice uses a single Minor ID. This usually means your practice has only one location.
If your practice or organisation has multiple Minor IDs registered with Medicare, the configuration process will be slightly different. See Set up Online Claiming for multiple Minor IDs for more information.
IMPORTANT If you are using another management package that uses Online Claiming, you will need to finalise and receipt all claims in that package before configuring Bp Premier for Online Claiming. Medicare Online Claiming can only operate from one software package at a time.
If you changed to Bp Premier from another billing package
If you recently changed from another billing package, your practice will most likely not have the correct Medicare components installed on your system. Before you continue with the configuration, check the following:
- Check that you have Bp Premier version 1.7.0.500 or higher installed. From the main menu, click Help > About and check that the version or Build No. shows 1.7.0.500 or higher.
- In File Explorer, browse to the C:\ drive of the Bp Premier server PC and look for the folder C:\Program Data\BPOnline.
- Browse again to the folder c:\Program Data\BPOnline. If the folder still does not exist, contact Best Practice Software support for assistance.
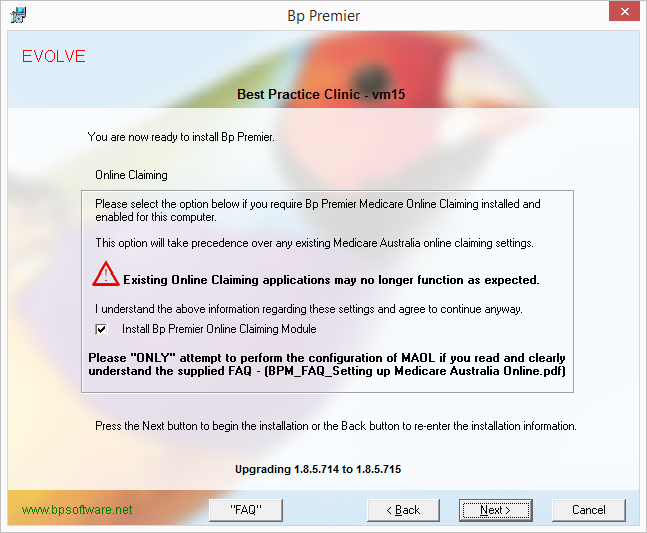
If the folder does not exist, the Medicare components have not been installed during the installation of Bp Premier. To apply these components, close down the Bp Premier server and reapply the program upgrade for your version of Bp Premier. When you reach the Online Claiming installation screen, tick Install the Best Practice Software Online Claiming module.
Installing the Medicare module
You can install the Bp Premier Medicare module if you did not select to install this module the first time you installed Bp Premier. This module allows Bp Premier to connect to Medicare to verify patient Medicare/DVA eligibility and send patient and bulk bill claims online.
- Locate the program upgrade media for your version of Bp Premier. This might be a DVD sent to you by Best Practice Software, or an .exe file that you downloaded from the Best Practice Software website.
- Run the upgrade file.
- Proceed through the upgrade screens, leaving default values for everything until you reach the Online Claiming installation option.
- Tick the checkbox Install Bp Premier Online Claiming Module and click Next.
- Complete the rest of the installation using the default values. You can now enable online claiming in Bp Premier.

If you have set up Medicare Online previously at your practice, you may already have completed steps 1. Obtain your Minor ID and 2. Register with Medicare.
1. Obtain your Minor ID
The Minor ID is an 8 digit number derived from your Best Practice Software Site ID.
- Identify your Site ID. Select Help > About from the main Bp Premier screen. Your Site ID is displayed in the bottom left of the screen.
- Take your Site ID and prefix it with the letters BPS.
- Pad the ID with zeroes so that the total length is 8 characters.
For example:
- If your Best Practice Software Site ID is 849, your Medicare Minor ID number would be BPS00849.
- If your Best Practice Software Site ID is 1234, your Medicare Minor ID number would be BPS01234.
2. Register with Medicare
All practitioners wishing to use Medicare Australia Online (MAOL) will need to register and obtain Medicare Site certificates. Contact Medicare eBusiness centre on 1800 700 199 to obtain the application forms. When completing the form, you will need to provide your practice’s Minor ID.
- If you are already registered but are using another management package, you can use your current certificates to set up Medicare Online in Bp Premier, but you will still need to notify Medicare to tell them you are now using Bp Premier. You will have to supply your new Minor ID .
- If you are not currently registered, you will need to register and apply for a Medicare Site Certificate. You will have to supply your Minor ID.
- Each time you add a new doctor to the practice, you will have to notify Medicare to add this doctor.
The Practice Details Form for online claiming and Payee Provider Banking Details Form can be found in the list of Medicare forms at:
https://www.humanservices.gov.au/health-professionals/forms/
3. Enable online claiming
- Log in to the Bp Premier server as a user with administrator permissions.
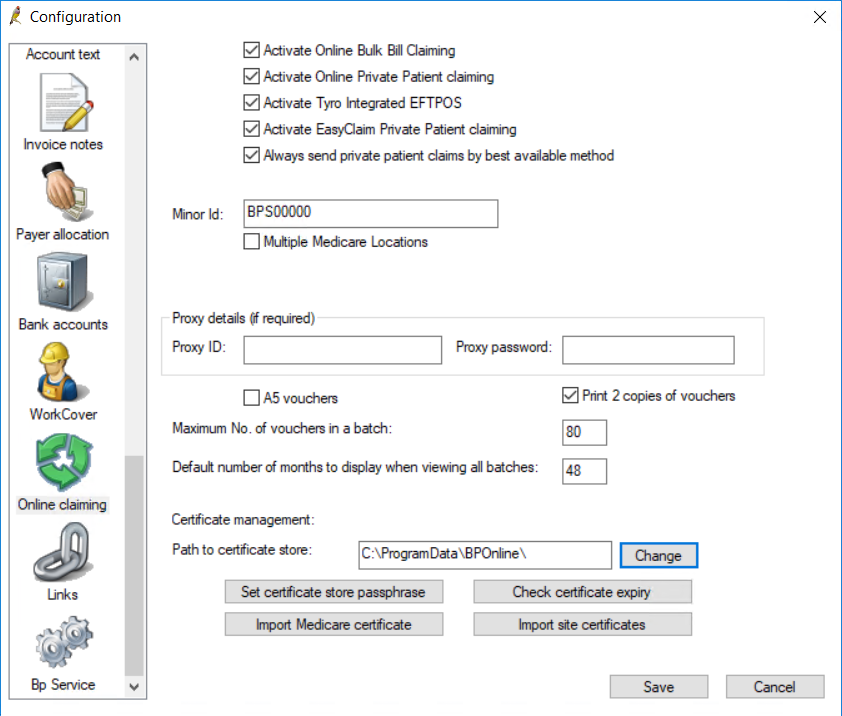
- Select Setup > Configuration from the main screen. Select the Online claiming tab.
- Complete the fields in this screen, using the table below for guidance.
- See Configuring Medicare Certificates for information on how to install Medicare Certificates.

Field | Description |
|---|---|
Activate Online Bulk Bill Claiming | Tick to activate online claiming for bulk billing, if your practice offers bulk billing (or Direct Bill) and wishes to process bulk billing claims through Medicare online claiming. |
Activate Online Private Patient Claiming | Tick to activate online claiming for private patients, if you wish to process patient claims through Medicare online claiming. |
Activate Tyro Integrated EFTPOS | Tick this option if your practice uses a Tyro terminal and you wish to process EFTPOS payments through the Tyro terminal. |
Activate EasyClaim Private Patient Claiming | Tick this option if your practice uses a Tyro terminal and you wish to process real-time Medicare Easyclaims through the Tyro terminal. |
Always send private patient claims by best available method | Tick if you intend to use the Online Patient Claiming for private billings and wish to default for all private claims to be sent to Medicare. |
Minor ID | Enter your practice's single Minor ID. If your practice uses multiple minor IDs, you will have to set up each practice location and minor ID in the Practice Details screen. See Set up Online Claiming for multiple Minor IDs for more information. |
Multiple Medicare Locations | Leave this checkbox unticked. |
Proxy details | If your practice network uses a proxy server, enter the Proxy ID and Proxy password for the proxy server so that online claiming can connect through the proxy. |
A5 Vouchers | Tick to print Medicare and DVA vouchers as two separate A5 pages. If not selected, the two copies will be printed side by side on a single A4 page. |
Print 2 copies of vouchers | Tick if you wish to print two copies of each Medicare assignment form. |
Maximum No of vouchers in a batch | Defaults to 80. This is the recommended maximum batch size, but can be reduced. Best Practice Software do not recommend that you increase this value. |
Default number of months to display when viewing all batches | Sets the default number of months to display when viewing batches from the Direct Bill Batches screen. |
Path to Certificate Store | The certificate store is created on the Bp Premier server and shared by all workstations where transmission to Medicare is to occur. This path is where Bp will store the certificates after they are imported using the Import Medicare Certificate and Import site certificates buttons. DO NOT copy your Medicare certificates manually into this folder. Certificates must be imported using the buttons. Do not change this folder from C:\ProgramData\BPOnline\. |
Best Practice Software recommend that you create an online batch with just a few transactions and transmit this as a test. If the test batch is successful, you can create larger batches for transmission.
4. Clear AIR Register
Each time an immunisation is recorded for a child, a record is written to the Australian Immunisations Register (AIR). If you have been using Bp Premier for a while but have been transmitting immunisation data via another application, you should clear out the AIR in Bp Premier prior to your first online transmission from Bp Premier.
To clear the AIR:
- Select Utilities > Australian Immunisation Register from the main screen. The Australian Immunisation Register screen will appear.
- Select all records. Use Ctrl+Click if you need to.
- Select File > Exclude Current Record.
If you wish to have a hard copy of the records you can select File > Print and print the list. Once the printing is complete, you will be prompted ‘Do you want to mark these immunisation records as notified to Australian Immunisations Register’. Click Yes to mark all records and remove them from the list.
