Bp Premier can export clinical data for one patient, a set of patients, or all patient records in your database.
For example, you can use this process if a patient leaves the practice and you wish to export their data to send to the other practice. If the other practice also uses Bp Premier, you can export as XML data, and import the data into the other Bp Premier server. If the other practice does not use Bp Premier, you can export to HTML, which is a more readable format.
If you do not know the software the other practice uses, export files in each format.
NOTE To export demographic data and clinical data, a user requires the permissions Export demographic data and Export clinical data set to 'Allow access'.
Export individual patient records
Individual patient records are exported from within the patient file.
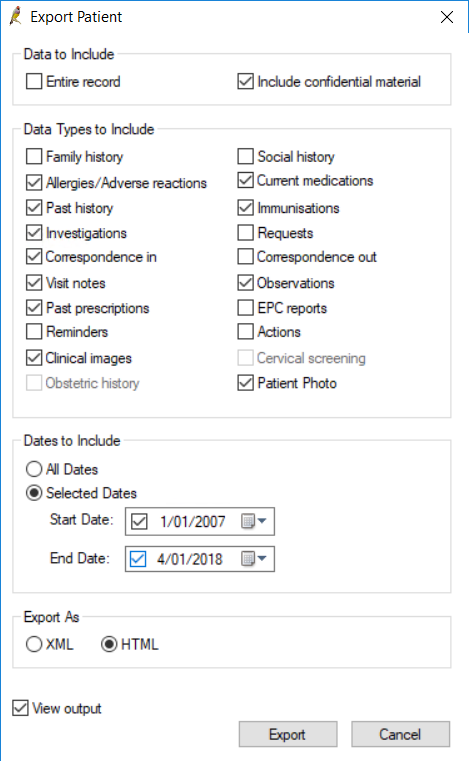
- Open the patient record you want to export and select File > Export patient.
- Select your user name and enter your password, you require Allow access on the Export clinical data permission to proceed. The Patient export screen will appear.
- To export the Entire record, tick the box at the top of the screen. If you wish to export only certain parts of the patient record, tick the Data Types to export.
- Tick Include confidential material to export notes marked as confidential by a provider. If this option is not ticked, any items marked as confidential will not be exported.
- Tick All dates to import all data in the file, or select a start and stop date range to import only data between the dates.
- Select to export as either XML or HTML.
- Tick View output to automatically open the exported file in the default browser when the export is complete.
- Click Export and browse to the destination where you want to save the file. Click Save.

The practice must have an emergency password set in Setup > Configuration > Database to be able to export confidential items, otherwise you will receive a prompt that no emergency access password has been set and confidential items cannot be exported. See Understanding confidentiality and patient notes for more information.
An item is included if the clinically significant date falls between the date range; the clinically significant date is the date of administering, not the date when the item is recorded by a Bp Premier user. Items without clinically significant dates, such as demographic information, are exported by default.
Files are exported with a filename of the patient name and a file extension of '.xml' or '.htm'.
Export a selected list of patient records
To export multiple patients , you must first create a list of patients using Bp Premier's database search function. For example, if you needed to export all of the patients for a specific provider, you can retrieve this list from the database by filtering records by provider. See Searching the database for more information.
To search clinical data, a user requires the permission Search clinical data set to 'Allow access'.
NOTE The Database search facility is an advanced function of Bp Premier. A basic knowledge of the query language SQL is not required, but may help in creating successful queries. If you are unsure how to create a database search, contact Best Practice Support for assistance.
To create a list of patients:
- From the main Bp Premier screen, select Utilities > Search or press Ctrl + S. The Database search screen will appear.
- Construct a query for your search using the row of buttons along the top. Click New query to erase the current query and start again.
- Click Run query to see the search results in the list below.
- If the search results contain all the patients you want to export, select File > Save or click the Save icon in the toolbar. The Save As screen will appear.
- Browse to the location you want to save the results file to.
- In the File name field, override the default filename and enter a more meaningful filename.
- Leave Save as type set to 'XML File'. Click Save.
You will need to supply the path and filename of the results file in the next set of steps.
To run the export:
- From desktop, select the Windows logo in the bottom left > Apps > Patient Import-Export.
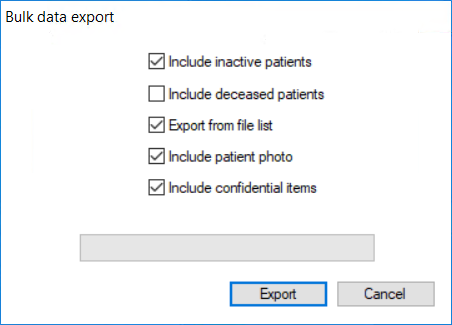
- Log in. On the Import/Export utility screen, click Export patients. The Bulk data export screen will appear.
- Tick whether to include inactive and deceased patients, patient photos, and confidential items.
- Select Export from file list. Click Export. A file explorer will open.
- Browse to the search results file you created. Select the file and click Open. The Browse for folder screen will appear.
- Browse to the destination where you want to save the exported files and click OK.

NOTE If you are exporting confidential material, and the export contains patients with notes marked 'Confidential', you must supply the emergency access code.
Bp Premier will create an XML file for each patient, using the patient name as the filename. When complete, a message will indicate how many patients were exported.
Export all patient records
Make sure that you have sufficient disk space available on the target drive to store the files. The exported XML files require roughly the same disk space as the size of your entire database.
The size of your most recent Bp Premier backup is a good indicator of the size required.
- From the desktop, select the Windows logo in the bottom left > Apps > Patient Import-Export.
- Log in. On the Import/Export utility screen, click Export patients. The Bulk data export screen will appear.
- Select to Include inactive patients and Include deceased patients in the exported records.
- Click Export. The Browse for folder screen will appear.
- Browse to the destination where you want to save the exported files and click OK..
One XML file will be created for each patient record in the database.
