You can send and receive emails from three areas in Bp Premier:
- Word processor (send only)
- Incoming Mail (receive and send from email addresses)
- Practice Email (receive and send from the practice email address).
You must have configured email for the practice and users who want to send email messages.
Send emails from the word processor
You can only send emails from the word processor, not view incoming emails. If a user's account has been set up with an email address, the e-mail icon ![]() will be enabled on the word processor toolbar.
will be enabled on the word processor toolbar.
- Open the word processor and create the letter to be emailed, from template or a blank document.
- Click
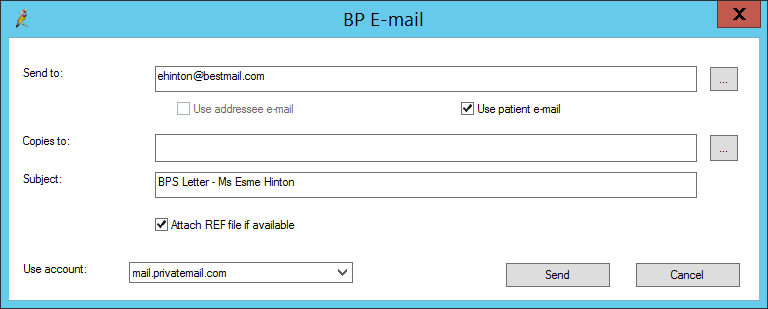
 on the toolbar, or select File > Send Mail to display the BP E-mail screen.
 - Choose an address for the Send to field:
- If the template prompted you to select a contact, the contact's email address will be displayed automatically in this field.
- If you are in a patient record, or the template prompted for a patient's name, tick Use patient e-mail to insert the patient's email address.
- If the template asked you for an addressee, tick Use addressee email to insert the addressee's email address.
- Click ... to display the E-mail address screen and search for a contact's or patient's email address.
- Type in the email address to send to.
- Click ... next to the Copies to field to insert contact or patient email addresses to send an electronic copy to.
- Enter a Subject for the email. If Bp Premier inserted an email address for you, the name will also appear in the subject.
- Tick Attach REF file if available to attach a patient reference file, if applicable.
- You should not need to change the Use account setting. This field indicates the mail servers available for the user creating the email.
- Click Send to send the letter by email.

If the addressee and logged-in user both have PKI keys present, Bp Premier will encrypt the email. For more information, see Encrypt e-mail messages from Bp Premier.
Manage incoming email
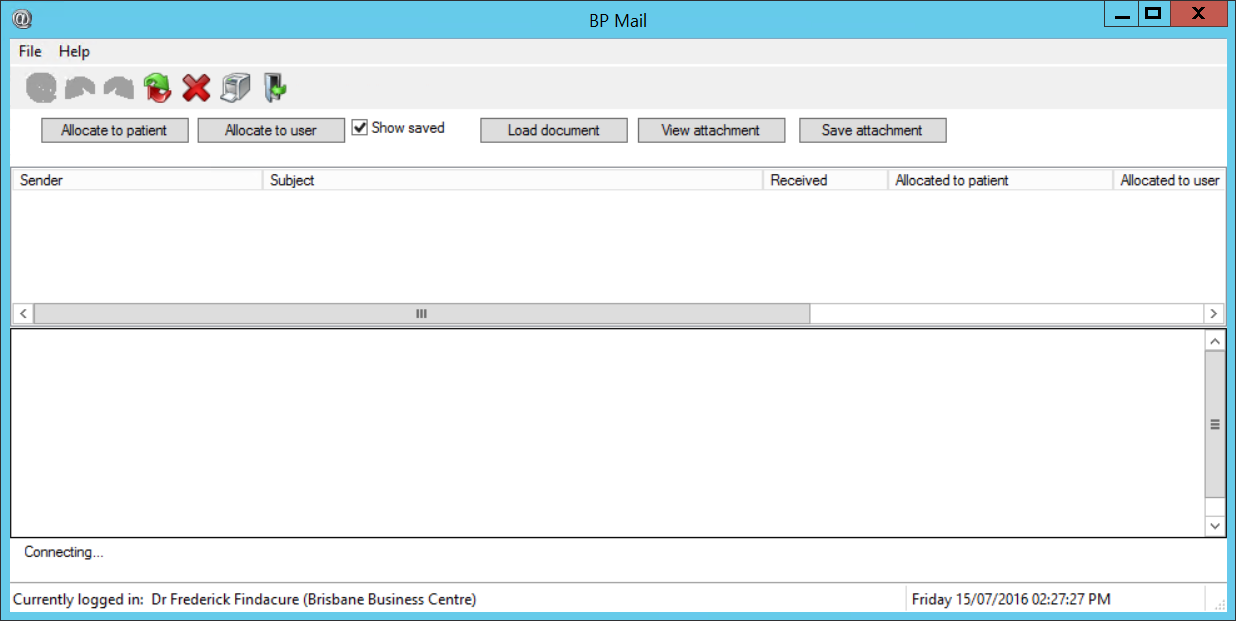
The BP Mail screen manages incoming emails. From this screen you can allocate emails to patients or providers, and save attachments.

There are two paths to the BP Mail screen:
- If your practice uses a practice email address for all incoming emails, select View > Practice email. The user will require the Practice email user permission set to 'Allowed'.
- If your practice allows users to receive emails to their individual email address, select View > Incoming email. Only emails sent to the user's email address will be displayed.
- From the main screen of Bp Premier, open the BP Mail screen. By default, the BP Mail screen shows all received emails that have not been allocated.
- Use the options at the top of the screen to manage the received emails.
Button | Action | |
|---|---|---|
Create New Email |
| Create a new email message |
Reply to Sender |
| Reply to the sender of the selected email |
Send / Receive |
| Check for new emails |
Delete email |
| Delete the selected email |
Print email |
| Print the selected email |
Allocate to patient | Allocates the email to the patient within the View > Incoming Email (BP Email) window. This action will not yet save the email to the patient’s record. After the email has been assigned to the patient, the user can right-click on the email and either Move to Correspondence in or Move to Inbox to move to the patient record or provider inbox. | |
Allocate to user | Allocates the email to a user within the View > Incoming Email (BP Email) window. This action will not yet save the email to a provider inbox. After the email has been allocated, the user can right-click on the email and Move to Inbox to move to the patient record or provider inbox. You can also change who the email is assigned to. | |
Show saved | Tick to show all emails received, including emails saved to a patient record. | |
Load document | If the attachment is a Microsoft Word document, click to display the contents of the attachment in the bottom of the screen. | |
View attachment | Opens the attachment for viewing. | |
Save attachment | Saves the attachment to file, so the file can be imported into a patient record separately. | |
To save an email, highlight the email and select File > Save. The email wil be saved into the BP Mail window. For example, an email may not be assigned to a patient or a user, but the user wants the email removed from the incoming list. Users can retrieve the saved incoming email by ticking Show saved.
