
Get Started
Set up
Clinical
Patient Comms
Management
Tools & Utilities
Title
Onboarding with the SRA
Complete the onboarding process to begin using the SRA. Two separate workflows are available depending upon whether you have registered your organisation with the SRA previously.
Register and link Bp Premier with SRA
If you have not registered with the SRA, complete the steps in this section to register with SRA and link Bp Premier to your SRA account. Perform the following instructions on any machine with Bp Premier installed. The user performing these steps must have Allow Access on the Configuration permission.
If you have already registered with the SRA, follow the instructions at Title.
- Login to Bp Premier and navigate to Setup > Practice details.
-
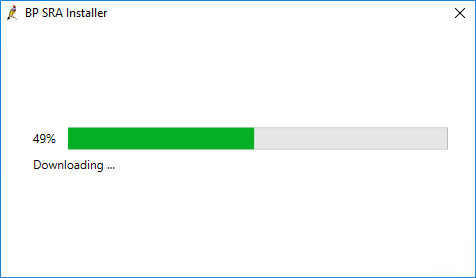
Click the Sync button. If the Sync button is not available, see Service Registration Assistant for details on how to enable the SRA within Bp Premier.

If not yet installed, the SRA component is downloaded and installed.
- Check
- You must check the Have you made the SRA a Contract Service Provider (CSP) for the Health Identifier (HI) Service checkbox before proceeding. Open HPOS using the Click here hyperlink to make the Service Registration Assistant a Contract Service Provider. Read more about Contracted service providers on the My Health Record web site.
- Click Next >. The Organisation Details screen appears.
- On the Organisation Details screen, ensure the correct details are entered.
When the installation is complete, you may be prompted to log in, else the BP Service Registration App screen appears.
Field Name | Field Explanation |
|---|---|
Practice Name | The name of your practice as it is to be registered using the SRA. Changing the Practice Name here also updates the details held in Setup > Practice Details. |
Legal Name | Your ABN is used to retrieve the legal name from a web service. |
Email Address | Enter an email address to receive legal notices from the SRA. |
BP Site ID | Your Bp Premier Site ID held in Setup > Practice Details. |
ABN | Your ABN as held in Setup > Practice Details. |
VSP Number | Your Vaccine Service Provider number. |
Health Identifier | Your Health Identifier as held in Setup > Practice Details. |
HPIO Certificate | Select the installed certificate that matches your Health Identifier. |

Click Next >. The PRODA login screen appears.
Login to PRODA
- On the PRODA login screen, enter your PRODA Username and Password. Click the blue Login button. Read more about PRODA and how to register on the human services website.
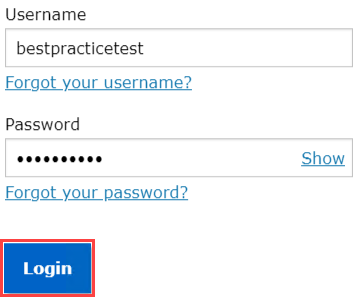
- Logging in to PRODA requires two-step verification. When creating your PRODA account, you nominated to receive a verification code via email or SMS text. When the code is received, enter the code and then click the blue Next button.

Complete the SRA Registration
The Complete Registration screen requires you to scroll down to view the entire contents.
- Verify your Organisation Details are correct and that you accept the Agreed Statements.

- Scroll down and confirm the Authorisation Details contact email and contact number are accurate. Check the confirmation checkbox if you are an authorised representative of your organisation.

- The Authorisation Documents section requires you to upload a PDF file that provides evidence of your authorisation to represent the organisation you are registering. This letter must be from an officer of your organisation authorising you to register the organisation in the SRA and sign the participation agreement. Click the blue Choose Document(s) button to select a file to upload.

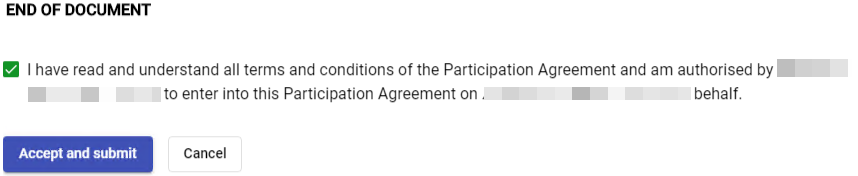
- Scroll through and read the Participation Agreement.
- At the End Of Document, check the box confirming you have agreed to the terms and conditions. Click Accept and submit.
Approve Bp Premier as an authorised system
The wizard now presents the Organisation screen. To proceed, you must approve Bp Premier as a system linked to your organisation within PRODA.
- Select the Authorised Systems tab. A list displaying your Client Id with a Pending status is displayed.
Click the link under Client Id (blurred out in below image).

- The Manage Authorised System screen displays. Ensure the fields are filled appropriately:
- Scroll to the bottom of the Manage Authorised System screen and click Save Authorised System.
- You are taken back to the Organisation screen. The Status displays Active, meaning Bp Premier is now authorised to manage your organisations within the SRA.
- Click the Next > button located at the bottom of the screen. The Location Mapping screen displays.
Field Name | Field Explanation |
|---|---|
Software Id | Displays Bp Premier. |
Software Version | Your currently installed version of Bp Premier. |
Client Registration Status | Change to Active. |
Is the authorised client system active? | Check/Tick. |
Roles checkboxes | Check/Tick all the boxes to allow Bp Premier full permissions to synchronise between the SRA and Bp Premier. |


Map Bp Premier users to SRA users
The User Mapping screen displays a list of providers in your Bp Premier database that can map to providers in the SRA system. To make a user available in the SRA system:
- Click the Open button next to the user in the list. The User Details screen appears.
- Check the ...has consented to disclosure of their details to third parties checkbox.
- Enter the user's Surname, First Name and Registration No if available and click Search.
- In the search results list, select the practitioner you are mapping.
- For each location that the practitioner provides services:
- Click Open in the location list and check the box, this tells the SRA at which locations the provider operates.
- Enter in a Practitioner Role Type. For example, General practitioner.
- Check the Active checkbox.
- Select Create New Practitioner Role.

- Click Close.
- Perform the above steps for every user that you want available in the SRA.
- Click Next >.

Map Bp Premier users to SRA users
The User Mapping screen displays a list of providers in your Bp Premier database that can map to providers in the SRA system. To make a user available in the SRA system:
- Click the Open button next to the user in the list. The User Details screen appears.
- Check the ...has consented to disclosure of their details to third parties checkbox.
- Enter the user's Surname, First Name and Registration No if available and click Search.
- In the search results list, select the practitioner you are mapping.
- For each location that the practitioner provides services:
- Click Open in the location list and check the box, this tells the SRA at which locations the provider operates.
- Enter in a Practitioner Role Type. For example, General practitioner.
- Check the Active checkbox.
- Select Create New Practitioner Role.
- Click Close.
- Perform the above steps for every user that you want available in the SRA.
- Click Next >.
Link Bp Premier to a registered organisation
If you have previously registered with the SRA, complete the steps in this section to approve Bp Premier as a system linked to your organisation. Perform the instructions on any machine with Bp Premier installed. The user performing these steps must have Allow Access on the Configuration permission.
If you have not registered your organisation with the SRA, follow the instructions at Title.
- Login to Bp Premier and navigate to Setup > Practice details.
-
Click the Sync button. If the Sync button is not available, see Service Registration Assistant for details on how to enable the SRA within Bp Premier.
If not yet installed, the SRA component is downloaded and installed.
- Check
- You must check the Have you made the SRA a Contract Service Provider (CSP) for the Health Identifier (HI) Service checkbox before proceeding. Open HPOS using the Click here hyperlink to make the Service Registration Assistant a Contract Service Provider. Read more about Contracted service providers on the My Health Record web site.
- Click Next >. The Organisation Details screen appears.
- On the Organisation Details screen, ensure the correct details are entered.
When the installation is complete, you may be prompted to log in, else the BP Service Registration App screen appears.
Field Name | Field Explanation |
|---|---|
Practice Name | The name of your practice as it is to be registered using the SRA. Changing the Practice Name here also updates the details held in Setup > Practice Details. |
Legal Name | Your ABN is used to retrieve the legal name from a web service. |
Email Address | Enter an email address to receive legal notices from the SRA. |
BP Site ID | Your Bp Premier Site ID held in Setup > Practice Details. |
ABN | Your ABN as held in Setup > Practice Details. |
VSP Number | Your Vaccine Service Provider number. |
Health Identifier | Your Health Identifier as held in Setup > Practice Details. |
HPIO Certificate | Select the installed certificate that matches your Health Identifier. |
Click Next >. The PRODA login screen appears.
Login to PRODA
- On the PRODA login screen, enter your PRODA Username and Password. Click the blue Login button. Read more about PRODA and how to register on the human services website.
- Logging in to PRODA requires two-step verification. When creating your PRODA account, you nominated to receive a verification code via email or SMS text. When the code is received, enter the code and then click the blue Next button.
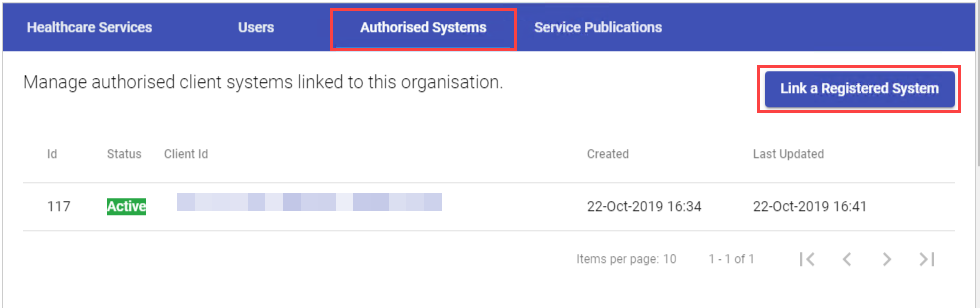
Link a Registered System
- Locate your organisation from the Your Organisations list, ensuring to match the ABN displayed with the ABN entered into Bp Premier.
- Click your organisation name displayed in blue. The organisation name is "Test Organisation" in the above example. The Organisation screen appears.
- Select the Authorised Systems tab.
- Click the blue Link a Registered System button.
On the Link a Registered System window, copy and paste your SRA Client ID from the top of the screen into the Client Id field.
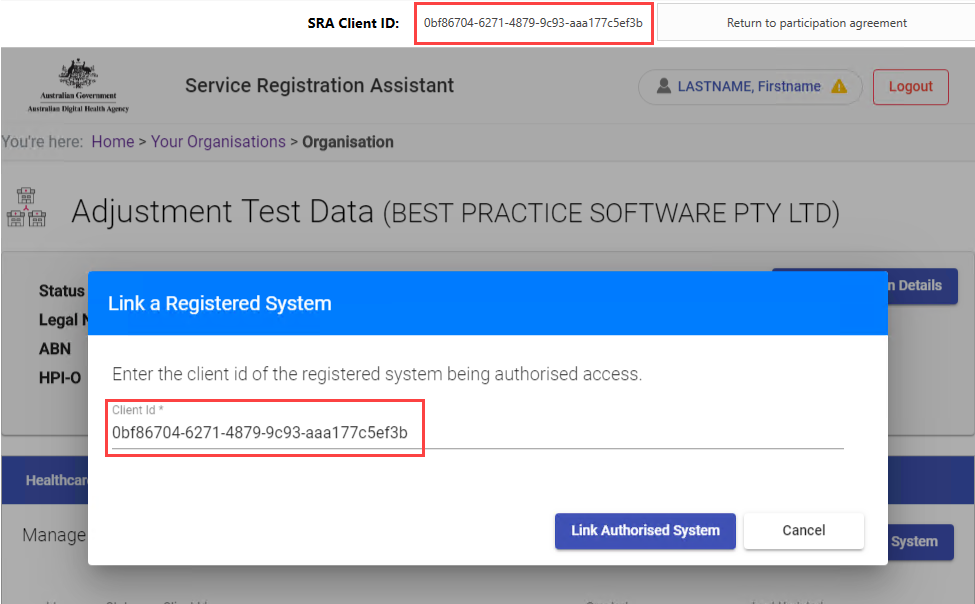
- Click Link Authorised System.
- The Manage Authorised System screen displays. Ensure the fields are filled appropriately:
- Scroll to the bottom of the Manage Authorised System screen and click Save Authorised System.
- You are taken back to the Organisation screen. The Status displays Active, meaning Bp Premier is now authorised to manage your organisations within the SRA.
- Click the Next > button located at the bottom of the screen. The Location Mapping screen displays.

Field Name | Field Explanation |
|---|---|
Software Id | Displays Bp Premier. |
Software Version | Your currently installed version of Bp Premier. |
Client Registration Status | Change to Active. |
Is the authorised client system active? | Check/Tick. |
Roles checkboxes | Check/Tick all the boxes to allow Bp Premier full permissions to synchronise between the SRA and Bp Premier. |
Map Bp Premier locations to SRA locations
The Location Mapping screen displays a list of locations held in your Bp Premier database. Each location requires you to select an option in the SRA Action column.
- Select No SRA Action if you don't want this location available in the SRA.
When all locations have an option selected in the SRA Action column, click the Next > button located at the bottom of the screen. The User Mapping screen appears.

Map Bp Premier users to SRA users
The User Mapping screen displays a list of providers in your Bp Premier database that can map to providers in the SRA system. To make a user available in the SRA system:
- Click the Open button next to the user in the list. The User Details screen appears.
- Check the ...has consented to disclosure of their details to third parties checkbox.
- Enter the user's Surname, First Name and Registration No if available and click Search.
- In the search results list, select the practitioner you are mapping.
- For each location that the practitioner provides services:
- Click Open in the location list and check the box, this tells the SRA at which locations the provider operates.
- Enter in a Practitioner Role Type. For example, General practitioner.
- Check the Active checkbox.
- Select Create New Practitioner Role.
- Click Close.
- Perform the above steps for every user that you want available in the SRA.
- Click Next >.
SRA Synchronisation Complete
The SRA synchronisation is now complete.
What do I do next?
Feedback


This material is classified as commercial-in-confidence. Unauthorised distribution of this information may constitute a breach of our Code of Conduct, and may infringe our intellectual property rights. This information is collected and managed in accordance with our Privacy Policy, available on our website. © Copyright 2020