This article describes how to create a template that includes text, images, tables, and database fields.
Template fields are used to insert information from the database, for example, a patient's first name, DOB, or a reminder reason. When the letter is printed, the field is substituted with the value from the database for that patient.
After you have created a template, you can select the template when creating a document from the patient record or word processor.
Users require the Word processor templates user permission set to 'Add/Edit/Delete' to create and edit document templates.
Create a template
- From the main screen, click the
 icon or select Utilities > Word processor from the menu.
 - Select Template > New Template from the Word Processor main menu. A blank document will be displayed. The template fields toolbar containing the available field categories is displayed on the left.
- Write the body text of your template as you would in any word processor.
- Where you want to insert a database value, for example, a patient name in a greeting line, position the cursor where you want the field and double-click the field on the left hand list.
- If you add fields in succession, ensure that there is a space between each field.
- Apply any formatting to the field and the text around it, for example, font style, font size, font weight (boldness), italics, tables, and images.
NOTE Ensure you have optimised any images for size and colour in a graphic program prior to use in the Bp Premier word processor. The image resolution should be as small as possible to conserve disk space ( no more than 100kb is recommended).
- When you have finished setting up the template and inserting the fields you need, select File > Save As. The Template detail screen appears.
- Enter a Template name and tick the Available to all users checkbox. This option allows anyone at the practice to open and use the template.
- Click Save. The template is now available for use.
TIP You can also press F4, or, from a patient record, press F4 or select File > New Letter.
The template field will be inserted at the cursor with brackets around, for example, <currentRX>.
IMPORTANT You cannot insert a field by typing the field into the word processor directly. You must insert the field by double-clicking on the field name in the list on the left hand side. For example, typing '<DrName>' onto the template will not insert the DrName field.
Edit an existing template
- From the Bp Premier word processor, select Templates > Edit template. The Word Processor templates screen is displayed.
- Select Custom to show only user-created templates. You cannot edit and save supplied templates; you must save them as a different name.
- Select the template you want to update and click Open.
- Make the changes you need and select File > Save, or click the disk icon in the toolbar.
Formatting tips
Tables
Tables can assist with the layout of the document. Take care, however, when using certain template fields that are themselves tables. Examples of these fields are:
- past medical history template
- allergies
- current and past medications
- immunisations
- observations
- attendances dates.
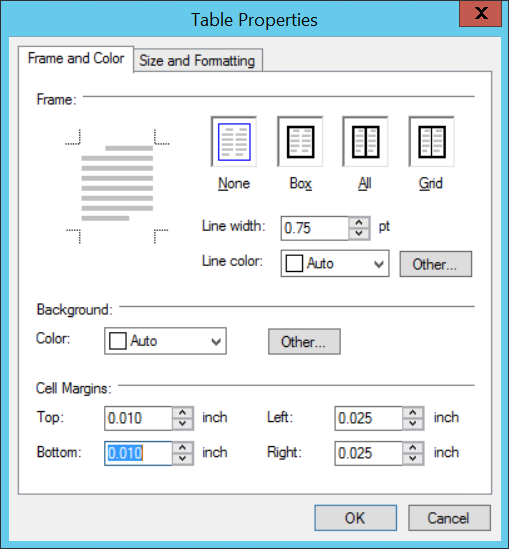
Best Practice Software recommend that these fields are not put into tables, because table-type fields expand across the width of the page, giving no room for the table cell. If you must insert a table field into into a cell, make sure that the table is one cell wide with a full page width and that the margins are set to zero all around:
- Click into any table cell and select Table > Properties. The Table Properties screen is displayed
- Set the Cell Margins at the bottom of the screen and click Ok.

Using tabs in table cells
The Tab key on the keyboard moves the cursor between cells in a table. If you want to insert a table between data in a cell, use Shift + Tab.
Deleting fields
To delete a template field, click on the field; the cursor will change to an up arrow and the field will be highlight in grey. Press Delete on your keyboard.
Font size
Use a size 10 font for form readability and template presentation.
Spreading data across end of page
When using a template, the order that the custom fields are displayed in on the template is the order they will appear on the data entry screen. It is good template practice to align fields down the page to make data entry flow better.
Template margins
Keep the left margin no smaller than 10mm, otherwise data may be cut off when printing.
Reinventing the wheel
Before starting to create your new template, search the Internet to see if someone else has already created a template of that type and made the template available. If there isn't one formatted for Bp Premier, you could use a Medical Director template (MD templates can be imported successfully). For instructions in how to import a template, see Import a document template.
