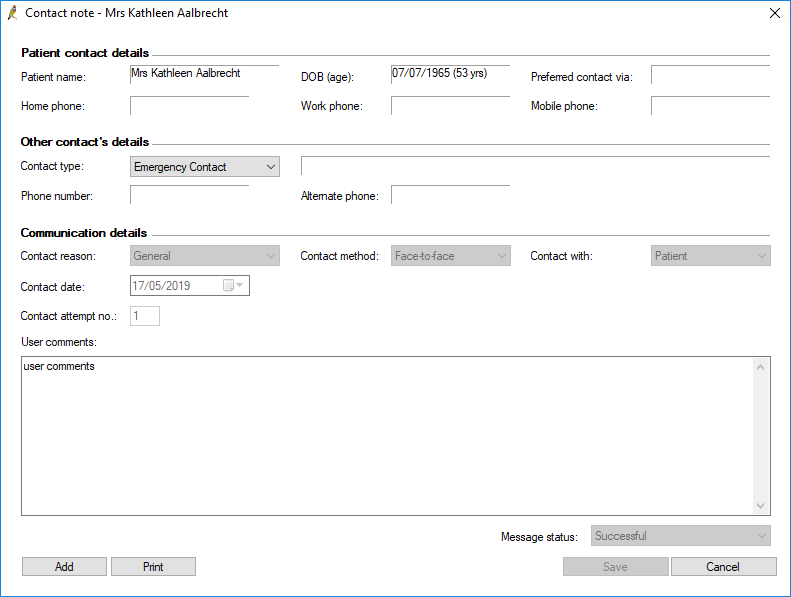
You can manually record a contact note from anywhere in Bp Premier that you see the Record note button or menu option.
Record a contact note
- To add a general note, search for the patient (F2) and click View > Contact notes.
- Click Add. The Contact note screen will appear.
- If you contacted (or tried to contact) someone other than the patient, select Contact type in the Other contact’s details section to indicate the relationship with the patient. The other fields will be populated with information stored in the database, if any.
- Under Communication details, select the Contact reason and Contact method. For most functions, the Contact Reason will be preselected and cannot be changed.
- If the contact method is 'Phone', select the person you spoke to from the Contact with field. If the contact person does not fit any of the listed contacts (such as a flatmate), select 'Not specified' and follow your practice guidelines for recording the contact (such as recording a name and relationship in User comments).
- Add any User comments and select the Message status for the contact attempt at the bottom right. The options available depend on the Contact method selected, and may be automatically set.
- Click Save to save the contact note and return to the Contact notes screen.
To add a clinical-related note, open the appropriate window in Bp Premier and click Record note.

View a patient’s contact history
- Press F10 to open the Patient list. Search for the patient by name, or click Advanced search to search by DOB, Medicare number, or HI number.
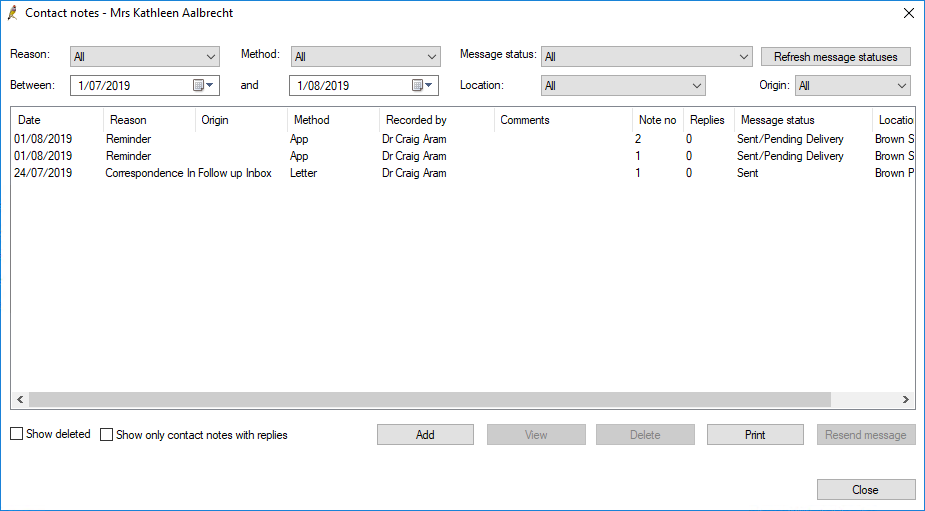
- Select the patient from the list of search results and click Contact notes in the bottom right corner, or press Alt+C. The Contact notes screen will appear.
- Use the Reason, Method, and Message status filters along the top to restrict the contact records shown. For example, select ‘Unsuccessful’ from the Status filter to view only unsuccessful contact attempts that need following up.
- Select a date range and a Location to restrict the records shown.
- Filter from where within Bp Premier the message was sent from by using the Origin list. The Origin list could contain the options All, Inbox, Follow up Inbox and Patient record. Options available in the Origin list depends upon from where within Bp Premier contact notes for this patient has been sent. Select All if you are searching for a Contact Note that was not sent from either the Inbox, Follow up Inbox or Patient Record.
- Tick Show deleted at the bottom to include deleted contact note records in the list.
- Click View to open a contact record, Print to print the selected contact note, or Patient details to open the patient demographics screen for the patient.

Check for failed messages and resend
You can check the status of messages sent electronically and search for those that failed to send. Your practice may also have a policy to always follow up a failed electronic message with a phone call, for example.
Check for all unsuccessful messages at your practice and resend a message:
- From the main Bp Premier screen, select View > Contact notes. The Contact notes screen will appear.
- Select the message you want to resend.
- Click the Resend message button. The Resend message screen will appear.
- Change the Send via setting to change the contact method.
- Click Send to send the message. A new contact note will be created for the selected patient.
By default, Message status is set to 'Sending failed / Unsuccessful', showing all unsuccessful messages over the past month. Use the Reason, Method, and Message status filters to refine your search.
Check messages for a single patient and resend a message:
- Press F10 to open the Patient list. Search for the patient to whom you need to resend a message. You can also press F2 to search for a patient and click View details.
- Select the patient and click Contact notes. The Contact notes screen will appear. Use the Reason, Method, and Message status filters to find the message you want to resend.
- Select the message you want to resend.
- Click the Resend message button. The Resend message screen will appear.
- Change the Send via setting to change the contact method.
- Click Send to send the message. A new contact note will be created for the patient.
Related topics
Last updated 23 July 2020