You can process payments through the Management menu for account holders and patients if the invoice was not created and paid from the appointment book after the consultation.
To view your practice's payment data, view Payment Reports.
Which screen do I use?
You can record a payment from several screens in Bp Premier:
- To enter a payment for an existing account for a patient, account holder, or contact — Management > Process Payment
- To create an account and enter a payment — Management > Create patient account > Pay now
- To enter a payment by a patient from their Billing History — Management > Patient billing history > Pay Single Invoice / Pay all
The method you select will depend on your practice's workflows and your account settlement process, and whether you are processing payments from patients or account holders, such as an employer or company.
The instructions below demonstrate the first option. This option is usually used where a patient has a number of invoices outstanding and are being paid all at once, or for a hospital or insurance company that will be paying a set of accounts (often from a statement generated from the Debtors List).
Regardless of which method you use, the steps are the same: select the account holder, select the invoices being paid, and enter the amount in each applicable payment method.
What if I need to pay a lot of invoices?
The Bulk payment screen is a more streamlined screen for processing irregular or very large numbers of invoices. Your practice may find this screen useful if it processes invoices with non-standard fees from hospitals or insurance companies. See Process a bulk payment for more information.
Process a payment
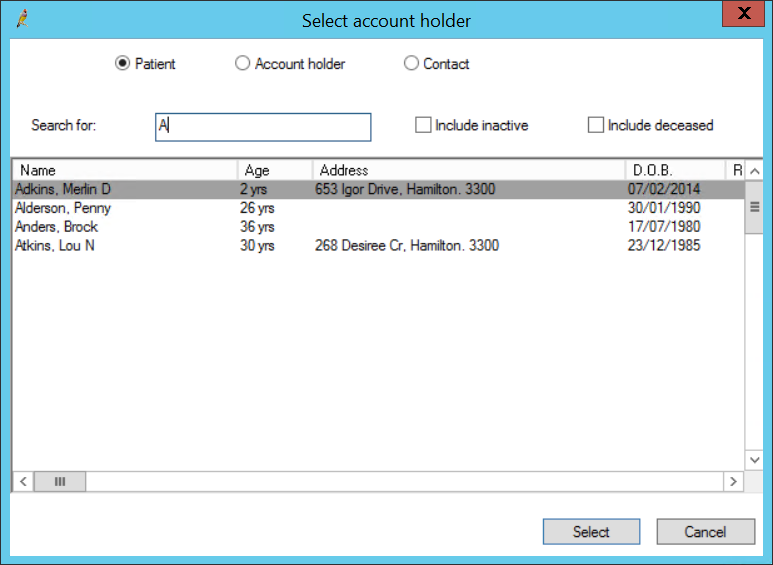
- Select Management > Process payment from the main screen. The Select account holder screen will appear.
- Select Patient, Account holder, or Contact to filter the account holders shown.
- Tick Include inactive or Include deceased checkboxes if you are processing an old payment for inactive or deceased account holders.
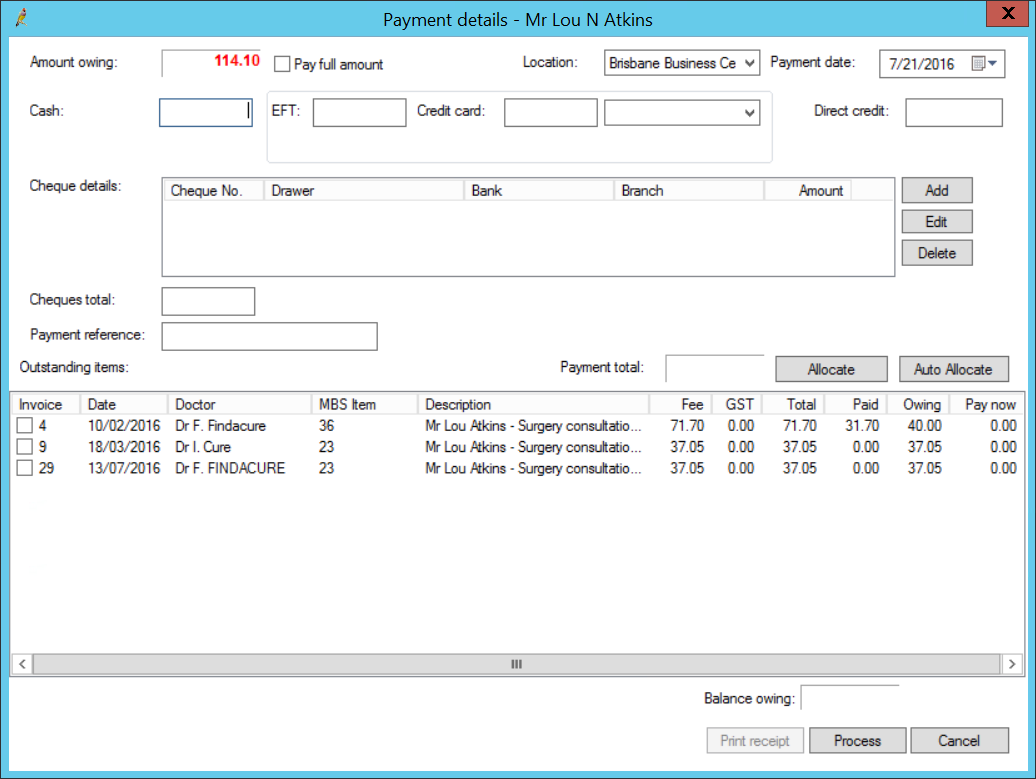
- Enter the surname into the Search by surname field. Select the patient or company from the list and click Select. The Payment details screen will appear.


This screen is similar to the one shown when a patient account is paid after consultation, except the screen shows all invoices outstanding.
The next steps depend on whether the account is being paid in full or in part.
Pay in full
- Place the cursor in one of the Cash, EFT, Credit Card, Direct credit, or Cheque total fields (depending on how the account is being paid) and tick the checkbox Pay full amount.
- If the payment is by cheque, the Cheque details screen will appear. If it does not appear, click Add.
- Enter the cheque details and click Save. This information will appear on the Payment details screen and the Banking report.
- Check that the payment amount has been entered correctly into the payment type field you clicked in step 5.
- All outstanding items will be ticked automatically and the Pay now column filled with the amount owing for each item. If not, click Auto allocate to allocate the entire amount across all of the accounts. When the entire payment amount has been allocated, the Balance owing field at the bottom will be zero.
- Click Print receipt to save the payment, print the receipt, and exit the screen, or click Save to save the payment and exit the screen.
Pay in part
- If the account is being only partly paid, enter the split amounts to be paid into the Cash, EFT, Credit Card, or Direct credit fields. For example, for an account of $75.00, you could enter $25.00 into the Cash field and $50.00 into the Cash field.
- If you are part-paying by cheque, click Add to open the Cheque details screen.
- Enter the cheque details and click Save. The Payment total field at the bottom of the screen will update to display the total amount entered in all payment fields.
- Click Auto allocate to allocate the amount being paid sequentially across the account items. The Pay now column indicates the amount allocated for each item.
- Instead of auto-allocating, you can manually tick a checkbox next to an account item to pay that item. The Pay now column indicates the full amount of the item.
- You can also part-pay individual items. Click Allocate. Select the item that you want to part pay and edit the amount in the Pay now column. Click Ok.
- After allocating payments, check that the amounts in the Pay now column total to the Payment Total field.
- Click Print receipt to save the payment, print the receipt, and exit the screen, or click Save to save the payment and exit the screen.
$107.10 is paid and auto-allocated against three account items, with a part payment on one.

The first and third account items are being paid in this transaction. To allocate a payment of $85 to individual items, tick the items the payment is for.

You must allocate all of the amount paid from this screen (for example, if the payer is paying a total of $100.00, the entire amount must be allocated from the Allocate payment screen).
A payment of $85 is being allocated in this transaction: the third item is being paid in full, and the fourth item is being part-paid with $21.00.

What do I do next?
Last updated 23 July 2020