If a workstation has trouble connecting to the Bp Premier server after being added to the network, or after changes to your practice's network, follow the instructions below to troubleshoot the client-server connection.
If a Bp Premier client cannot connect to the server, the Available Servers list is blank:
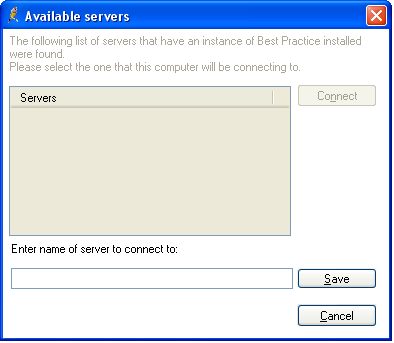
or the error ‘Unable to connect to the server\BPSInstance Server’ appears.
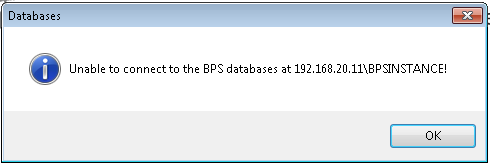
Work through the possible problems and solutions below.
Check the client and server are the same version
This step is particularly important if you are re-engaging a workstation like a remote laptop or a desktop client that has not been used as a Bp Premier client for some time.
Client computers must run the same version of Bp Premier as the server, otherwise the client-server connection will not be successful.
To check the version of a client without starting Bp Premier:
- In Windows File Explorer, go to C:\Program Files\Best Practice Software\BPS.
- Right-click on the file Best Practice.exe and select Properties.
- Click the Details tab and view the product version.
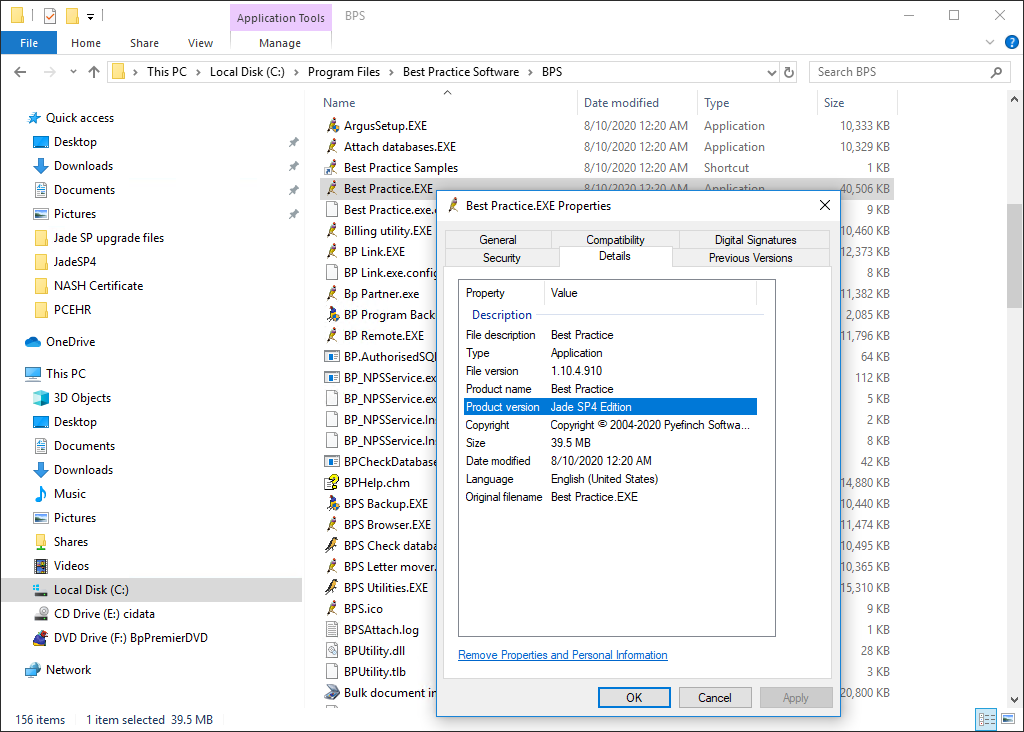
You can view the version of the Bp Premier server by selecting Help > About within the software.
If the client version is not the same as the server version, you must upgrade the client to the same version. Use the same installation media that you used to upgrade the Bp Premier server. You can also download recent program updates from bpsoftware.net.
Check network connection
Check the following items if existing installations have server connection problems.
Physical problems
- Are other workstations in the practice able to connect to the Bp Premier server?
- Is the server turned on?
- Is the network cable plugged in to the computer correctly?
- Are the cables from the client connected to the server or network switch?
- Is the network card in the computer connected and seated properly, if there is a network card?
Internet access
Open your internet browser and enter the website www.microsoft.com.au. Does the browser display Microsoft’s website? If not, contact your network administrator for assistance. If yes, continue.
The next two tests require that you access the command prompt on your PC. You will need to know the name of the Bp Premier server on your practice network.
- Select the Windows flag in the bottom left, click the down arrow to view applications, and open the Command Prompt under Windows System. The Windows command prompt will appear.
- In the black command prompt box, type:
- Press Enter.
- In the command prompt, type:
- Press Enter. The command prompt will return a set of information about the workstation's IP configuration.
- In the section of the returned information titled Ethernet adapter, look at the value for 'Media State'. If the 'Media State' is 'Media Disconnected', a problem exists with your network card or the cable plugged into it. Contact your network administrator for assistance.
- Go to the Windows Control Panel and open Network Connections, Manage Network Connections, or Network and Internet, depending on your Windows version.
- Check that your current network connection is enabled and active. If not, contact your Network administrator for assistance.
If unsuccessful, the ping will time out or return an error message that it could not find the host. Contact your network administrator for assistance.
If the ping is successful, the command prompt will return your server's IP address. Write down the IP address. Continue diagnosing the problem.
TCP/IP settings
If the resolutions above do not work, make sure that Enable LMHOSTS lookup and Enable NetBIOS over TCP/IP are enabled in your Windows TCP/IP configuration. Your IT support can assist. You must restart the SQL Server Browser service after any changes to TCP/IP configuration.
Check firewalls
If you have installed a client but cannot find the Bp Premier server, your firewall settings may be preventing detection. The Bp Premier server Windows firewall must allow connections to and from Bp Premier clients. This is normally configured during installation, but you may need to run a utility to set the port values correctly.
If your server uses Windows firewall
- Log in to Windows on the Bp Premier server as an administrator.
- Make sure that Windows firewall is turned on.
- In Windows File Explorer navigate to BP.PortsUtility.exe in C:\Program Files\Best Practice Software\BPS\BPSupport.
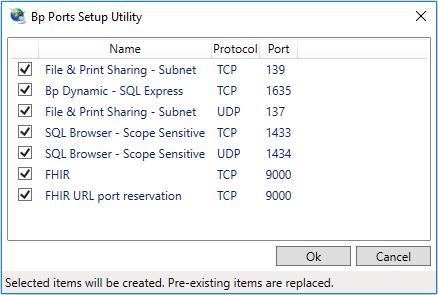
- Right click on BP.PortsUtility.exe and select run as administrator. The Bp Ports Setup Utility will open.
- Ensure all the checkboxes on the left are ticked, and click Ok.
- Go to a workstation and try to log in to Best Practice again.
- If the workstation still cannot connect to the server, continue with Check dynamic ports.
If your server uses third-party firewall software
- Log in to Windows on the Bp Premier server as an administrator.
- Make sure that the third-party firewall is turned on.
- In Windows File Explorer navigate to BP.PortsUtility.exe in C:\Program Files\Best Practice Software\BPS\BPSupport.
- Right click on BP.PortsUtility.exe and select run as administrator. The Bp Ports Setup Utility will open.
- The list of ports required by Bp Premier will be displayed. The ports will need to be opened in your firewall.
- Close the utility when done.
- Open the required ports on the server using your firewall configuration software.
- Go to a workstation and try to log in to Bp Premier again.
- If the workstation still cannot connect to the server, continue with Check dynamic ports.
Check dynamic ports
On some systems, the dynamic port will not be displayed and could block the connection from a workstation. You will need to check SQL server to identify these ports.
- Go to Programs or Apps > Microsoft SQL Server > SQL Server configuration Manager.
- Select SQL Server Network Configuration.
- Select Protocols for BPSINSTANCE.
- Double click on the protocol TCP/IP.
- Click on IP Addresses.
- Scroll to the bottom and identify the entry for 'TCP Dynamic Ports'. This is the dynamic port that needs to be opened within the firewall.
- Open the dynamic port on the server using your firewall configuration software.
- Go to a workstation and try to log in to Bp Premier again.
If you still cannot connect to the server, you may need to check that the Windows registry entry is pointing to the correct server.
Update registry to point to server
After moving a Bp Premier server, you must edit the Windows registry on each workstation to connect to the new server. You will need the Bp Premier server's IP address or hostname. You can run 'ipconfig' to identify a machine's IP address, or 'hostname' to obtain a machine's hostname.
Obtain server hostname or IP address
- Log in to Windows on the Bp Premier server.
- From the Windows Desktop, go to Start > Apps > Windows System > Command Prompt.
- Type 'hostname' at the prompt and press enter. The command prompt will return the computer's hostname on the next line.
- If you need the IP address, type 'ipconfig' at the prompt and press Enter.
- The IP address will be listed under the active ethernet card's IPv4 Address. In the following example, the IP address is '192.168.1.10'.

Update workstation registry
IMPORTANT Updating the Windows Registry incorrectly has risks. Update only the entries indicated in the instructions. Record initial values on entries that you change, in case an entry needs to be restored.
- Log in to Windows on a Bp Premier workstation.
- Open the Windows command prompt.
- Type in ‘regedit’ and press Enter. The Registry Editor will open.
- Navigate to the following folder:
- On 32-bit operating systems, scroll to HKEY_LOCAL_MACHINE > Software > Best Practice Software
- On 64-bit operating systems, scroll to HKEY_LOCAL_MACHINE > Software > Wow6432Node > Best Practice Software.
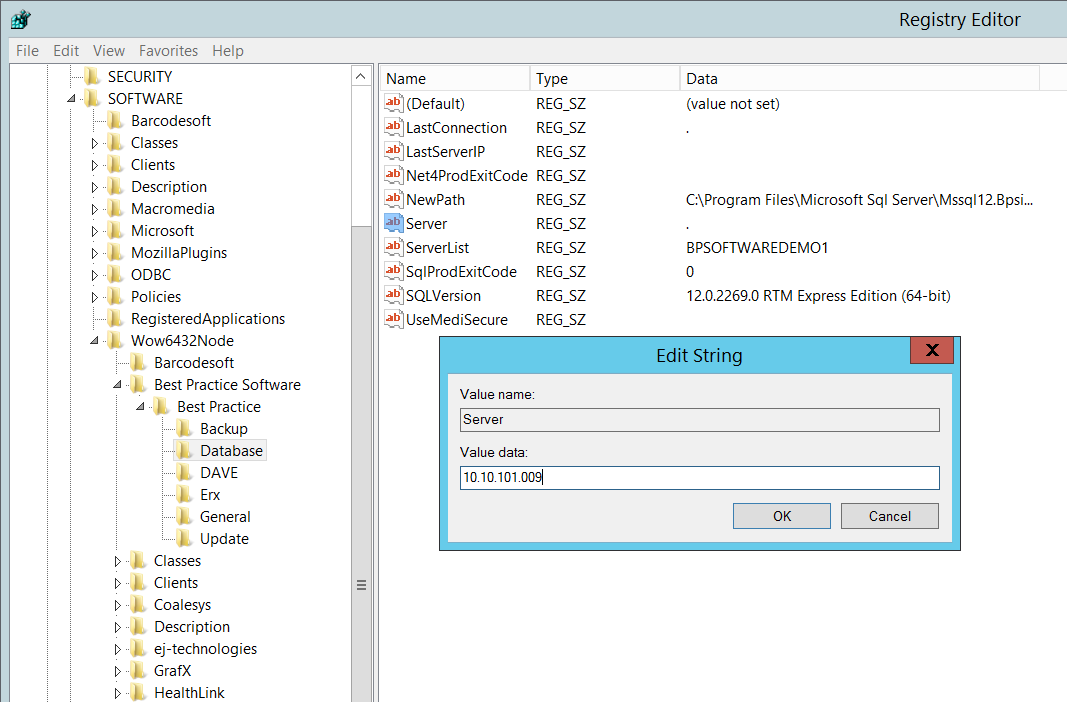
- Navigate to Best Practice Software > Best Practice > Database.
- You will see an entry for Server on the right hand side. Double-click this and an Edit String dialog box will appear.
- Type in the hostname or IP address for the Bp Premier server into the Value data field.
- Click OK.
- Navigate to HKEY_CURRENT_USER\Software\Best Practice Software\Best Practice\Database and repeat steps 6-8.
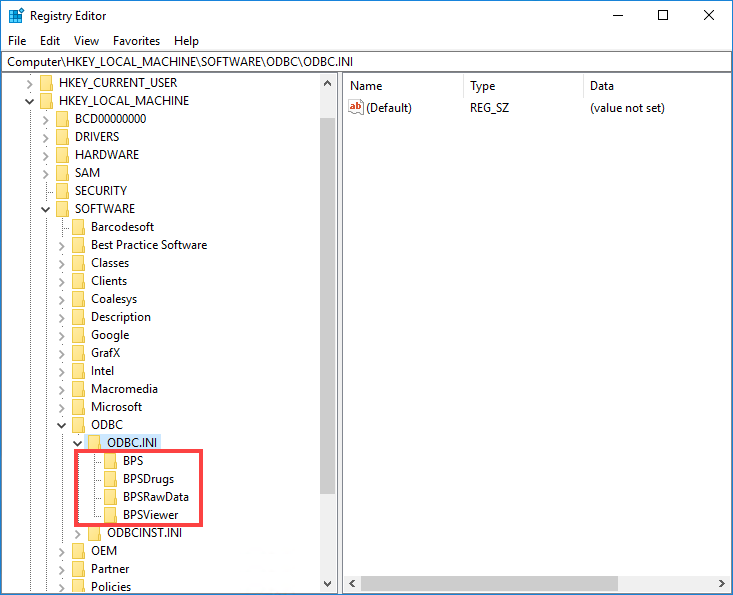
- Locate the registry folder HKEY_LOCAL_MACHINE > Software > ODBC > ODBC.INI. If this folder contains any sub-folder starting with BPS, delete these keys.
- Log in to Bp Premier on the workstation.
- Modify a test patient's record on the workstation with a minor change and save the changes.
- Log in to the Bp Premier server and view the patient's record you just modified. If the change is visible, the workstation has successfully connected to the new server.
- Occasionally, this setting will not work the first time. If the workstation cannot connect to the Bp Premier server, repeat steps 4—8 to update the registry and test the connection to the server again.
Repeat steps 1—12 for each Bp Premier workstation.
Delete Best Practice registry keys and folders under virtualstore
Delete registry keys under virtualstore
- Log into Windows on the Bp Premier workstation that is not connecting to the server.
- Open the Windows command prompt.
- Type in ‘regedit’ and press Enter. The Registry Editor will open.
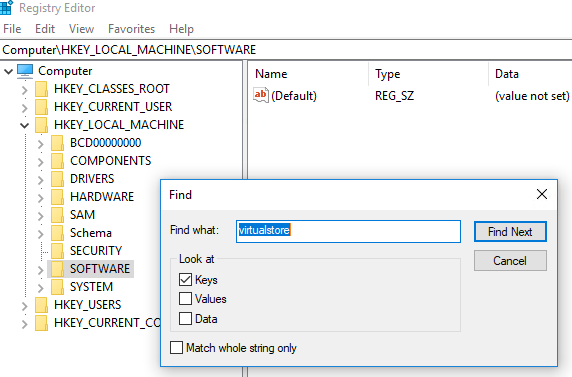
- Select HKEY_LOCAL_MACHINE > Software in the left-hand pane, and select Edit > Find... in the top menu.
- In the Find what: field, enter 'virtualstore' and under Look at, ensure Keys is ticked, and Values and Data are unticked.
- Click Find Next.
- If you cannot find any registry keys called virtualstore, no further action is required. If you do find a virtualstore registry key, check if there are any Best Practice-related keys under it and delete them.
- Check if the registry key ODBC.INI exists under virtualstore. If there are any Best Practice-related keys under ODBC.INI, delete them.
- Repeat steps 4 - 8 for HKEY_CURRENT_USER > Software.
- Log in to Bp Premier on the workstation. Modify a test patient's record on the workstation with a minor change and save the changes.
- Log in to the Bp Premier server and view the patient's record you just modified. If the change is visible, the workstation has successfully connected to the new server.

Delete folders under virtualstore
- In the client computer's file explorer, navigate to C:\Users\(your user profile)\AppData\Local\VirtualStore\Program Files.
- If there is a Best Practice Software folder here, delete it.

User is prompted to reconnect each login
If a Bp Premier workstation prompts a user to reconnect to the server each time you log in, the issue is most likely related to the Windows user having limited permissions to update the registry.
- Log in to the workstation as a Windows administrator.
- Log in to Bp Premier and connect to the server.
- Close Bp Premier.
- Open the Windows command prompt.
- Type in ‘regedit’ and press Enter. The Registry Editor will open.
- Scroll down to the following folder:
- On 32-bit operating systems, scroll to HKEY_LOCAL_MACHINE > Software > Best Practice Software
- On 64-bit operating systems, scroll to HKEY_LOCAL_MACHINE > Software > Wow6432Node > Best Practice Software.
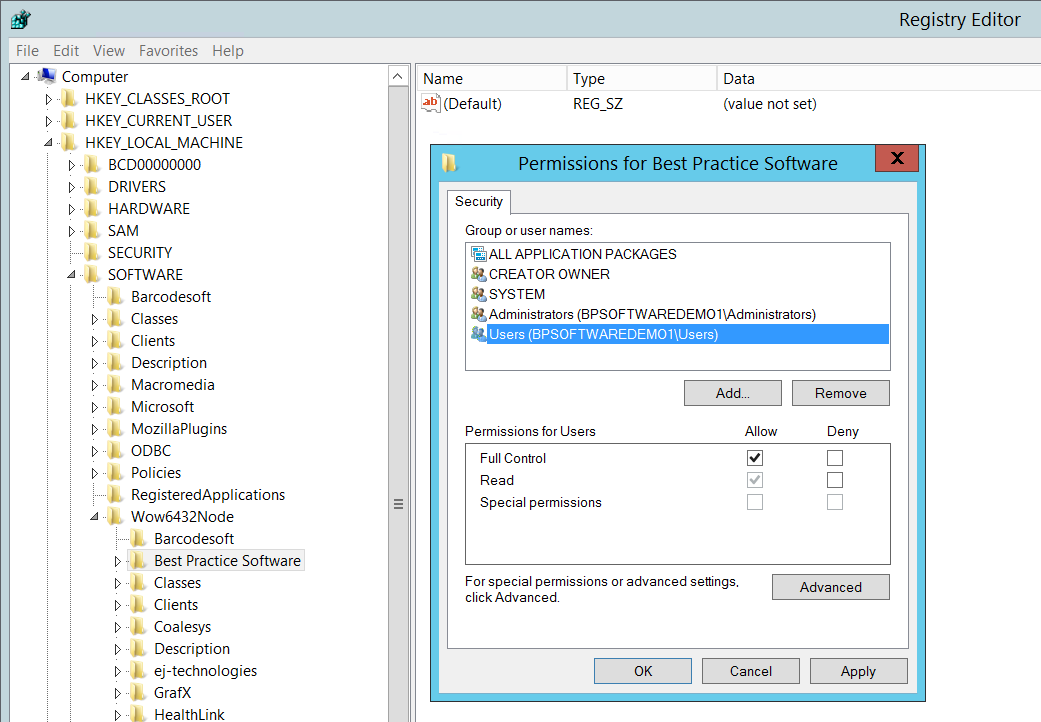
- Right-click on the folder Best Practice Software and select Permissions. The Permissions for Best Practice Software screen appears.
- Select a user group to which the user who cannot connect to server belongs (most likely ‘Users’ or ‘Everyone’).
- Tick the box in the Allow column for Full Control. Click Ok.
- Close the Registry Editor.
- Log out as administrator and back in as the Windows user who cannot connect to server.
- Log in to Bp Premier and connect to the Bp Premier server.
- Log out and back in to Bp Premier to test that the problem is resolved.
Terminal servers unable to connect to server
The steps above apply to troubleshooting terminal server workstations in addition to PC workstations. However, if your practice has a terminal server that will not connect to the Bp Premier server, the steps below may resolve the issue.
- Log in to the terminal server that is unable to connect to the server.
- Open the Windows command prompt.
- Type in ‘regedit’ and press Enter. The Registry Editor will open. If Windows displays a UAC control dialog, click Yes.
- Scroll down to the following folder: HKEY_LOCAL_MACHINE > SOFTWARE > Wow6432Node > Microsoft > Windows NT > CurrentVersion > Terminal Server > Install > Software > Best Practice Software > Best Practice > Database.
- You will see an entry for Server on the right hand side. Double-click this and an Edit String dialog box will appear.
- Type in the IP address for the Bp Premier server into the Value data field.
- Click OK.
- Log in to Bp Premier again on the workstation.
Last updated 23 July 2020