
Get Started
Set up
Clinical
Patient Comms
Management
Tools & Utilities
- What's New?
- COVID-19 and Bp Premier
- Program, drug, and database updates
- Install for the first time
- Set up Management
- Set up Clinical
- Convert or merge a database
- Link or convert billing data
- Medicare Web Services
- Billing and Banking
- Appointment Book
- Users
- Medicare, DVA, and Tyro
- My Health Record
- Prescribing
- Secure messaging and online directories
- Pathology and imaging
- Bp Comms and Best Health App
- Add a new ?
- Document templates and printing
- Reminders and Actions
- Clinical integrations
- Commbank Smart Health
- COVID-19 and Bp Premier
- Prescribing and Medication
- Today's notes
- Pathology and Imaging
- My Health Record
- Clinical Reminders
- eReferrals
- Clinical tools
- Enhanced Primary Care
- Immunisations
- Diabetes
- Best Health App
- Patient consent
- Contact notes
- Send Bp Comms to patients
- Use the word processor
- Medicare Web Services
- COVID-19 and Bp Premier
- Reporting
- Booking appointments
- Invoice and pay on the day
- Invoice and pay later
- Correct an account or payment
- Claim with Medicare and DVA
- Banking reconciliation
- WorkCover
- Troubleshooting
- Back up and restore data
- Remote database
- Query data
- Database Integration
- Merge data
- Import and export data
- Maintain data
Title
Setting up Bp Premier for Billing
The following components of Bp Premier must be set up in Setup > Configuration for your billing workflows to take effect:
- Billing workflow preferences
- Account holders
- Set the default invoice text
- Custom invoice notes and service detail text
- Bank accounts and cheque drawers
- Payer allocation (if your practice distributes bulk bill payments from a central account)
- Workcover
- Private fee schedules and items
You will also need to set up your appointment book for billing to flow through your appointment statuses.
Billing preferences
From the main screen, select Setup > Configuration > Billing tab to configure defaults for the way accounts, payments, invoice and receipts work at your practice. The options in this tab include:
Field | Description |
|---|---|
Default billing | Sets the default billing type when new providers are added. |
New patients | Sets the default billing type when new patients are added. |
Billing precedence | Determines whether the doctor's or patient's billing type is used as the default when creating accounts. The billing type can be changed before printing or saving the account:
|
Payment Type | Determines which payment type will be selected when you first open the Payments screen: None, Cash, EFT, or Credit card. |
Default to the patients usual doctor for new accounts | If ticked, all new accounts generated from the Create Account screen will be billed to the provider listed in the patient's usual doctor field in the patient's demographics record. |
Enforce entry of reason for cancelling payments and invoices | If ticked, users must enter a reason for cancelling payments and invoices. |
Create separate accounts in Debtor list for each doctor | If ticked, the debtor list will generate separate debtor statements for each doctor and a drop down box will appear on the ‘Debtor list screen to allow you to select the doctor. If unticked, the ‘Debtor list screen will produce debtor statements for the practice rather than each doctor. |
Print practice name on accounts, receipts and statements | If ticked, the practice name and address entered in the Setup > Practice details > Edit screen will be printed on all accounts, receipts, and statements. If unticked, the doctor's name and details will be printed on all accounts, receipts, and statements. |
Prevent Direct Bill vouchers without Medicare and DVA no. | If ticked, accounts which are direct-billed to Medicare or DVA can't be entered if the Medicare number or DVA number is not recorded on the patients demographic record. If unticked, accounts can be direct-billed if the Medicare number or DVA number is not recorded. NOTE This historical billing preference has been deprecated in version Saffron and will have no effect. This preference will be removed in Orchid SP1. |
Allow invoices with no services to be printed | If ticked, accounts that do not contain any services can be printed. NOTE This historical billing preference has been deprecated in version Saffron and will have no effect. This preference will be removed in Orchid SP1. |
Print invoices and receipts on A5 paper | If ticked, all invoices and receipts will print in A5 format. If unticked, all invoices and receipts will print in A4 format. |
Print header on invoices and receipts | If ticked, all invoices and receipts will have the practice or doctor details printed at the top of the page (see also setting for Print practice name on accounts, receipts and statements). If unticked, nothing will be printed at the top of invoices and receipts. |
Bill direct to insurance company if known | Tick this box if you want any accounts created for the patient to default to bill to the insurance company noted on the patient's demographics record. |
Prompt when there is a duplicate service on the same day | Tick this box to display, when saving an invoice, if an item number listed on the invoice has already been billed that day. |
Print Medicare No and DoB on Invoices and receipts | Tick this box to print the patient's Medicare number and date of birth in their invoices and receipts. |
Print health insurance fund details on invoices and receipts | Tick this box to print a patient's health care fund details from their demographic record in the patient's invoices and receipts. |
Include outstanding balance on Invoices and Receipts | Tick this box to print outstanding balances on invoices and receipts. |
Include Practice in the list of billing providers | Tick this box to include the provider's practice in the list of billing providers when creating an account. |
Default to DVA list for DVA accounts for Allied Health Professionals | Tick this box to display the Allied Health DVA item list when creating accounts for DVA patients. |
Include Services when using ‘Use previous account button | If ticked, the Use previous accounts function is available when creating an account to default to, including services. |
Round GST to the nearest 5 cents | Rounds GST amounts up or down to the nearest 5 cents. |
Apply Diagnostic Imaging rules to private accounts | Apply the multiple services rules for diagnostic imaging, as applied to Medicare and DVA accounts, to private fee accounts also. |
Check the 'Credit payment...' box when reversing a payment | When reversing a payment, tick the Credit payment to payer’s account checkbox on the Reverse Payment popup by default. If the Credit payment to payer’s account checkbox is ticked, the refunded amount will be credited to the payer’s account. See Reverse an unbanked payment for more information. |
Print Registration number on invoices and receipts | Tick this box to include AHPRA registration numbers on invoices and receipts. This is a requirement of the State Insurance Regulatory Authority (SIRA) in New South Wales. |
Print name & address on accounts and receipts __ mm from left of page | Adjusts where the name and address is printed on accounts or receipts from the left of page. |
Start printing body of accounts and receipts __ mm from to top of page | Adjusts where the body of accounts and receipts are printed from the top of the page. This setting is useful if your practice prints on preprinted letterheads or forms. |
Layout of Medicare Claim form | Medicare regularly change the layout of their green claim form. This option allows you to change the print format to match the form you are using. The form number is printed on the bottom left hand side of the Medicare claim form. |
Account holders
Accounts holders are companies and institutions that can be used as a third-party recipient for patient accounts (for example, Insurance Companies, Employers, or Hospitals). Account holders and contacts can also be invoiced directly as a non-patient account.
- From the main Bp Premier screen, select View > Account Holders.
- Select Add new to add a new account holder.
- Complete the contact details and click Save.
Default invoice text
From the main screen, select Setup > Configuration > Account text tab to configure default text for overdue invoice statements and invoices that have had a discount applied.

The options in this tab include:
Field | Description |
|---|---|
Print for location | Choose the practice location to set account text for. Make your adjustments, click Save, and choose another locations to save different invoice text for each location. |
Standard account footer | Text that appears on the invoice footer when an account is first generated and printed. |
30 | 60 | 90 days overdue | Text that appears for overdue accounts. |
Discount text | This text is printed on any accounts that have a Bill to selection of the 'Discount' schedule. Any text here can contain the placeholder %FEE%, which is replaced during printing with the value of the account at the practice schedule fee rate. See Set up custom fees and schedules for more information. |
Base overdue for practice on | Begin counting the number of days overdue from the service date or the invoice date. |
Custom invoice notes and service text
From the main screen, select Setup > Configuration > Account text tab to configure prefilled invoice notes or service text that can be selected when creating or adjusting invoices.
Click Add, add text to the Invoice note popup that appears, and click Save to add the note. Any carriage returns will be collapsed into a single line of text.

You can select the prefilled text you define here from the Notes field in the Account details screen, and the Service details field of the Account item screen.
NOTE As of Saffron SP3, information included in the Service details field in the Account item screen is sent to Service Australia as service text, and information in the Notes field in the Account details screen is not. Any information required by Services Australia for an item must be added to the Service details field.

The screenshot above shows the Account details screen. Do not add information required by Services Australia for an item to the Notes field.

The screenshot above shows the Account item screen. Access the Account item screen by clicking Add item in the Account details screen. Any information required by Services Australia for an item must be added to the Service details field.
Bank and drawer names
- From the main Bp Premier screen, select Setup > Cheque details.
- Click Add from the Cheque details screen and add a bank name.
- Click Add below the Default drawers list to add permitted drawers from the user list.
- Click Save.

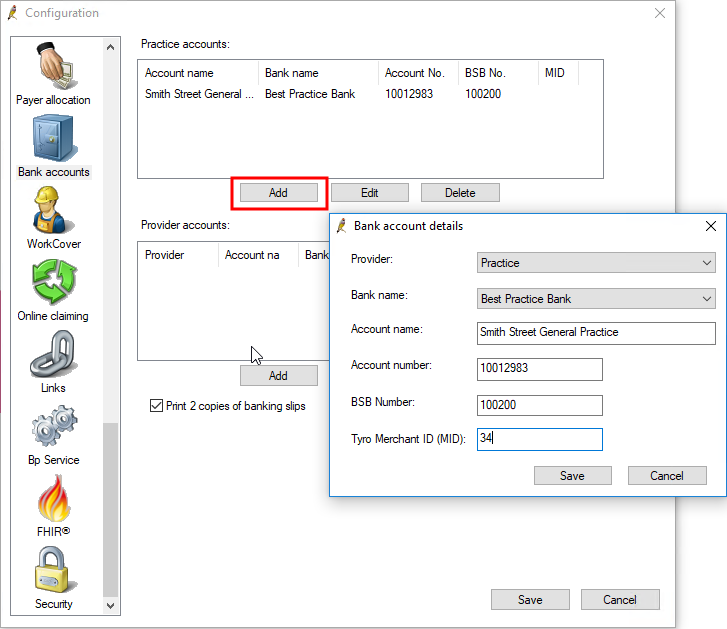
Bank accounts
The Bank accounts tab configures bank accounts for your practice and providers. You must add a new bank in Setup > Cheque details from the main Bp Premier screen before you can configure an account for it in Configuration.
- From the Configuration screen, select the Bank accounts tab. Click Add under Practice accounts to define Bank account details for the practice.
- Complete the account details and click Save. You can add as many bank accounts for the practice as you need.
- Click Add under Provider accounts to open the Bank account details screen for a provider. You can add as many bank accounts for providers as you need.
- Tick Print 2 copies of banking slips to always print a second copy when processing a banking batch from the Banking screen (for example, one for records, one for taking to the bank).
- Click Save to save all accounts.
Payer allocation
You only need to set up payer allocation settings if your practice directs employee doctors' bulk bill payments into a centralised account, such as a principal doctor's bank account, and distributed later.
- From the Configuration screen, select the Payer Allocation tab.
- Click Add to add a new payer allocation. The Provider payment details screen will appear.
- Select the provider who is performing services and will have their Direct Bill payments redirected. Payments to this doctor will be paid into the alternate bank account.
- Enter the provider number for Medicare and DVA payments to be paid to.
- Click Save and Save again to save payer allocation.
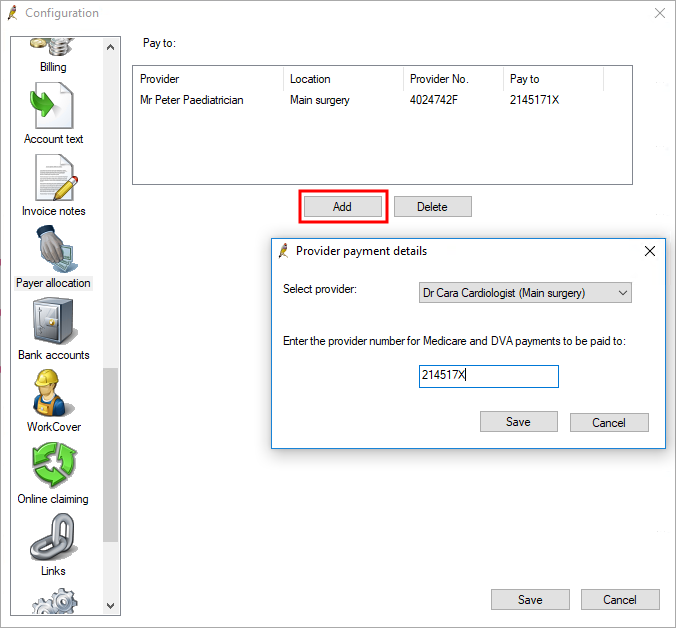
Bp Premier will indicate to Medicare that payments for services billed to the listed providers should be paid into the bank account registered with Medicare associated with this provider number. Payments to doctors will be disbursed from this account by your practice.
Workcover
If your practice is in Queensland, you can submit invoices electronically from Bp Premier to WorkCover Queensland. You need to set up electronic invoicing in Setup > Configuration > WorkCover. See WorkCover QLD electronic invoicing for more information.
Otherwise, if your practice intends to bill to WorkCover insurance, you will need to:
- Create an account holder for the appropriate WorkCover insurance body for your state.
- Create a WorkCover or worker's compensation fee schedule .
- When billing, select a Bill to of the WorkCover account holder, and the worker's compensation Schedule in the Account details screen.
Private fees and schedules
Bp Premier can configure a range of custom fees and fee schedules for practices that bill privately. See Set up custom fees and schedules for more information.
Last updated 16 March 2021
Related topics
Feedback
Medicare Web Services | Pathology | Bp Comms | Best Health App | Multi-location |    |
|
|
This material is classified as commercial-in-confidence. Unauthorised distribution of this information may constitute a breach of our Code of Conduct, and may infringe our intellectual property rights. This information is collected and managed in accordance with our Privacy Policy, available on our website. © Copyright 2023 | |
 AU
AU 