
This article explains how to configure email in Bp Premier. While functionality for both incoming and outgoing email exists in Bp Premier, incoming email functionality has been deprecated. Best Practice Software recommends upgrading to Saffron SP2 and only using outgoing email functionality in Bp Premier.
Saffron SP2 introduces improvements to outgoing email functionality in Bp Premier.
NOTE On upgrade to Saffron SP2 or later, any previously set up email accounts will no longer function correctly, and must be reconfigured.
Set up outgoing email
- Log into the Bp Premier server as a user with access to the Setup > Configuration screen.
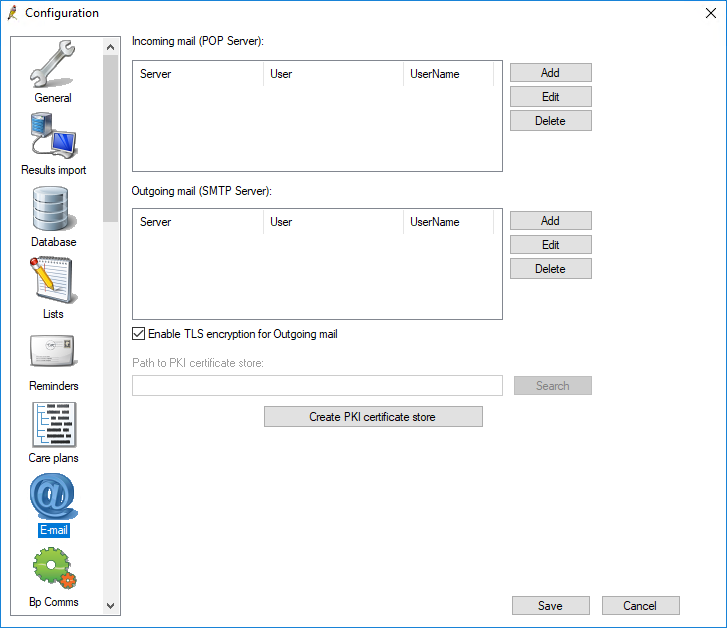
- From the main screen, select Setup > Configuration > Email.
- In Saffron SP2, Enable TLS encryption for outgoing mail will be ticked by default. Check that your email server supports TLS encryption, and if not, untick Enable TLS encryption for outgoing mail. TLS encryption provides a higher level of security than unencrypted emails.
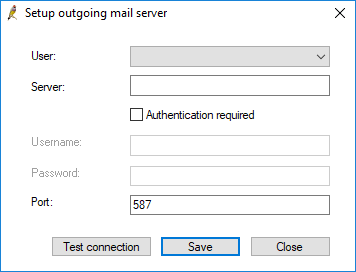
- Under Outgoing mail (SMTP server), click Add. The Setup outgoing mail server screen will appear.
- Complete the fields in this screen:
- User – Select a user to set up email for, or select 'Practice' to set up the practice email.
- Server – Enter the outgoing email SMTP server name (for example, smtp.office365.com or smtp.gmail.com).
- Authentication required - Tick if the outgoing mail server requires authentication.
- Username – Enter the username used to access the outgoing mail server (for example, username@bpsoftware.net).
- Password – Enter the password associated with the username. The password is not displayed.
- Port - If you ticked Enable TLS encryption for outgoing email, the default port (587) will be pre-populated. You can change the port if you wish, but it should not be necessary.
- Click Test connection to check that the connection has been correctly set up.
- Click Save.
NOTE Bp Premier does not support SSL encryption for emails.
As of Saffron SP2, receiving incoming emails in Bp Premier has been deprecated. You may wish to set up a no-reply email address (for example, noreply@yourdomain.com.au) to send all practice email from, to discourage patients from replying to emails.
Set up outgoing email without TLS encryption
A known issue exists where a port cannot be set if TLS encryption is disabled for outgoing email.
If you wish to set up outgoing email without TLS encryption, use the following workaround:
- When setting up outgoing email via Setup > Configuration > Email, tick Enable TLS encryption for Outgoing mail.
- In the Outgoing mail (STMP Server): section, click Add or Edit. The Setup outgoing mail server screen will appear.
- Specify the port you wish to use or keep the default port. If you are adding a new email, complete the rest of the fields on the screen and click Save.
- Untick Enable TLS encryption for Outgoing mail.
Ignore the message that the SMTP test connection has failed.
Setting up gmail for outgoing email
From 30 May 2022, Google will no longer support the use of third-party apps or devices which ask you to sign into your Google Account using only your username and password.
If you use smtp.gmail.com as your Outgoing Mail Server in Bp Premier , follow the below instructions:
Enable two-step verification
- Follow the instructions in this Google Support article to enable two-step verification on your practice's Gmail account.
- Google will ask you to verify your identity with a second step used to sign in. It will not matter to Bp Premier what the second verification step is.
- Confirm that two-step verification to access your Gmail account is working.
You will need administrator permissions on the Gmail account to update configuration settings. If you don't see the Security option, you may not have administrator access.
Create an app password
- Follow the instructions in this second Google Support article to generate an app passcode for your Gmail account.
- In the Select App dropdown, choose 'Mail'.
- Click Generate to generate the app password.
- Copy the generated password into Setup > Configuration > Email > Edit, replacing the old email password.
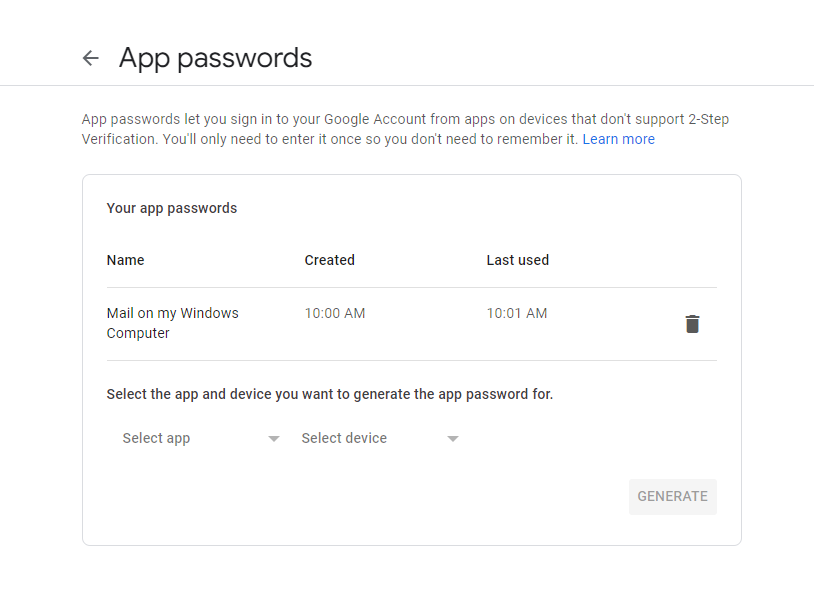
As soon as you close the Your app passwords Google settings screen, you will not be able to access the generated password. If you didn't copy the password successfully, just generate a new app password.
Test verification
Send a test email from Bp Premier to an email address that you can check and confirm that the test email was received successfully.
Setting up Office 365 for outgoing email
Enable authenticated SMTP
If you are unable to send email from Bp Premier via Outlook using the instructions above you may need to enable Authenticated SMTP for the email account in the Microsoft 365 admin center. You may require assistance from your IT provider.
To enable authenticated STMP for a user:
- Open the Microsoft 365 admin center and go to Users > Active users.
- Select the user, and in the flyout that appears, click Mail.
- In the Email apps section, click Manage email apps.
- Ensure Authenticated SMTP is ticked.
- When you're finished, click Save changes.
To enable basic authenticated STMP for the organisation:
- Open the Microsoft 365 admin center and go to Settings > Org Settings > Modern authentication.
- Ensure Authenticated SMTP is ticked.
- Save the changes.
Turn off multifactor authentication
You can try turning off multifactor authentication for the account.
- Open the Microsoft 365 admin center and go to Users > Active users.
- Select the user, and click Manage multifactor authentication.
- Select the user and click Disable.
Set up incoming email
NOTE Incoming email functionality is deprecated in Saffron SP2. Best Practice Software does not recommend using this feature.
- Log in to the Bp Premier server as a user with access to the Setup > Configuration screen.
- Select Setup > Configuration > Email from the main screen.
- Click Add next to the Incoming mail (Pop Server) list. The Setup incoming mail server screen appears.
- Complete the fields in this screen:
- User – Select the BP user who will receive emails, or select 'Practice' to set up the practice email.
- Server – Enter the incoming email POP server name.
- Username – Enter the username used to access the incoming mail server.
- Password – Enter the password associated with the username. The password is not displayed.
- Port - Enter 110 as the port number. This is the default port number for incoming mail.
- Click Save to return to the Configuration screen.
- Repeat steps 3–4 for each user able to receive incoming email.
- Click Save on theConfiguration screen.
Related topics
Last updated 25 October 2021


 AU
AU 