Troubleshoot general client connections
If you experience problems connecting a workstation to the server, this article can provide troubleshooting resolutions. It also describes how to update the registry entries for Bp Premier after moving a server, and troubleshoot terminal server connections.
Managing general errors and exits to desktop
If you have experienced a serious error using Bp Premier and need to call Support to assist resolution, this article describes how you can reduce resolution time by preparing some information beforehand.
Troubleshoot backups
How to troubleshoot some common issues encountered when backing up Bp Premier, including the location of the backup log files and if you should use compressed or uncompressed backups.
Change Document Database Rollover Size
Saffron SP1 allows sites to configure the size of their document database to roll over at 1.8GB (the value all previous databases have rolled over at) or 9.5GB (in keeping with SQL Server Express’ current database size limit of 10GB).
Searching the database
Bp Premier offers a tool for searching the database for patient records based on demographic and clinical filters you define. Searches can be used to run a mail merge, for example, or export a list of patients.
Supplied Database Queries
This article lists the supplied database queries that are available to use with Bp Premier, with instructions on how to use them.
Custom Materials Development
Best Practice Software Development Services team can create custom reports, database queries, and word processor templates for you at a structured fee cost.
Access the database through the viewer account
The BPS 'viewer' account allows read-only access to the Bp Premier database. Administrators and third-party applications can use this account to view and access a subset of database data. You can also export table data to XML or text file.
Search for immunisations
This example shows how to search for patients who received a vaccination during a set time period, or have not received a vaccination by a specific age or for a length of time.
Search for patients with diabetes
This example shows how to search for patients with 'diabetes' in their current or past history, and how to search for patients by past medication.
Partner Network
The Bp Partner Network is a program that formalises the relationship with practices and technology vendors that develop integrated solutions with Bp's suite of software products.
Bp eOrdering Partners
The Bp Partner Network includes our eOrdering parters from version Saffron Service Pack 1 (SP1) and later. You can configure eOrder labs and send electonic requests directly to the lab.
Clinical integrations
Third-party software that integrates with Bp Premier. For example, telehealth apppointments, secure messaging, referral lookups, clinical audit tools, smart forms.
Approving third-party integration
When upgrading Bp Premier, or any time from Configuration > Database, you must approve all third-party integrations before an integration will be peritted to read from or write to the database.
Import bulk clinical documents
The Bulk Document Import utility (BDI) imports multiple document files in all popular formats (images, PDF, .doc and .docx, RTF, TXT, and HTML), and imports scanned documents directly from a network scanner or digital camera. Once scanned or imported, you can allocate documents to a provider Inbox, or into the Correspondence in, Correspondence Out, or Clinical images sections of a patient record.
Subpoena Tool
The Subpoena tool allows your practice to export a patient record, or sections of a patient record, to print or file for legal purposes. Access to the tool is protected by user permission and the emergency access password.
Import patient records
Import single or bulk patient records that have been exported as XML files from a previous Bp Premier server. Make sure the patient does not already exist in the new database.
Export patient records
How to export patient demographic and clinical data for one or more patient records, or the entire database.
Import and export contacts
You can import and export contact records between Bp Premier servers. Contacts imported from an older version will contain blank entries in any new fields.
Export management data
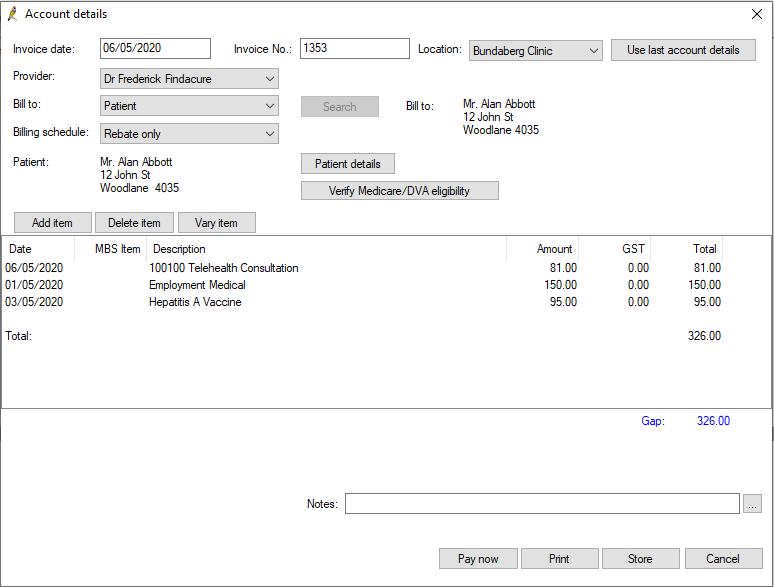
How to export management data from Bp Premier to CSV file, including Services, Invoices, Payments, Paid Services, and Appointments.
Change Document Database Rollover Size
Saffron SP1 allows sites to configure the size of their document database to roll over at 1.8GB (the value all previous databases have rolled over at) or 9.5GB (in keeping with SQL Server Express’ current database size limit of 10GB).
Record Locking
Understand how Bp Premier locks database records to ensure database integrity. Record locking occurs on visits, appointments, invoices and payments.
Mark patients as inactive or deceased
Mark patients as deceased or inactivate, if a patient has not attended your practice in some time. Run a database search for duplicate or inactive patients and mark the patients in bulk as inactive.
Optimise SQL Server Memory
Optimise the amount of memory (RAM) allocated to SQL Server database, based on the amount available on your server.
Cleaning up uncoded and free text data
Some screens allow 'free text' entry, which is usually not searchable and may be clinically ambiguous. Bp Premier offers a free text cleanup tool for Contact and document types, reminders, and free text diagnoses.
View deleted clinical data
Deleted clinical data is always retained. Administrators can view deleted data for a type of clinical data, or for a specific patient, which can be accessed from the main screen or from within the patient record. You can also export and recover deleted data from this utility.
Delete and recover records
In Bp Premier, you can delete and restore patient and user records. Patient records are deleted through the Patient list screen, and user records are deleted through the Users screen. Both patients and users can be restored through Bp Utilities.


 AU
AU 