This article describes how to create a template that prompts the user to enter information.
Regular template fields are used to insert information stored in the database, like a patient name, DOB, or reminder reason. Bp Premier also allows advanced template fields that prompt the user for additional data that is not available from the patient record.
Custom template fields show in a template the same as supplied fields (<> brackets around). However, when you click on a custom field, the cursor changes to an up arrow and the Custom field screen appears so you can set up the field.
Limited time or capacity? Prefer to have someone build a custom report, query, or template for you? Learn more about our SQL and Custom Report Building service here.
Reinventing the wheel
Before starting to create your new template, search the Internet to see if someone else has already created a template of that type and made the template available. If there isn't one formatted for Bp Premier, you could use a Medical Director template (MD templates can be imported successfully).
Sources you may be able to obtain templates from include the Best Practice Software user forum, industry groups, PHNs, and the Best Practice Software development Services team.
See Importing a document template for more information.
Custom field example
- Select Template > Edit Template from the Bp Premier word processor main menu.
- Select the template 'Comprehensive Medical Assessment' and click Ok to load the template.
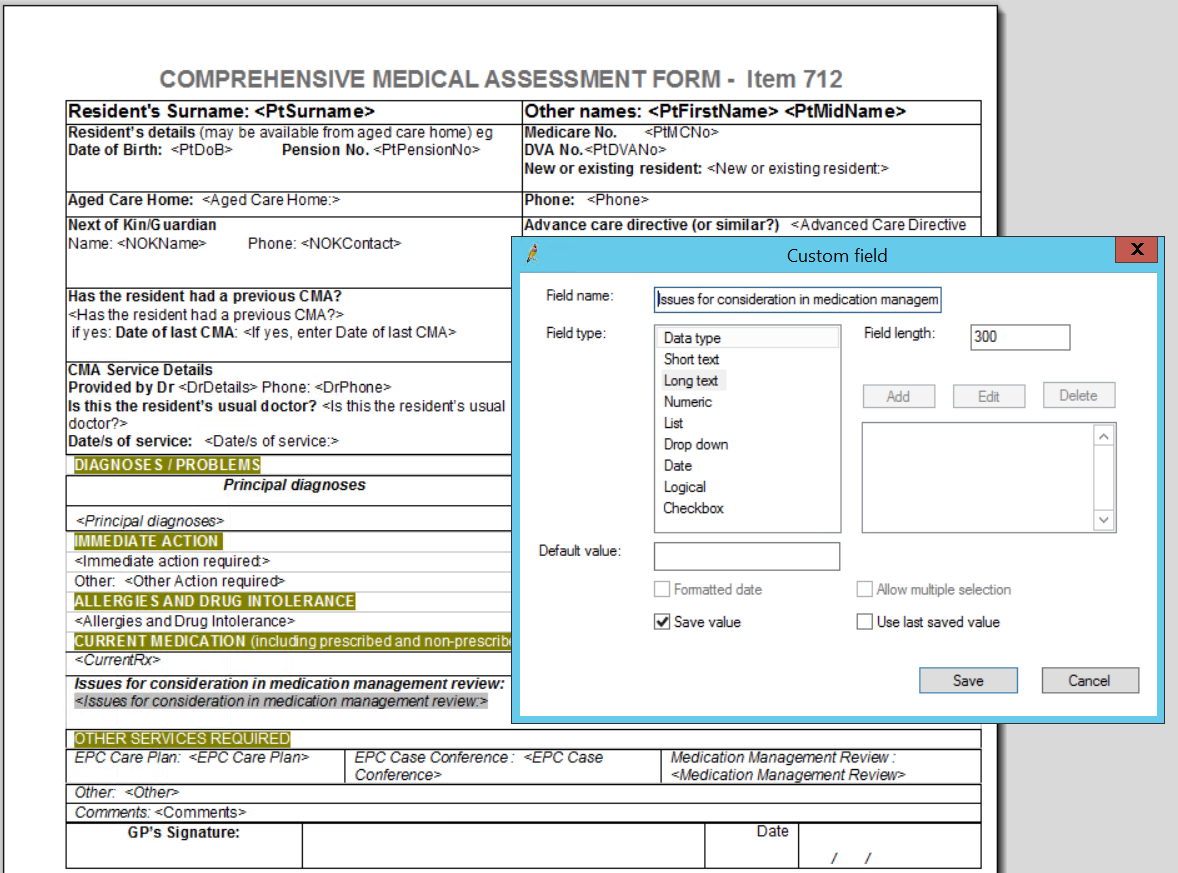
- Double-click the field <Issues for consideration in medication management review:>. The Custom field screen will appear.
- <Issues for consideration in medication management review> field is an example of a custom field. The Custom field screen shows the formatting of the field: a Field type of 'long text', a Field length of '300', and other settings.

Create a template with custom fields
- From the main Best Practice screen, click the
 icon or select Utilities > Word processor from the menu.
 - Select Template > Edit Template from the Best Practice Word Processor main menu. Select the template to be edited and press Open.
- Change the text in the template to suit your requirements. Add template fields or replace existing template fields using the tree on the left hand side.
- Position the cursor where the custom field is to be inserted.
- Double-click the Custom field option at the bottom of the tree on the left hand side. The Custom field screen will be displayed.
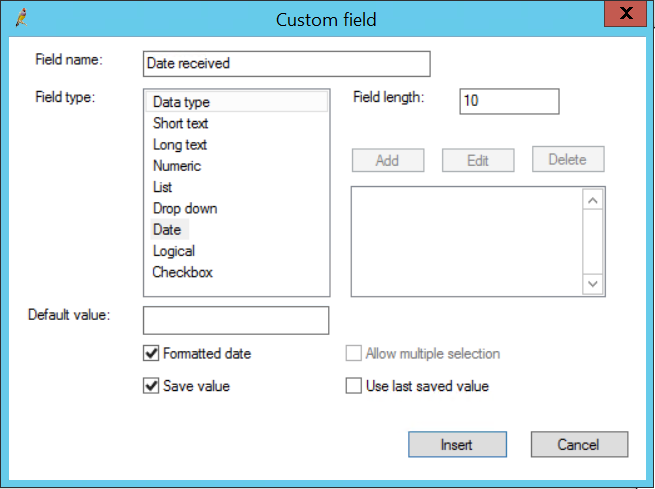
- Enter the Field name. Make the name obvious so that the user can easily identify what to type into the field.
- Select a Field type.
- Short text – User can enter up to 100 characters long.
- Long text – User to enter long paragraphs of free text data.
- Numeric – User must enter a number.
- List – User must select from a predefined list of items. Select Allow multiple selection to allow the user to select more than one item.
- Drop down – User must select one option only from a predefined list of choices.
- Date – Forces the user to pick a date from the date picker.
- Logical – User must choose Yes or No.
- Checkbox – User must tick or untick a checkbox.
- Complete the rest of the fields in the screen. Some fields will only be available depending on the selected field type.
- If you are creating a custom field of type 'List', use the Add, Edit, and Delete buttons to create a custom list of field values in the list box. The user will be able to select an item when a document is created from this template.
- Choose File > Save as or select the Save icon from the toolbar to save the template. The Template Detail screen will be displayed, showing the current name for the template.
- Type the new name into the Template name field and select Available to all users.
- Click Save.
TIP You can also press F4, or, from a patient record, press F4 or select File > New Letter.

In some cases, the field name will be a question. In the example 'Comprehensive Medical Assessment', the field <Has the resident had a previous CMA?> is a question.
TIP Make the Field name informational enough for the user to understand what needs to be entered.
The type of custom field you want depends on the sort of information you are trying to capture: free text, a date, a number only, a predefined list of options, or maybe a Yes/No answer.
The options are:
Field | Description |
|---|---|
Field length | Determines how many characters the user can enter as a field value. |
Default value | Default value supplied for the custom field when a user creates a document from this template. |
Formatted date | For a field type of 'Date', select this option to enforce the date format to the Bp Premier default. |
Allow multiple selection | For a field type of 'List', this option allows users to select multiple items from the list. The default behaviour is to select only one list item. |
Save value | If ticked, when a document is created from this template, Bp Premier will remember the value for the active patient when the document is saved. |
Use last saved value | Used with the Save value field. If ticked, when you create a document from this template, the field will be automatically populated with the last data entered for the active patient. |
NOTE Bp Premier will not allow you to save changes to a supplied template. The system will prompt you for a new template name. Be sure you advise practice staff of the correct template to use.
Create a document from an advanced template
- Select Template > Use Template from the word processor menu. Select the template to be edited and click Open.
- There may be multiple pages displayed, depending on how many custom fields have been created in the template. If an input screen is paginated, click Next to view the next page of the input screen.
- After you have entered values in all of the custom fields on the input screen, click Insert to commit the data to the document. The formatted document will be displayed, showing all the data generated from standard and custom template fields.
- Continue to edit and save the document as for a basic template.
When a template with custom fields is accessed from the word processor, the user will be presented with an input screen to enter the information that populates the custom fields. The input screen is dynamically built based on the number of fields and order in which the template is constructed.
Related topics
Troubleshooting
Last updated 03 September 2021