
Get Started
Set up
Clinical
Patient Comms
Management
Tools & Utilities
Title
Online Claiming: Direct Bill
This stepthrough article is for practices that batch and send direct bill (bulk bill) claims through Medicare Online, and describes how to:
- Activate online claiming for direct bill accounts.
- Bill an invoice to 'direct bill' and store for batching.
- Send claim batches to Medicare Online and check for payments.
- Read the payment and processing reports and reconcile common unpaid scenarios.
- Adjust a service for reconciliation.
- Troubleshoot some common errors that may occur during online patient claiming.
The article also describes how to manually create a batch and reconcile a manually created batch, for legacy purposes. Practices that use online claiming should rarely ever need to manually create a batch.
The steps in this article assume that you have set up all of your minor IDs, installed your Medicare certificates, and tested that online patient claiming works for your Bp Premier installation. If you have not set this up already, see the following articles for more information:
Activate online direct bill claiming
Enable online claiming for batched direct billed accounts through the Bp Premier Configuration screen.
- Log in to the Bp Premier server as a user with administrator permissions.
- Select Setup > Configuration from the main screen. Select the Online claiming tab.
- From the list of check boxes at the top of the screen, tick the options that apply:

Activate Online Bulk Bill Claiming | Always tick this option to activate direct bill online claiming. |
Activate Tyro Integrated EFTPOS | Tick this option only if your practice uses a Tyro terminal to process patient claims and processes direct bill claims through the terminal by EasyClaim. |
Activate EasyClaim Bulk Bill claiming | Tick this option only if your practice uses a Tyro terminal to process patient claims and processes direct bill claims through the terminal by EasyClaim. |
For instructions on how to process direct bill Easyclaims, see Online Claiming: EasyClaim and Tyro.

A5 Vouchers | If ticked, Medicare DB4 vouchers will be printed in A5 size. |
Print 2 copies of Vouchers | If ticked, two copies of the Medicare DB4 voucher will be printed. To print just one copy, uncheck the box. |
Maximum No. of vouchers in a batch | 80 is the maximum number of vouchers that can be sent to Medicare in a single batch. If preferred, this can be set to a lower number. |
Default number of months to display when viewing all batches | Specifies how many months are displayed in the Online Claiming screen when viewing all batches. By default, this has been set to 12 months. |
Invoice and store for batching
When a doctor or provider finalises a visit or practice staff are processing an account, indicate direct billing by:
- From the Patient record, click Finalise visit and select 'Direct bill' in the Account type drop-down list.
- From the Account details screen, set the Bill to field to 'Medicare Direct Bill' or 'DVA Direct Bill'.
Use the Store button, which makes the account immediately available to include in the next direct bill batch. Clicking Held will hold the account, and it will not be eligible for inclusion in a batch until stored.
Click Print if you wish to print the Bulk Bill Assignment of Benefit form and make the account immediately available to include in the next direct bill batch.
Hospital Services Claims
Any direct bill invoices marked as In hospital must include a hospital name and provider number. The hospital must be added as a contact in Bp Premier, and the hospital's provider number must be included in the contact record.
To add a hospital and provider number to an invoice, in the Account details screen tick In Hospital and select the hospital from the Hospital name/No: field.
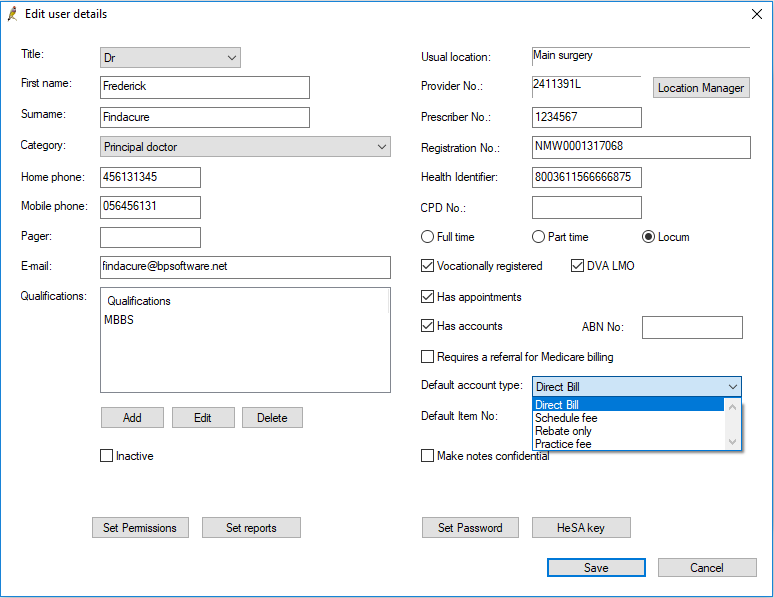
Change a provider's default account type to Direct Bill
You can change a provider's default account type to direct bill from Setup > Users > Edit > Default account type.
Send a batch
How often a practice should send direct bill batches will depend on the size and billing preferences of the practice. However, batches should be sent to Medicare at least once per day; busier practices may wish to send multiple batches in a day at regular times.
Direct bill batches are managed from the Online claiming screen. Select Management > Online claiming from the main screen. All of the following procedures start from the Online claiming screen.
NOTE As of Saffron SP3, the Correlation ID column has been added to the Online claiming screen. You may need to provide the correlation ID to Medicare when contacting them about a batch.

- Click the
 icon or select File > New claim menu item to open the Direct bill batch screen. The screen will be empty to start.
 - Select the Location and Provider to create a batch for. Only services performed at that location by that provider will be included in the batch. Limiting batches by provider and location can make batches more manageable and assist with reconciliation.
- Select the type of batch to be created: Medicare or DVA.
- Select if the batch is for Hospital Services, Imaging Services, or both.
- In Saffron SP3, each hospital services batch must be made up of claims from a single hospital. If you are creating a batch for hospital services, a dropdown menu listing all hospitals with vouchers to be processed will appear. Select the hospital you wish to create the batch for. DVA does not require this separation and this option will be unavailable when DVA is selected.
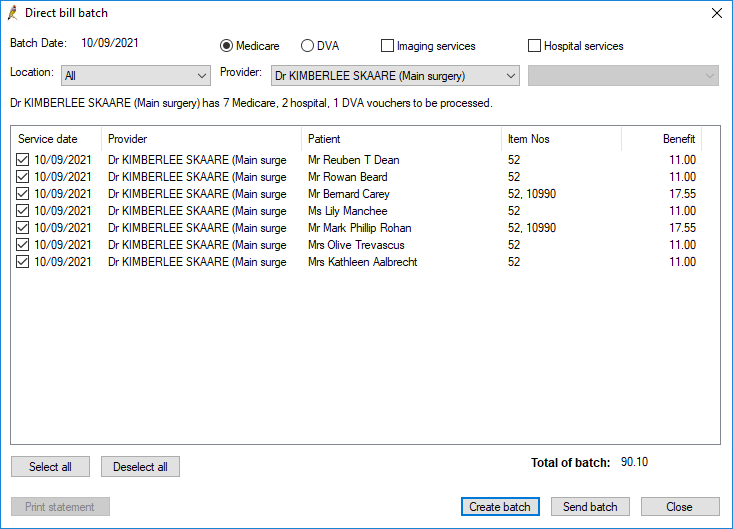
- Click Create batch. Bp Premier will generate a batch containing a maximum of 80 'vouchers' for the selected doctor that have not been previously sent to Medicare.
- Untick any vouchers that you do not want to include in the current batch. Unticked vouchers will be eligible for inclusion in subsequent batches.
- Click Send batch to transmit the batch to Medicare.
- To print a statement of the batch that has just been transmitted, click Print statement.
- Repeat steps 2–9 to send vouchers for other providers. If you do not want to send any more batches, click Close.
![]()
NOTE Medicare require that hospital in-patient services are batched separately. Use the Hospital services checkbox to generate hospital in-patient claims.
The hospital must be added as a contact with a provider number in Bp Premier, or you will receive an error when sending the batch. See Invoice and store for batching for more information.
If transmission is successful, a voucher is marked as ‘Sent’ and excluded from future batches.
NOTE If there are any vouchers that cannot be sent (for example, because the demographic information is incomplete), a message will be displayed and the vouchers will not be included in the batch.
Approximately the next business day after lodgement, the claims should be processed and the payment reports available from a Check for Payments.
Check for payments
As with sending batches, how often a practice should check for payments from Medicare will depend on the size and billing preferences of the practice. But at least once per day, staff should check for payments, so that new batch payments are updated within the system and any unpaid claims can be reviewed and actioned.
- Click Check for payments from the Online Claiming screen. Bp Premier will connect to Medicare. This process may take a few minutes depending on how many unpaid batches are currently in the system.
- Tick Print items without explanation codes on processing reports if you want to show all services claimed on the report regardless of whether they had an error. Normally these are not shown.
- Click Save to save all payment and processing reports for the payment runs shown, update all batches and create any related payment records.
- If some batches still have a status of 'Received', you will need to reconcile those batches.
In Saffron SP3, depending on the claim's status with Services Australia, the following alerts may appear:
Alert | Description |
|---|---|
REPORT_NOT_FOUND | The claim information does not match Services Australia's records. Contact Services Australia for more information |
REPORT_NOT_READY | The claim has not yet been finalised by Services Australia. Try again later. |
REPORT_NOT_AVAILABLE | The claim was processed and has been rejected. Check the processing report for more information. |
Once all the payment information has been identified, the Online claim payments summary screen will appear showing returned payments and exceptions.
If you are unable to perform the check for payments, contact Medicare to ensure that the batch has been received.
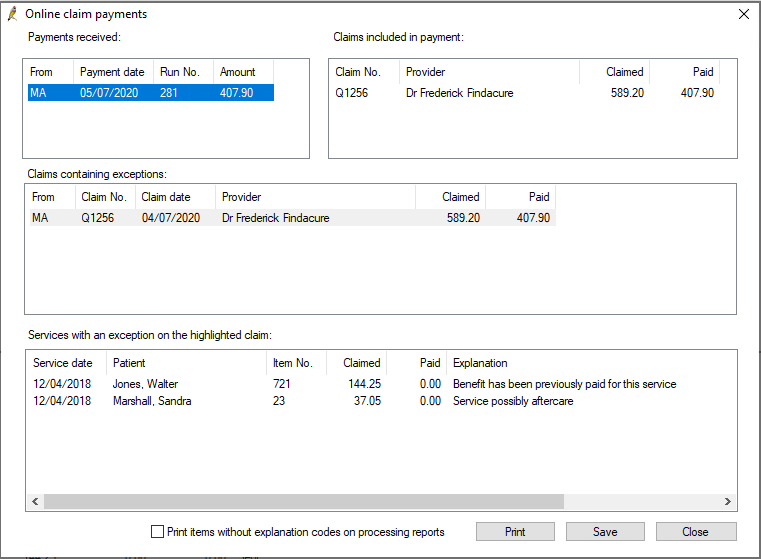
Online claim payments includes the following sections:
Payments received | Lists all payment runs since the last check for payments. Select a payment run to view the claims included in that run. |
Claims included in payment | Shows the claims within the selected payment run, and Claimed against Paid amounts. |
Claims containing exceptions | Lists all claims in the selected payment run that contain exceptions or errors; that is, the amount paid for a claim is different to the amount claimed. Select a claim to view the services with exceptions in that claim. |
Services with an exception on the highlighted claim | Shows the services that have an exception in the selected claim, and the Medicare Explanation for the exception. |
Depending on the number of batches included in this check for payments, this process may take a number of minutes. A message will appear on screen to indicate that the update is in process.
When you return to the Online Claiming screen, Bp Premier will update the status of batches and services from the payment runs you just saved:
Status type | Bp Premier status after saving |
|---|---|
Batch Status
| Unpaid – Batch was transmitted to Medicare / DVA but has not yet been processed. The batch will be included in a future check for payments. If the batch remains unpaid for more than a few days, contact Medicare to ensure that they received the batch transmission. |
Reconciled - Batch has been paid in full, or any errors have been rectified and resubmitted in another batch. The total amount claimed equals the total paid plus adjustment columns. Reconciled batches are removed from the default list of batches displayed in the Online claiming screen. To show the reconciled batches, tick Include reconciled batches, enter the Start date and End date, then press the Apply filters button. You can also filter on specific Doctors, Locations or Batch type | |
Received – Batch may be unpaid or partly part but contains errors that have not been actioned. | |
Service Status
| Sent – Service was transmitted to Medicare but has not been processed. |
Not Paid – Service has been processed by Medicare but an error has occurred. The error is shown in the Note column and on the processing report. The service must be corrected before the batch is reconciled. | |
Paid – Service has been paid in full. | |
Resent - Service was rejected in this batch and has been actioned to be resent in another batch. | |
Refunded - Service had been paid or partly paid but has been refunded. Comment field will show any user enter details on why this was done. |
Processing and payment reports
Medicare processing and payments reports are available for processed batches.
Download a payment or processing report
If a payment report is not showing for a batch, Bp Premier can check for that report and download the report for you to view and print.
- Select the batch on the Online Claiming screen and select File > Get payment report or Get processing report. Bp Premier will retrieve the report.
- After the report is downloaded, select View > Payment reports or Processing reports.
Print payment or processing reports
You can print all reports, or single reports to aid reconciliation or banking.
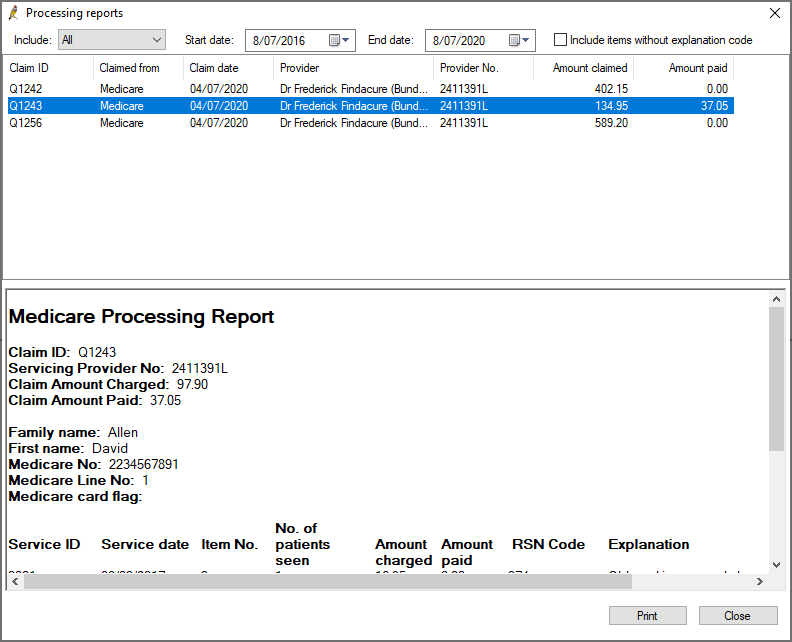
- From the Online claiming screen, select View > Payment reports or View > Processing reports from the menu.
- The Payments reports screen shows one report for each deposit made by Medicare. Select a report in the top half to view the information in the bottom half. Double-click a report to view and print the payment report individually.
- The Processing reports screen lists each claim that has been processed that had errors. Double-click a report to view and print just that report.
- By default, the processing report shows only exceptions that have an explanation code. To include exceptions without an explanation code in the report, tick Include items without explanation code.
- Click Print to print the processing or payment reports displayed.

What are the payment and processing reports?
Medicare Australia processes claims and makes payments overnight for all claims that have been processed. There are two types of reports returned from Medicare Australia: Payment reports and Processing reports.
Payment reports can include the payments for multiple claims, so there will often only be a single payment report even if several claims have been submitted in the last 24 hours. There will be a payment report for each deposit into the practice’s bank account.
DVA and Medicare reports are separate, so a payment report will never include both DVA and Medicare payments. The payment report includes details of the bank account into which the payment was made, how much was paid and what claims were included in the payment.
Processing reports contain an exception list of all services within a single claim where the amount paid was not the same as the amount claimed, including a code indicating the reason for the difference. There will not be a processing report for a claim that has been paid in full.
What can I do with these reports?
The payment and processing reports provide information on individual claim processing and payments. The Online Claiming screen presents a 'current state' summary of claims in a batch. For reconciliation or banking, you may need to look at the processing or payment details of a single claim.
If you need to identify the source of a deposit from a bank statement, for example, you can use the payment report to match the date and account of a Medicare deposit to the payment on the bank statement.
If you need more information on why a claim was unpaid, you can use the processing report to view details of how the claim was processed by Medicare. The processing report contains information that you may need to supply to Medicare if you dispute the claim decision.
Reconcile a batch
Once the check for payments has been completed, claims that have a difference between the amount claimed and the amount paid will have the status Received. You can reconcile batches with a received status from the Online Claim batch screen.
- Double-click on the claim you want to reconcile in the Online claiming screen. The Online Claim batch screen will open, showing all the exceptions in a claim, with the Explanation given by Medicare for the difference in payment.

You have three options to reconcile unpaid services from this screen:
Button | Description |
|---|---|
Accept all paid amounts | Accept all amounts paid by Medicare and set the status of all services and the batch to 'Paid'. This option is the equivalent of selecting Accept fee of for all services. |
Patient details | Opens the patient demographics screen so that patient details can be updated and Medicare/DVA numbers verified. |
Adjust service | Adjusts the service using a number of options, such as accepting the amount paid, changing the service details, or changing the billing to recipient. |
Patient details
Fields in error in a patient's demographic, like an invalid or missing Medicare number, can cause a claim to be rejected. The Explanation field will provide more information on missing or invalid details.
- Select the service and click Patient details.
- Make changes to the patient's Medicare details and click the Medicare/DVA eligibility check button to validate the new settings.
- Click Save to return to the Online Claim batch screen. The Action column will change to ‘Resend’.
- Follow the instructions in the next panel Finalise Reconciliation.
Adjust service
- To correct issues other than patient demographics, select the service in error and click Adjust service. The Adjust billing screen will appear.
- Select one of the following radio buttons, depending on the error to reconcile:
- Follow the instructions in the next panel Finalise Reconciliation.

Field | Description | Action |
|---|---|---|
Mark as fully paid | Do not use this option. No payment record will be created if this option is selected. | Fully Paid |
Resend service | Select only if Medicare has had an issue on their end and they have requested that you resend the item with no changes. The service will be included in the next batch created. | Resend |
Change Item number | Select if Medicare have rejected the original item number claimed for, and the provider wishes to substitute a different item number for the service. Click Change, select the new item number, enter any applicable Service text and click OK. | Change Item |
Edit Voucher details | Select if you want to add additional details to the invoice, such as No of patients, Notes, or Not normal aftercare. Click Save to update the details. | Resend |
Edit Service Text | Select if you want to change or add service text for an item, for example, if two of the same items have been claimed, and one item needs service text to clarify and resend. | Resend |
Accept fee of | Select if the item has been underpaid by Medicare because of Medicare rules, and you accept this payment. | Accept |
Change billing | Select if this service will not be paid by Medicare or DVA and you wish to change the billing type to another method, or you need to change a bulk bill from DVA to Medicare. If the billing is changed to private, the service will be removed from the current batch. | Change Payer |
Write off | Select to write off this service. Writing off removes the service from the batch. | Write Off |
Finalise reconciliation
- As patient details are corrected or items are adjusted, the Action column in the Online Claim batch screen shows the action that Bp Premier will take when the user clicks Process.
- After all services in a batch have been adjusted or resent, click Process.
- The batch will automatically be marked as ‘Reconciled’ and removed from the list of Unpaid batches on the Online claiming screen. Tick the Show all batches tick box to view the batch details again.
Bp Premier will take the following actions per service based on the user's reconciliation selections. Unless a service changed the Billed to value, no other user actions are required.
Action | Description |
|---|---|
Fully Paid | Bp Premier considers the service paid in full. |
Accept | Bp Premier considers the service paid in full. A 'service adjustment' record will be created to balance the underpayment in the billing history and reports. |
Resend | The service will be available for inclusion in the next batch to be submitted to Medicare. |
Change Item | The service will be available for inclusion in the next batch to be submitted to Medicare. |
Change Payer | If changed to private billing, the service will not be available for inclusion in any batches. The account with an unpaid status will be viewable from the patient's Patient Billing History; the Billed to field will reflect the change from Medicare or DVA to the patient. The account must be paid by the new billing recipient, such as the patient, HOF, or WorkCover. If changed from DVA to Medicare bulk bill, the service will be eligible to include in the next batch. Any change of payer will result in the original invoice being cancelled, service adjustment records created, and a new invoice for the new Bill to value created. Fees may change for services changed from DVA to Medicare. |
Write Off | Used only if the practice has determined it will not receive any money for this service from Medicare or the patient. Bp Premier will create a service adjustment to reflect the written-off amount. The Status will show Written off. |
Refund a paid item
- Select Management > Online claiming from the menu or press Ctrl+F9. The Online claiming screen will appear.
- Select the batch containing the service you need to refund. Right-click the service in the bottom half of the screen and select Refund/Adjust Payment. The Refund/Adjust Payment screen will appear.
- Select 'Refund entire payment to Medicare' from Select the type of adjustment.
- Select the Refund method by which your practice will refund the amount to Medicare: Direct Credit or Cheque.
- Enter any applicable Comments to explain why the refund is being made. The comments will show on the Online Claiming screen.
- Click OK to process the refund.
NOTE As of Saffron SP3, claim numbers will reset to A0001 every day for each provider. To search for a particular batch, use the claim number in combination with the batch date.

What do I do next?
Pay the refund amount back to Medicare by the method your practice normally uses (and indicated in step 4).
The service will be updated as 'Written off' in the billing history and adjustments will be created to reverse the payment and show the payment being refunded to Medicare. You do not need to manually adjust any payments to doctors. The refund to Medicare will be deducted automatically in all payments, services, and transactions reports.
If the service is being refunded because of an error such as a wrong item number, create a new account to process the refunded service correctly.
Partial refunds
Saffron SP1 introduces functionality for partial refunds to Medicare.
Options for partial refunds include:
- Part refund to Medicare leaving remainder on current item. This option caters for situations where a site has been overpaid by Medicare, and is required to return part of the payment.
- Part refund to Medicare and increase No. of patients value. This option caters for situations where a site has been overpaid and Medicare asks for part of the payment back because the site has indicated the incorrect number of patients in the original claim.
- Part refund to Medicare and set In Hospital flag. This option caters for situations where a site has been overpaid and Medicare asks for part of the payment back because the site has not ticked ‘In Hospital’ in the original claim.
Part refund to Medicare Leaving remainder on current item
- Select Management > Online claiming from the Bp Premier home screen or press Ctrl+F9. The Online claiming screen will appear.
- Select the batch containing the service you need to partially refund. Right-click the service in the bottom half of the screen and select Refund/Adjust Payment. The Refund/Adjust Payment screen will appear.
- Select Part refund to Medicare Leaving remainder on current item from Select the type of adjustment.
- Select the Refund method by which your practice will refund the amount to Medicare: Direct Credit or Cheque.
- Enter the Amount to refund to Medicare.
- Enter any applicable Comments to explain why the refund is being made. The comments will show on the Online Claiming screen.
- Click OK to process the refund.

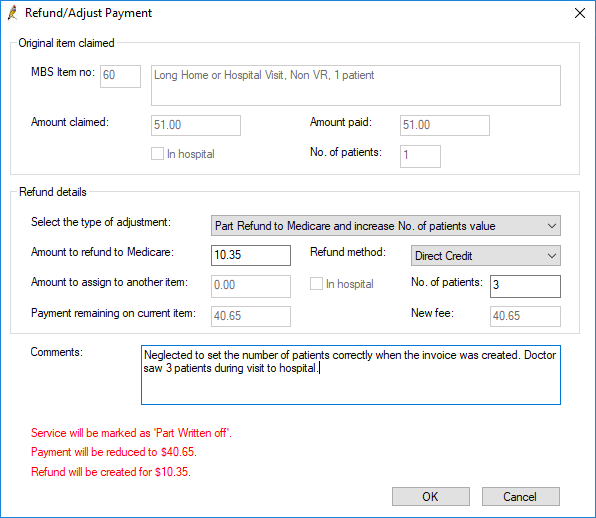
Part refund to Medicare and increase No. of patients value
- Select Management > Online claiming from the Bp Premier home screen or press Ctrl+F9. The Online claiming screen will appear.
- Select the batch containing the service you need to partially refund. Right-click the service in the bottom half of the screen and select Refund/Adjust Payment. The Refund/Adjust Payment screen will appear
- Select Part refund to Medicare and increase No. of patients value from Select the type of adjustment.
- Select the Refund method by which your practice will refund the amount to Medicare: Direct Credit or Cheque.
- Enter the correct No. of patients. The Amount to refund to Medicare will be automatically calculated.
- Enter any applicable Comments to explain why the refund is being made. The comments will show on the Online Claiming screen.
- Click OK to process the refund.
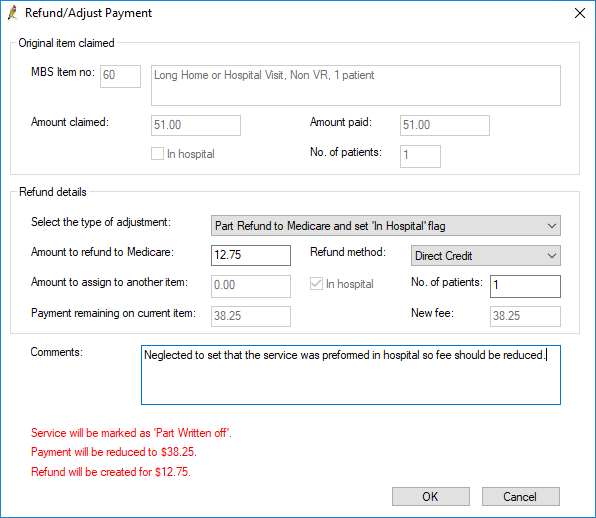
Part refund to Medicare and set In Hospital flag
- Select Management > Online claiming from the Bp Premier home screen or press Ctrl+F9. The Online claiming screen will appear.
- Select the batch containing the service you need to partially refund. Right-click the service in the bottom half of the screen and select Refund/Adjust Payment. The Refund/Adjust Payment screen will appear.
- Select Part refund to Medicare and set 'In Hospital' flag from Select the type of adjustment. The Amount to refund to Medicare will be automatically calculated.
- Select the Refund method by which your practice will refund the amount to Medicare: Direct Credit or Cheque.
- Enter any applicable Comments to explain why the refund is being made. The comments will show on the Online Claiming screen.
- Click OK to process the refund.
What do I do next?
Pay the refund amount back to Medicare by the method you have indicated in the Refund method field.
The service will be updated as 'Written off' or 'Part written off' in the billing history depending on if you created a part or full refund, and adjustments will be created to reverse or partially reverse the payment and show the payment being refunded to Medicare. You do not need to manually adjust any payments to doctors. The refund to Medicare will be deducted automatically in all payments, services, and transactions reports.
If the service is being refunded because of an error such as a wrong item number, create a new account to process the refunded service correctly.
See Medicare Refunds Frequently Asked Questions for more information.
Troubleshooting
The following information may be useful for troubleshooting technical issues with online claiming. This section also describes how to resolve batches that have remained 'unpaid' after several days, and how to record a Medicare payment made outside of online patient claiming.
Medicare return codes and fixes
This article provides a list of return or error codes returned by Medicare after your practice has submitted online claims, and the cause and resolution actions for each code. If a submission has been declined, consult this list before calling Best Practice Software Support to see if you can resolve the problem.
Some resolutions will require your IT Support or a Windows administrator with knowledge of updating environment variables and setting access permissions on folders.
NOTE In Saffron SP3 and later, Medicare certificates no longer need to be configured. The functionality provided by Medicare certificates has been replaced by Medicare Web Services.
Common Medicare return codes
Medicare Code | Description | Cause | Resolution |
|---|---|---|---|
1004 | A session could not be established. |
| Install the Medicare module. See Set up Online Claiming for single Minor ID for more information. |
1006 | PKI Login failure | The Medicare Certificates have expired. | Re-import the Medicare certificates from C:\Program Files\Best Practice Software\BPS\MedicareCerts. |
1011 | Unable to find Java Virtual machine library | Java is not installed correctly on the machine. | Install the Medicare module. See Set up Online Claiming for single Minor ID for more information. |
1014 | Unable to locate the EasyclaimAPI class | Environment Variables are incorrect. | Install the Medicare module. See Set up Online Claiming for single Minor ID for more information. |
1705 | Secure Failure | Site Certificates have expired. | Check the Site Certificate Expiry Date. If the site certificates haven't expired, tried recreating the certificate store in a new location. Give the Windows user group 'everyone' full control to the store as well. |
1999 | An undefined error has been detected in Java API | Incorrectly configured environment variables. | Edit Environment Variables > user variables to make sure that TMP and TEMP are the only user-defined variables. Your IT support can assist you with editing Windows user and environment variables. |
2008 | No business object currently exists for the supplied Session ID | Install the Medicare module. See Set up Online Claiming for single Minor ID for more information. | |
2015 | No voucher exists within the session for the supplied VoucherSeqNum | Multiple Thumbprint files exist. |
|
2017 | The Payee Provider specified is the same as the Servicing Provider | They've got Payee Providers in the System with the same provider numbers. | In Bp Premier, go to Setup > Configuration > Payer Allocation and make sure that provider allocation is set up correctly. |
2021 | Invalid directory or directory not found | Client can’t find the HIC.psi file. |
|
2027 | The report does not exist for the given selection criteria | Multiple Thumbprint files exist. |
|
2054 | Date of service is inconsistent with other dates set | Patient's date of birth. | Check that the date of birth is correct in patient demographics. The last modification to a patient demographics is shown down the bottom of the window. |
3001 | Communication error. Check that you have a current internet session. For further assistance contact the Medicare eBusiness Service Centre. | Potential problem with the anti-virus software | There may be an issue with your anti-virus software, or internet service provider. Best Practice Software cannot resolve this issue. Contact your anti-virus vendor or Medicare eBusiness. |
3004 | The request cannot be dealt with at this time because real-time processing is not available or the system is down. Contact the Medicare eBusiness Service Centre for further assistance. | Reinstall the Medicare module. See Set up Online Claiming for single Minor ID for more information. If that does not resolve the issue, edit Environment Variables > user variables to make sure that TMP and TEMP are the only user-defined variables. If that does not resolve the issue, the Medicare servers may be experiencing high volume issues. Try resubmitting at a later time if possible. This error message has also been caused by some antivirus software. If an OPV check works but the transmission still fails, try temporarily disabling your antivirus or firewall and resubmit. | |
3008 | The sending Location could not be identified at the Client Adaptor |
| |
9003 | The provider is identified as inactive for Online Claiming purposes. Contact the PKI Customer Service Centre for assistance. | The provider is not marked as 'Active' in the Medicare Servers. This may be due to the registration not being completed correctly. | Contact Medicare e-Business to confirm the provider is active. You may need to complete a Change of Bank Details form again. |
9007 | The Location is not authorised to undertake the function on the date of transmission. The transmission has been rejected. Contact the Medicare eBusiness Service Centre for further assistance. | If your practice has upgraded to Saffron SP2, You may receive this error if Medicare Online has not been linked as a service provider to your organisation in PRODA. | Follow these instructions on the Services Australia website to Link Medicare Online to your organisation in PRODA. If you continue to receive this error, call or email the Medicare eBusiness service centre on 1800 700 199 or ebusiness@servicesaustralia.gov.au. |
9010 | The software product used to create the transaction is not certified for this function. Contact the Medicare Australia eBusiness Service Centre for further assistance. | Best Practice is trying to transmit using another products Medicare Module. | Reinstall the Medicare module. See Set up Online Claiming for single Minor ID for more information. If that does not resolve the issue, edit Environment Variables > user variables to make sure that TMP and TEMP are the only user-defined variables. If the user variables Easy_Parm_3 or Easy_Parm_4 exist, AND your practice does not use a proxy server for online claiming, delete these variables. |
9111 | If createCryptoStore - a PSI Store already exists in the nominated folder. Otherwise a problem has been encountered using PKI services. Repeating the function call should be successful. | Unable to access the certificate store in the correct manner. | This issue can indicate a few causes, such as MAOL not set up correctly. However, this message is usually related to permissions.
This issue can also be caused by not enough space on C:\ Drive. |
9119 | The provider is identified as inactive for Online Claiming purposes. Contact the PKI Customer Service Centre for assistance. | The provider is marked as inactive in the Medicare System. Their provider number may not be registered or updated. | Best Practice Software cannot assist with this issue. Contact Medicare to reactivate the provider. |
9121 | Desecure failure at Medicare. Contact the PKI Customer Service Centre for assistance. | Certificate cannot verify when attempting OPV. | Site certificate imported may have used SHA-2 encryption. You will need SHA-1 site certificates for Medicare Online Claiming. If these have not been supplied as part of your original site certificates, contact Medicare eBusiness to obtain SHA-1 site certificates for use with Bp Premier. |
9123 | The HCL certificate used to sign the transmission is not the certificate currently registered against the location ID. | Only one site certificate can be linked to a single minor ID. | Your site may have received a new site certificate (for example, because the practice has changed owners) and the old certificate has not yet been removed at Medicare's end. Contact Medicare eBusiness to remove the old certificates. |
9127 | Requested Location Encryption Certificate not found in the PSI Store | fac_encrypt.p12 was not imported correctly or at all. | Re-import the Medicare certificates from C:\Program Files\Best Practice Software\BPS\MedicareCerts. |
9201 | Invalid format for data item | Invalid characters in patient name | Characters accepted are: alphanumeric characters, apostrophes, hyphens, and spaces. However, spaces must not appear immediately before or after apostrophes and hyphens. The issue is usually caused by leading or trailing spaces as per the examples below:
SQL queries are available that are supplied with Bp Premier and can be imported into the Database Searchtool to search for patients with invalid names. |
9202 | Invalid value for data item. The data element does not comply with the values permitted or has failed a check digit check. | Check that the Windows system date and time is correct and set to the correct time zone. Reinstall the Medicare module. See Set up Online Claiming for single Minor ID for more information. | |
9217 | Authorisation date is a date in future | Potentially a problem with the Time Zone set on the computer that has created the service. | Check that the Windows system date and time is correct and set to the correct time zone. |
9308 | Referring Practitioner's Provider Number must be supplied. | The Provider number for the referring Doctor hasn't been updated in the Contacts screen. | Enter the Provider Number into the Contact Details for the referring Provider. |
9325 | Service type not supplied | Reinstall the Medicare module. See Set up Online Claiming for single Minor ID for more information. Edit Environment Variables > user variables to make sure that TMP and TEMP are the only user-defined variables. If the user variables Easy_Parm_3 or Easy_Parm_4 exist, AND your practice does not use a proxy server for online claiming, delete these variables | |
9342 | The Payee Practitioner supplied is the same as the Servicing Provider. If both are the same, only one of the Servicing Provider should be completed. | They've got Payee Providers in the System with the same provider numbers. | In Bp Premier, go to Setup > Configuration > Payer Allocation and make sure that provider allocation is set up correctly. |
9602 | This claim cannot be lodged through Medicare Easyclaim. Please submit the claim via an alternative Medicare claiming channel. | OTS has advised that this can be caused by an issue with the Medicare card number. | The claim must be manually submitted to Medicare. |
9641 | A restrictive condition exists |
| Ensure that you have entered the correct restriction codes under Add item when creating the invoice, such as 'Separate Sites', or 'Not related'. See Restriction codes for more information. |
Bp Premier crashes without generating any errors or logs when you perform a Check for Payments or an OPV lookup. | Java has not been installed correctly. | Uninstall the old version of Java first, then run the MAOL utility to re-install Java. See Set up Online Claiming for single Minor ID for more information. See Updating JAVA on Bp Premier server and workstations for more information. |
General troubleshooting steps
NOTE In Saffron SP3 and later, Medicare certificates no longer need to be configured. The functionality provided by Medicare certificates has been replaced by Medicare Web Services.
If you receive a generic error message, a code not included in the list above, or the following message, follow the resolution steps below to see if the problem is resolved before you call Best Practice Software Support.
Step | Knowledge base articles |
|---|---|
1. Ensure that all five Medicare certificates are present in Setup > Configuration > Online Claiming. | |
2. Ensure that the two site certificates are present in the same location. | |
3. Ensure that all of the certfiicates have a valid start date and expiry date. | |
4. Ensure that the MinorID in Setup > Config > Online Claiming > Check certificate expiry has been entered. | See Set up Online Claiming for single Minor ID for more information. |
Unpaid whole batches
If the practice has not registered correctly with Medicare, an entire batch may remain 'unpaid' indefinitely. Batches may also remain unpaid if an error occurred during sending that was not received by the Bp Premier user. In these cases, Medicare may request that batches be resent.
The most common reason for an unpaid batch is that a Doctor has not yet registered his or her provider number with Medicare at your practice, especially if they are new. See Troubleshooting a whole unpaid batch for more information.
You will need the user permission Resend batches to perform this.
Resend a whole unpaid batch
NOTE Always check for payments to see the most recent updates before resending a batch. You should only resend a batch if advised by Medicare.
The following limits to resending a batch apply:
- You can only resend batches that have a status of 'unpaid'.
- DVA and Medicare services must be dated within the last two years.
To resend a batch:
- From the main screen of Bp Premier, select Management > Online Claiming. The Online Claiming screen will appear.
- Click Check for payments in the top left. Bp Premier will update sent batches with the latest payment information.
- Select the unpaid batch in the top half of the screen that you want to resend.
- Select File > Resend batch. The Resend batch screen will open, showing the services in the batch.
- Confirm that you have selected the correct batch and click Send batch. Bp Premier will resend the batch to Medicare and update the Online Claiming screen.
- Run Check for payments again the next day to see if the batch has been successfully processed.

Troubleshooting a whole unpaid batch
If your practice sees that a batch has remained unpaid for an unreasonable period, check your Medicare setup for the following.
Reason | Explanation |
|---|---|
Minor ID has not been registered with Medicare | Before being able to submit claims to Medicare, you will need to have your minor (location) ID registered to identify who the claims are coming from. If you have not registered these details with Medicare, they will not receive any claims from you. |
Provider numbers have not been registered with Medicare | Before being able to submit claims to Medicare, you will need to register the provider numbers of all doctors who will be providing claims. If you have not registered these details with Medicare, they will not receive any claims from you. |
Practice has moved location | If the practice has moved location, or added another practice location, you will need to contact Medicare to receive new provider numbers and site certificates. New Medicare certificates will need to be imported into Bp Premier, and new provider numbers updated, before you can claim at your new location. |
Certificates registered under an old practice name | If the practice changes their name, Medicare will issue new site certificates. These will need to be imported into Best Practice before you can claim with the new practice name. |
Payer allocations incorrectly set | If a doctor's payments are being paid into a different provider's bank account, ensure these details are accurately reflected in Best Practice. To set payer allocation details, from the main menu select Setup > Configuration > Payer Allocation. |
Transmission Errors | Due to errors in the transmission (an Internet connection dropout, for example), Medicare may not receive the batch and will require the batch to be resent. |
Incorrect bank details | If incorrect bank details have been recorded with Medicare, the batch may remain unpaid until the issue is resolved. Contact Medicare to correct the details before resending the batch. |
Manual direct bill batch | If a batch has been created through the Manual Direct Bill Batches screen, the batch will not be transmitted electronically. A report is printed when a batch is created this way. The report is intended to be mailed to Medicare for payment. This will only apply if a batch has not been transmitted through online patient claiming, but manually created and mailed to Medicare. For most practices, this will be rare. |
Record a payment made manually by Medicare
If a Medicare batch in Bp Premier is marked as 'unpaid', but Medicare have manually made the payment to the practice account (that is, outside of the regular online patient claiming workflow), the payment has not been transmitted electronically and the claim will remain outstanding. This is not a common scenario, but does happen.
To record such a payment, you must resend the claim, recreate a single-claim batch, and record the Medicare payment against the batch. The invoice in the billing history will be correctly updated.
- Resend the claim:
- Select Management > Online Claiming or press Ctrl+F9 to open the Online Claiming screen.
- Record the batch number for the claim still marked as 'unpaid'.
- Double-click the batch with the unpaid claim, and double-click the voucher for the claim marked unpaid.
- Select Resend and click Process. Click OK.
- Recreate a single-claim batch:
- Select Management > Manual Direct Bill Batches. The Direct Bill Batches screen will open.
- Select File > New Batch to open the Direct Bill Batch screen.
- Select the same Provider as the batch from step 2.
- Deselect all vouchers except the voucher for the claim marked unpaid. Click Print & Save. You will return to the Direct Bill Batches screen.
- Double-click the batch you just created to open the Reconcile Direct Bill Batch screen.
- Record the Medicare payment against the batch:
- In the Amount Paid field, enter the amount paid by Medicare. You may need to accept the fee if Medicare has paid less than the amount claimed.
- Enter the date Medicare paid the claim into the Date paid field. Tick Direct credit and click Save.
- Select Management > Patient Billing History or press Shift+F6 to open the Billing History for the patient. Tick Show payments/deposits. The invoice should now be updated to 'Paid'.
Last updated 22 June 2022
Feedback
Medicare Web Services | Pathology | Bp Comms | Best Health App | Multi-location |    |
|
|
This material is classified as commercial-in-confidence. Unauthorised distribution of this information may constitute a breach of our Code of Conduct, and may infringe our intellectual property rights. This information is collected and managed in accordance with our Privacy Policy, available on our website. © Copyright 2023 | |
 AU
AU 