
This article explains how to configure Bp Premier Saffron SP2 and later to connect with PRODA, in order to use Medicare Web Services.
In this article
Before you begin
Before you can configure your connection with PRODA, you must:
- Ensure your organisation has been successfully set up in PRODA. See Connect to Medicare Web Services for more information.
This process can be completed on either the server or a workstation.
Permissions
To register a B2B device, you must have the Allowed permission set for PRODA Setup.
See User Permissions for more information.
Configure a single minor ID
Follow these instructions if your practice only uses one minor ID
The minor ID you add in Bp Premier should be the same minor ID you used to link to Medicare Online in PRODA.
If you already had online claiming enabled prior to upgrading to a Medicare Web Services enabled version, you will already have completed this step.
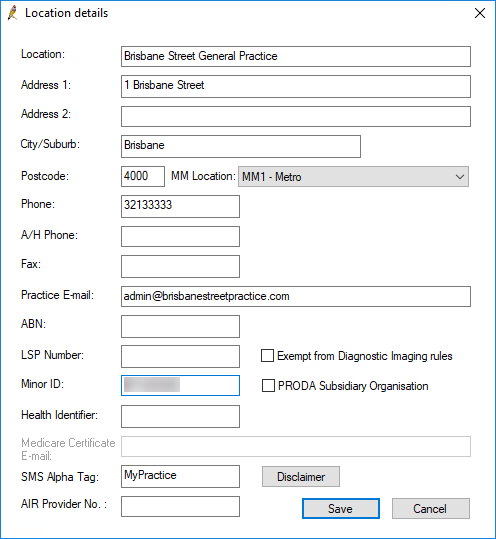
- Select Setup > Practice details > Change.
- Enter your minor ID and click Save.
Configure multiple minor IDs
Follow these instructions if your practice uses multiple minor IDs.
- Select Setup > Practice details > Change.
- Tick Multiple Medicare Locations and click Save.
- Select Setup > Practice Details > Edit for each location.
- Enter each location's minor ID.
- If your practice has multiple minor IDs that are each linked to Medicare Online for a separate organisation or subsidiary organisation in PRODA, tick PRODA Subsidiary Organisation.
- If your practice has multiple minor IDs, but they are all linked to Medicare Online for the same organisation, do not tick PRODA Subsidiary Organisation.
- Click Save.
The minor IDs you add for your locations should be the same minor IDs you used to link your organisation or subsidiary organisations to Medicare Online in PRODA.
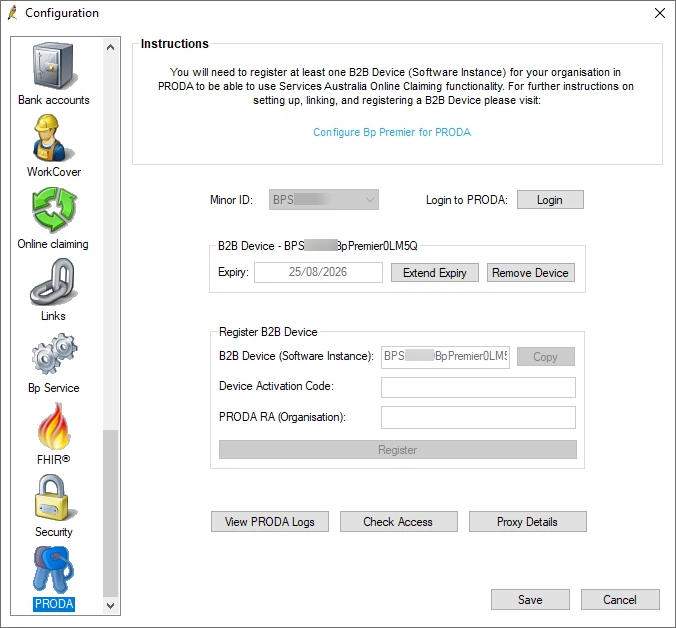
Register a B2B device
NOTE Before registering your B2B device, ensure the correct time and time zone has been set in Windows. If the correct time has not been set, this can cause issues when registering your B2B device, or extending your device expiry.
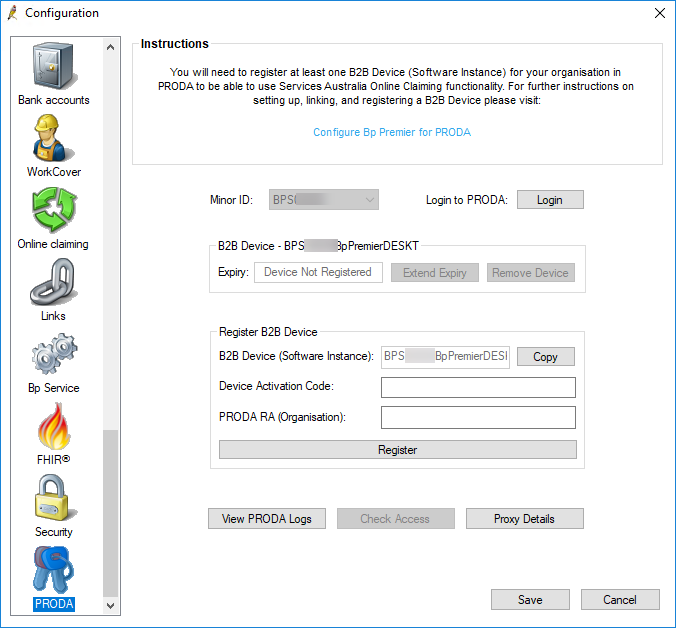
- From the Bp Premier home screen, select Setup > Configuration. The Configuration screen will appear.
- Select the PRODA icon on the left hand side of the screen.
- If your practice has multiple locations that are registered as subsidiary organisations in PRODA, ensure the correct minor ID has been selected from the Minor ID field.
- Click Login to access the PRODA login page.
- Enter your PRODA username and password, and select Login. A verification code will be sent to you as an email, sms, or to the PRODA mobile app, depending on your settings in PRODA.
- Enter your verification code and click Next. The PRODA home screen will appear.
- Select Organisations in the top right corner of the screen. The My organisations page will open.
- Select the organisation that you wish to set up the connection for. The Manage my organisation page will open.
- If you are connecting a subsidiary organisation to PRODA, open the Subsidiary Organisations menu, and select the subsidiary organisation you wish to connect.
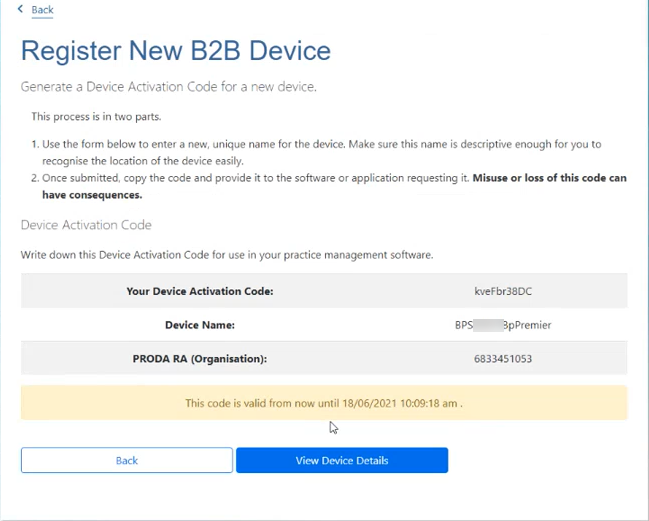
- Select B2B Devices, then Register New B2B Device. The Register New B2B Device screen will appear.
- Navigate back to Bp Premier and select Copy next to the B2B Device (Software Instance) field.
- Return to the PRODA Register New B2B Device screen and paste the content you copied from the B2B Device (Software Instance) field into the Device Name: field.
- Enter a description if you wish, and click Register Device.
- Copy and paste the Device Activation Code and the PRODA RA (Organisation) number into the corresponding fields in Bp Premier.
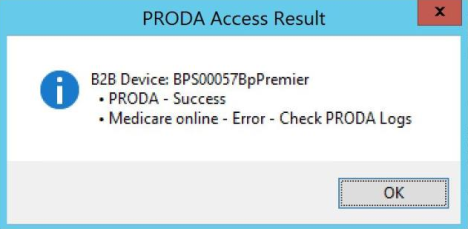
- In Bp Premier, click Register. An alert will appear indicating that the device has been successfully registered.
- Click OK on the alert. A second alert will appear indicating that PRODA and Medicare Online access is working correctly.
If you receive the below message when you click Register, it means you have not yet linked Medicare Online as a service provider to your organisation in PRODA. Complete this step to avoid this error.
If you wish to re-verify your PRODA access, you can do so by clicking Check access in the Bp Premier PRODA configuration screen.
Extend device expiry
Your device registration will expire after six months. Alerts will appear on opening Bp Premier 30, 14, and 7 days before your device is due to expire, then daily up to the expiration date if no action has been taken. Messages will also be sent to the Practice Manager and Principal Doctor's message inbox.
To extend your device registration:
- From the Bp Premier home screen, select Setup > Configuration. The Configuration screen will appear.
- Select the PRODA icon on the left hand side of the screen.
- If your practice has multiple locations that are set up as subsidiary organisations in PRODA, ensure the correct minor ID has been selected from the Minor ID field.
- Select Extend Expiry to access the PRODA login page.
- Enter your PRODA username and password, and select Login. A verification code will be sent to you as an email, sms, or to the PRODA mobile app, depending on your settings in PRODA.
- Enter your verification code and click Next. The PRODA Device details screen will appear.
- Click Extend B2B Device Expiry. An alert will appear.
- Click Yes on the alert to extend the device expiry date.
Your device registration will be extended for a further six months.
NOTE Once you have extended the B2B device in PRODA, it may take up to 72 hours for the extension to reflect in Bp Premier.
Remove a device
To remove a device from Bp Premier:
- From the Bp Premier home screen, select Setup > Configuration. The Configuration screen will appear.
- Select the PRODA icon on the left hand side of the screen.
- If your practice has multiple locations, ensure the correct minor ID has been selected from the Minor ID field.
- Click Remove Device. An alert will appear.
- Click Yes on the alert to remove the device.
The device will now be removed from Bp Premier, but not from PRODA. To remove a device from PRODA:
- Access the PRODA login page.
- Enter your PRODA username and password, and select Login. A verification code will be sent to you as an email, sms, or to the PRODA mobile app, depending on your settings in PRODA.
- Enter your verification code and click Next. The PRODA home screen will appear.
- Select Organisations in the top right corner of the screen. The My organisations page will open.
- Select the organisation that you wish to remove a device from. The Manage my organisation page will open.
- If you wish to remove a device from a subsidiary organisation, open the Subsidiary Organisations menu, and select the subsidiary organisation you wish to remove a B2B device from.
- Select B2B Devices, and click the device you wish to remove. The device details screen will appear.
- Click Remove B2B Device.
Configure proxy server
You can configure Medicare Web Services if your practice uses a proxy server to connect to Medicare and DVA.
- From the Bp Premier home screen, select Setup > Configuration. The Configuration screen will appear.
- Select the PRODA icon on the left hand side of the screen.
- Click Proxy Details. The Proxy Details screen will appear.
- Enter the proxy server URL, Username and Password, and click Save. An alert will appear indicating that the Best Practice PRODA Service on the Bp Premier Server will need to be restarted.
- From the Windows desktop Search bar in the bottom left, type Services and select the Services Desktop app.
- Right click on Best Practice PRODA Service in the Name column, and select Restart.
View Medicare Web Service Log utility
A utility is available for viewing Bp Premier Medicare Web Services logs.
To access the utility:
- Open the computer's file explorer, navigate to C:\Program Files\Best Practice Software\BPS, and double-click View MWS Log.EXE.
- Enter a Bp Premier username and password when prompted, and click Login. The Medicare Web Service Log screen will appear.
- Select a Start date and End date, and click Refresh to view Medicare Web Service Logs.
Last updated 03 May 2022


 AU
AU 