
You can create a simple account for services performed on the same day. For services performed over a date range, see complex accounts. If an account has not been paid yet, you can also edit a service on an invoice.
NOTE The following procedure is for creating an account for services provided if the provider has not finalised a visit. In a practice workflow where the provider finalises a visit at the end of a consult, service and clinical information would be passed through from the Finalise visit screen.
Create a simple account
- From the main Bp Premier screen, select Management > Patient Billing History. The Select patient screen will appear.
- Search for the patient whose billing history you want to view and double-click their name. The Billing History screen will appear.
- Either click New Account, select File > New Simple Account, or press F6. The Account details screen will appear.
- Check the details in this screen are correct, and make any changes necessary. For example, you may need to change the location or billing schedule.
- Click Add item to add services to the invoice. The Account item screen will appear.
- Search for the MBS item you require and double-click on the description or double-click on the fee in the Fee list to populate the Description of service and Fee to charge fields.
- If your practice provides diagnostic imaging services, tick Self deemed to bill a diagnostic imaging item number
- Click Add to close the Account item screen and return to the Account details screen, showing the item just added. Or click Add Another to add the item to the Account details screen and clear the existing screen to add another item.
- Repeat for all services to be added to the invoice.
- In the Account details screen, Tick Not normal aftercare or In hospital if applicable, and add any Notes to the invoice as necessary.
- Tick the post-settlement options to activate when the account is paid or stored:
- Print Medicare claim form — Prints the Medicare Assignment form for Medicare and DVA accounts, otherwise the default invoice is printed.
- Do another account — Keep the Account details screen open to process another account.
- Open Billing History — Open the patient’s Billing History for review.
- When you have finished adding services, click one of the buttons along the bottom, depending on the billing type and whether the account is paid now or later:
- Pay now — Pay the balance of a private account. The Payment Details screen will open to process payment.
- Print — For Direct Bill accounts, prints the Medicare Statement of Benefit for Claim form for the patient to sign and stores the claim ready for batching. For private accounts, prints an invoice for the patient.
- Store — Stores a Direct Bill claim ready for batching without printing a form.
- Hold — Records the account in the patient's account history, but does not store the claim for batching. The account must be finalised before payment or batching.
Accounts can be held if the operator is unsure of the correct item numbers to bill, for example. The account can be opened and finalised from the Billing History screen.

Add services to an invoice

NOTE If you select a DVA item that attracts a GST, ensure that the provider is registered with the ATO for GST. If the provider is not registered for GST, DVA will pay the item fee. minus GST. This may cause issues in your reports.
NOTE Certain items can only be claimed together, or duplicate items on the same day, if you supply a Medicare Restrictive Override code (restriction code).
If the Provider and the MBS item you are using requires a referral, the Referral details field will appear.
NOTE Due to Medicare rules, it is not possible to bill two consultation items on the same invoice. If this is attempted, the original item will be automatically replaced with the new item number. For example, if item 23 is added to an invoice and you add item 36, 36 will automatically replace item 23. To create an invoice with multiple consultation items, you must create a complex account. See Create a complex account for more information.
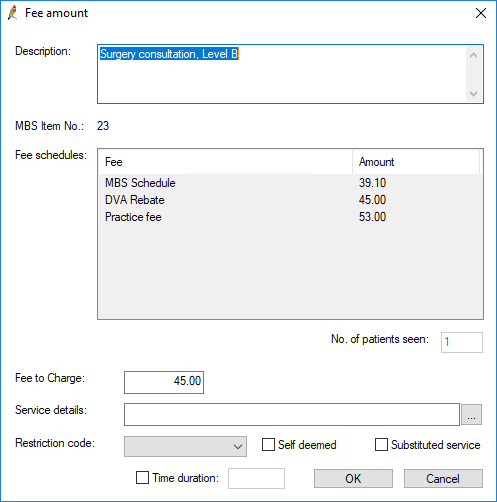
Edit a service on an invoice
You can change an item that has been added to an invoice.
- From the Account details screen, double-click on the service or select the service and click Vary Item. The Fee amount screen will appear.
- From this screen, you can:
- adjust the Fee to charge
- change how the GST is calculated (if applicable)
- change the No. of patients seen
- edit the Service details
- Change the restriction code
- enable or disable the Self deemed
- Click OK to return to the Account details screen, where the changes will appear.
Last updated 23 July 2020


 AU
AU 